
AWS Certified Security - Specialty - (SCS-C02) Exam Questions
Total Questions
Last Updated
1st Try Guaranteed

Experts Verified
Question 11 Single Choice
A user is trying to upload a large file to an Amazon S3 bucket present in a given AWS account. In the upload request, the user is passing the encryption information using an AWS Key Management Service (AWS KMS) key, also present in the same account. However, the user is getting an Access Denied error. Meanwhile, when the user uploads a smaller file with encryption information, the upload succeeds.
As a Security Engineer, how will you fix this issue?
Explanation

Click "Show Answer" to see the explanation here
Correct option:
Verify that kms:Decrypt permissions are specified in the key policy, otherwise they need to be added to the policy
The AWS CLI (aws s3 commands), AWS SDKs, and many third-party programs automatically perform a multipart upload when the file is large. To perform a multipart upload with encryption using an AWS KMS key, the requester must have kms:GenerateDataKey and kms:Decrypt permissions. The kms:GenerateDataKey permissions allow the requester to initiate the upload. With kms:Decrypt permissions, newly uploaded parts can be encrypted with the same key used for previous parts of the same object.
After all the parts are uploaded successfully, the uploaded parts must be assembled to complete the multipart upload operation. Because the uploaded parts are server-side encrypted using a KMS key, object parts must be decrypted before they can be assembled. For this reason, the requester must have kms:Decrypt permissions for multipart upload requests using server-side encryption with KMS CMKs (SSE-KMS).
Since the user can successfully upload smaller files, it is clear that the user already has kms:GenerateDataKey permissions. Hence, only the kms:Decrypt permission needs to be added to the policy.
Incorrect options:
Verify that the requester has kms:GenerateDataKey permissions. This permission is needed for multipart upload to work successfully - kms:GenerateDataKey is needed to upload encrypted objects to the S3 bucket. Since the user can upload smaller files, the user already has this permission.
Verify that kms:Decrypt permissions are specified in both the key policy as well as the IAM policy of the user - If your AWS Identity and Access Management (IAM) role and key are in the same account, then kms:Decrypt permissions must be specified in the key policy. If your IAM role belongs to a different account than the key, kms:Decrypt permissions must be specified in both the key and IAM policy. Since the question clearly states that the role and key are from the same account, this option stands incorrect.
Verify that kms:Encrypt permissions are specified in the key policy, otherwise, they need to be added to the policy - As mentioned in the explanation above, the requester must have kms:GenerateDataKey and kms:Decrypt permissions. kms:Encrypt can only be used to encrypt plaintext of up to 4,096 bytes using a KMS key. So, this option acts as a distractor.
Reference:
https://repost.aws/knowledge-center/s3-large-file-encryption-kms-key
Explanation
Correct option:
Verify that kms:Decrypt permissions are specified in the key policy, otherwise they need to be added to the policy
The AWS CLI (aws s3 commands), AWS SDKs, and many third-party programs automatically perform a multipart upload when the file is large. To perform a multipart upload with encryption using an AWS KMS key, the requester must have kms:GenerateDataKey and kms:Decrypt permissions. The kms:GenerateDataKey permissions allow the requester to initiate the upload. With kms:Decrypt permissions, newly uploaded parts can be encrypted with the same key used for previous parts of the same object.
After all the parts are uploaded successfully, the uploaded parts must be assembled to complete the multipart upload operation. Because the uploaded parts are server-side encrypted using a KMS key, object parts must be decrypted before they can be assembled. For this reason, the requester must have kms:Decrypt permissions for multipart upload requests using server-side encryption with KMS CMKs (SSE-KMS).
Since the user can successfully upload smaller files, it is clear that the user already has kms:GenerateDataKey permissions. Hence, only the kms:Decrypt permission needs to be added to the policy.
Incorrect options:
Verify that the requester has kms:GenerateDataKey permissions. This permission is needed for multipart upload to work successfully - kms:GenerateDataKey is needed to upload encrypted objects to the S3 bucket. Since the user can upload smaller files, the user already has this permission.
Verify that kms:Decrypt permissions are specified in both the key policy as well as the IAM policy of the user - If your AWS Identity and Access Management (IAM) role and key are in the same account, then kms:Decrypt permissions must be specified in the key policy. If your IAM role belongs to a different account than the key, kms:Decrypt permissions must be specified in both the key and IAM policy. Since the question clearly states that the role and key are from the same account, this option stands incorrect.
Verify that kms:Encrypt permissions are specified in the key policy, otherwise, they need to be added to the policy - As mentioned in the explanation above, the requester must have kms:GenerateDataKey and kms:Decrypt permissions. kms:Encrypt can only be used to encrypt plaintext of up to 4,096 bytes using a KMS key. So, this option acts as a distractor.
Reference:
https://repost.aws/knowledge-center/s3-large-file-encryption-kms-key
Question 12 Single Choice
A company has meticulously strengthened its AWS Cloud security solution to detect and respond to the organization’s security requirements by using AWS Firewall Manager, Amazon Inspector, and AWS Shield Advanced services in its AWS accounts. The company has recently added the Amazon Macie data security service to discover and help protect sensitive data. The company wants to implement a solution (using data from these security services) that can initiate alerts if a DDoS attack happens on the company's AWS resources.
Which solution will implement this requirement?
Explanation
Click "Show Answer" to see the explanation here
Correct option:
Create an Amazon CloudWatch alarm that monitors AWS Shield Advanced CloudWatch metrics for an active DDoS event
AWS Shield Advanced reports metrics to Amazon CloudWatch on an AWS resource more frequently during DDoS events than when no events are underway. Shield Advanced reports metrics once a minute during an event, and then once right after the event ends. While no events are underway, Shield Advanced reports metrics once a day, at a time assigned to the resource. This periodic report keeps the metrics active and available for use in custom CloudWatch alarms.
AWS Shield Advanced provides a few detection metrics and dimensions in the AWS/DDoSProtection namespace. DDoSDetected metric indicates whether a DDoS event is underway for a particular Amazon Resource Name (ARN). This metric has a non-zero value during an event.
Detection metrics provided by AWS Shield Advanced: 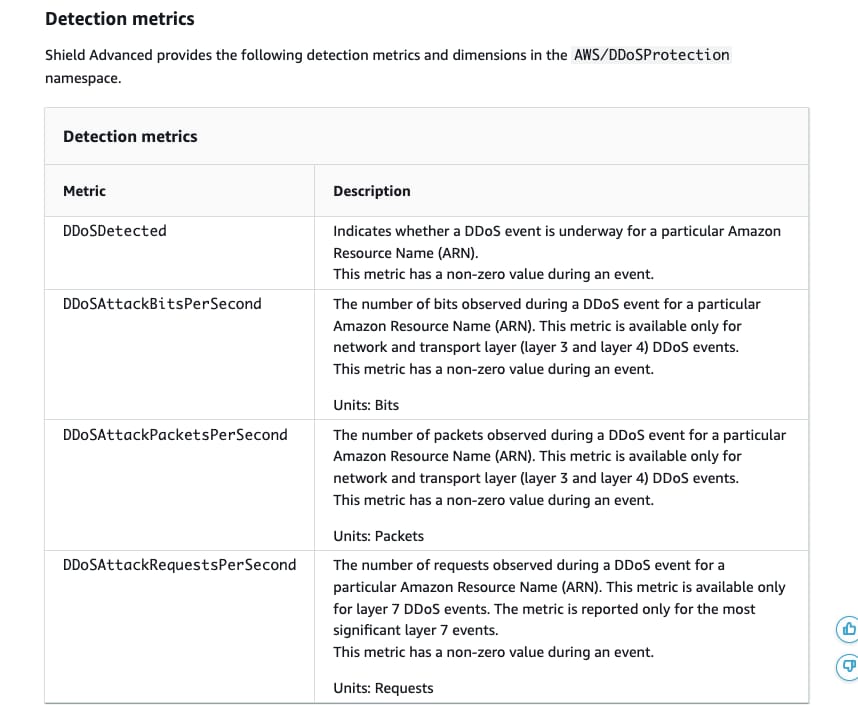 via - https://docs.aws.amazon.com/waf/latest/developerguide/monitoring-cloudwatch.html
Incorrect options:
Create an Amazon CloudWatch alarm that monitors AWS Firewall Manager CloudWatch metrics for an active DDoS event - AWS Firewall Manager doesn't record metrics, so you can't create Amazon CloudWatch alarms specifically for Firewall Manager.
Create an Amazon CloudWatch alarm that monitors Amazon Inspector logs for vulnerabilities related to an active DDoS event - Amazon Inspector automatically discovers workloads, such as Amazon EC2 instances, containers, and AWS Lambda functions, and scans them for software vulnerabilities and unintended network exposure. Amazon Inspector cannot be used for tracking an active DDoS event.
Create an Amazon CloudWatch alarm that monitors AWS Web Application Firewall (AWS WAF) for an active DDoS event - This option acts as a distractor. AWS WAF is not being used as a security service in the given use case.
References:
https://docs.aws.amazon.com/waf/latest/developerguide/ddos-cloudwatch-metrics.html
https://docs.aws.amazon.com/waf/latest/developerguide/monitoring-cloudwatch.html
Explanation
Correct option:
Create an Amazon CloudWatch alarm that monitors AWS Shield Advanced CloudWatch metrics for an active DDoS event
AWS Shield Advanced reports metrics to Amazon CloudWatch on an AWS resource more frequently during DDoS events than when no events are underway. Shield Advanced reports metrics once a minute during an event, and then once right after the event ends. While no events are underway, Shield Advanced reports metrics once a day, at a time assigned to the resource. This periodic report keeps the metrics active and available for use in custom CloudWatch alarms.
AWS Shield Advanced provides a few detection metrics and dimensions in the AWS/DDoSProtection namespace. DDoSDetected metric indicates whether a DDoS event is underway for a particular Amazon Resource Name (ARN). This metric has a non-zero value during an event.
Detection metrics provided by AWS Shield Advanced: via - https://docs.aws.amazon.com/waf/latest/developerguide/monitoring-cloudwatch.html
Incorrect options:
Create an Amazon CloudWatch alarm that monitors AWS Firewall Manager CloudWatch metrics for an active DDoS event - AWS Firewall Manager doesn't record metrics, so you can't create Amazon CloudWatch alarms specifically for Firewall Manager.
Create an Amazon CloudWatch alarm that monitors Amazon Inspector logs for vulnerabilities related to an active DDoS event - Amazon Inspector automatically discovers workloads, such as Amazon EC2 instances, containers, and AWS Lambda functions, and scans them for software vulnerabilities and unintended network exposure. Amazon Inspector cannot be used for tracking an active DDoS event.
Create an Amazon CloudWatch alarm that monitors AWS Web Application Firewall (AWS WAF) for an active DDoS event - This option acts as a distractor. AWS WAF is not being used as a security service in the given use case.
References:
https://docs.aws.amazon.com/waf/latest/developerguide/ddos-cloudwatch-metrics.html
https://docs.aws.amazon.com/waf/latest/developerguide/monitoring-cloudwatch.html
Question 13 Multiple Choice
An AWS root user has logged in to the AWS account and realized that there is no access to an Amazon S3 bucket under the given AWS account.
What is the reason for this behavior and how will you fix the issue? (Select two)
Explanation
Click "Show Answer" to see the explanation here
Correct options:
If there is a bucket policy on the Amazon S3 bucket that doesn't specify the AWS account root user as a principal, the root user is denied access to that bucket
Modify the bucket policy to allow root user access from the Amazon S3 console or the AWS CLI
In some cases, you might have an IAM user with full access to IAM and Amazon S3. If the IAM user assigns a bucket policy to an Amazon S3 bucket and doesn't specify the AWS account root user as a principal, the root user is denied access to that bucket. However, as the root user, you can still access the bucket. To do that, modify the bucket policy to allow root user access from the Amazon S3 console or the AWS CLI. Use the following principal and replace 123456789012 with the ID of the AWS account.
"Principal": { "AWS": "arn:aws:iam::123456789012:root" }
Incorrect options:
Only An IAM user with full access to IAM and the S3 bucket will be able to add the root user as principal to the bucket policy - As discussed above, the root user can make the changes to the bucket policy to grant the necessary permissions.
The access key of the root user account could be expired and hence needs to be recreated before accessing the S3 bucket - You use an access key (an access key ID and secret access key) to make programmatic requests to AWS. This is irrelevant to the given use case.
A root user has full access permissions on all the AWS resources in his user account. Contact the AWS support team to sort the access issue - This statement is incorrect and given only as a distractor.
Reference:
https://docs.aws.amazon.com/IAM/latest/UserGuide/troubleshoot_iam-s3.html
Explanation
Correct options:
If there is a bucket policy on the Amazon S3 bucket that doesn't specify the AWS account root user as a principal, the root user is denied access to that bucket
Modify the bucket policy to allow root user access from the Amazon S3 console or the AWS CLI
In some cases, you might have an IAM user with full access to IAM and Amazon S3. If the IAM user assigns a bucket policy to an Amazon S3 bucket and doesn't specify the AWS account root user as a principal, the root user is denied access to that bucket. However, as the root user, you can still access the bucket. To do that, modify the bucket policy to allow root user access from the Amazon S3 console or the AWS CLI. Use the following principal and replace 123456789012 with the ID of the AWS account.
"Principal": { "AWS": "arn:aws:iam::123456789012:root" }
Incorrect options:
Only An IAM user with full access to IAM and the S3 bucket will be able to add the root user as principal to the bucket policy - As discussed above, the root user can make the changes to the bucket policy to grant the necessary permissions.
The access key of the root user account could be expired and hence needs to be recreated before accessing the S3 bucket - You use an access key (an access key ID and secret access key) to make programmatic requests to AWS. This is irrelevant to the given use case.
A root user has full access permissions on all the AWS resources in his user account. Contact the AWS support team to sort the access issue - This statement is incorrect and given only as a distractor.
Reference:
https://docs.aws.amazon.com/IAM/latest/UserGuide/troubleshoot_iam-s3.html
Question 14 Single Choice
An AWS service present in AWS Account 1 is exposed to AWS Account 2 using VPC private link. The Network Load Balancer (NLB) in Account 1 is configured and has accepted the connection. While data is seen leaving from the NLB, the client side is not getting the transmitted data.
What steps should be undertaken to troubleshoot this issue?
Explanation
Click "Show Answer" to see the explanation here
Correct option:
Ensure that the Security Groups and Network Access Control Lists (NACLs) in both VPCs allow traffic
You can create an interface VPC endpoint to connect to services powered by AWS PrivateLink, including many AWS services. For each subnet that you specify from your VPC, AWS creates an endpoint network interface in the subnet and assigns it a private IP address from the subnet address range. An endpoint network interface is a requester-managed network interface; you can view it in your AWS account, but you can't manage it yourself.
An improper configuration of the involved security groups or the Network Access Control Lists (NACLs) can result in communication not getting established as expected. This is the right point to start the troubleshooting process. VPC flow logs are not available for this configuration because traffic between an endpoint network interface and a Network Load Balancer network interface isn't logged.
Incorrect options:
Enable VPC Flow Logs to capture detailed information about the traffic going to and from network interfaces to the NLB - Flow logs do not capture all IP traffic. One such exception is - Traffic between an endpoint network interface and a Network Load Balancer network interface.
Configure Gateway Endpoint instead of VPC private link to access the AWS service across AWS accounts - Gateway VPC endpoints provide reliable connectivity to Amazon S3 and DynamoDB without requiring an internet gateway or a NAT device for your VPC. This is irrelevant to the given use case.
Use AWS CloudTrail to capture detailed information about the calls made to the Amazon VPC API. You can use the generated CloudTrail logs to determine which calls were made and the source IP address where the call came from - AWS CloudTrail will log all data about calls made to the Amazon VPC API, and not about the network traffic data.
References:
https://repost.aws/questions/QUKYHCVsB3Swmf9mO6cp-6TQ/capture-flow-logs-for-vpc-privatelink
https://docs.aws.amazon.com/vpc/latest/userguide/flow-logs.html
Explanation
Correct option:
Ensure that the Security Groups and Network Access Control Lists (NACLs) in both VPCs allow traffic
You can create an interface VPC endpoint to connect to services powered by AWS PrivateLink, including many AWS services. For each subnet that you specify from your VPC, AWS creates an endpoint network interface in the subnet and assigns it a private IP address from the subnet address range. An endpoint network interface is a requester-managed network interface; you can view it in your AWS account, but you can't manage it yourself.
An improper configuration of the involved security groups or the Network Access Control Lists (NACLs) can result in communication not getting established as expected. This is the right point to start the troubleshooting process. VPC flow logs are not available for this configuration because traffic between an endpoint network interface and a Network Load Balancer network interface isn't logged.
Incorrect options:
Enable VPC Flow Logs to capture detailed information about the traffic going to and from network interfaces to the NLB - Flow logs do not capture all IP traffic. One such exception is - Traffic between an endpoint network interface and a Network Load Balancer network interface.
Configure Gateway Endpoint instead of VPC private link to access the AWS service across AWS accounts - Gateway VPC endpoints provide reliable connectivity to Amazon S3 and DynamoDB without requiring an internet gateway or a NAT device for your VPC. This is irrelevant to the given use case.
Use AWS CloudTrail to capture detailed information about the calls made to the Amazon VPC API. You can use the generated CloudTrail logs to determine which calls were made and the source IP address where the call came from - AWS CloudTrail will log all data about calls made to the Amazon VPC API, and not about the network traffic data.
References:
https://repost.aws/questions/QUKYHCVsB3Swmf9mO6cp-6TQ/capture-flow-logs-for-vpc-privatelink
https://docs.aws.amazon.com/vpc/latest/userguide/flow-logs.html
Question 15 Multiple Choice
A Network Load Balancer (NLB) was recently set up in a company's AWS infrastructure, but the target instances are not entering the InService state. The security engineer was called upon to investigate the issue. After conducting a thorough investigation, the engineer determined that the health checks were failing.
Which of the following could cause the health checks to fail? (Select three)
Explanation
Click "Show Answer" to see the explanation here
Correct options:
A Network Load Balancer functions at the fourth layer of the Open Systems Interconnection (OSI) model. It can handle millions of requests per second. After the load balancer receives a connection request, it selects a target from the target group for the default rule. It attempts to open a TCP connection to the selected target on the port specified in the listener configuration.
When you create an internet-facing load balancer, you can optionally specify one Elastic IP address per subnet. If you do not choose one of your own Elastic IP addresses, Elastic Load Balancing provides one Elastic IP address per subnet for you. These Elastic IP addresses provide your load balancer with static IP addresses that will not change during the life of the load balancer. You can't change these Elastic IP addresses after you create the load balancer.
When you create an internal load balancer, you can optionally specify one private IP address per subnet. If you do not specify an IP address from the subnet, Elastic Load Balancing chooses one for you. These private IP addresses provide your load balancer with static IP addresses that will not change during the life of the load balancer. You can't change these private IP addresses after you create the load balancer.
You can associate a security group with your Network Load Balancer to control the traffic that is allowed to reach and leave the load balancer. You specify the ports, protocols, and sources to allow for inbound traffic and the ports, protocols, and destinations to allow for outbound traffic. If you don't assign a security group to your load balancer, all client traffic can reach the load balancer listeners and all traffic can leave the load balancer.
The target instance’s subnet network ACL does not allow traffic from the NLB's IP Addresses
A network access control list (ACL) allows or denies specific inbound or outbound traffic at the subnet level. If the network ACL does not allow traffic from the NLB's IP Addresses, then the NLB's health checks will fail.
The target instance’s security group has no rules that allow traffic from the NLB's IP Addresses
A security group acts as a virtual firewall for your EC2 instances to control incoming and outgoing traffic. Inbound rules control the incoming traffic to your instance, and outbound rules control the outgoing traffic from your instance. If the target instance’s security group has no rules to allow traffic from the NLB's IP Addresses, then the NLB's health checks will fail.
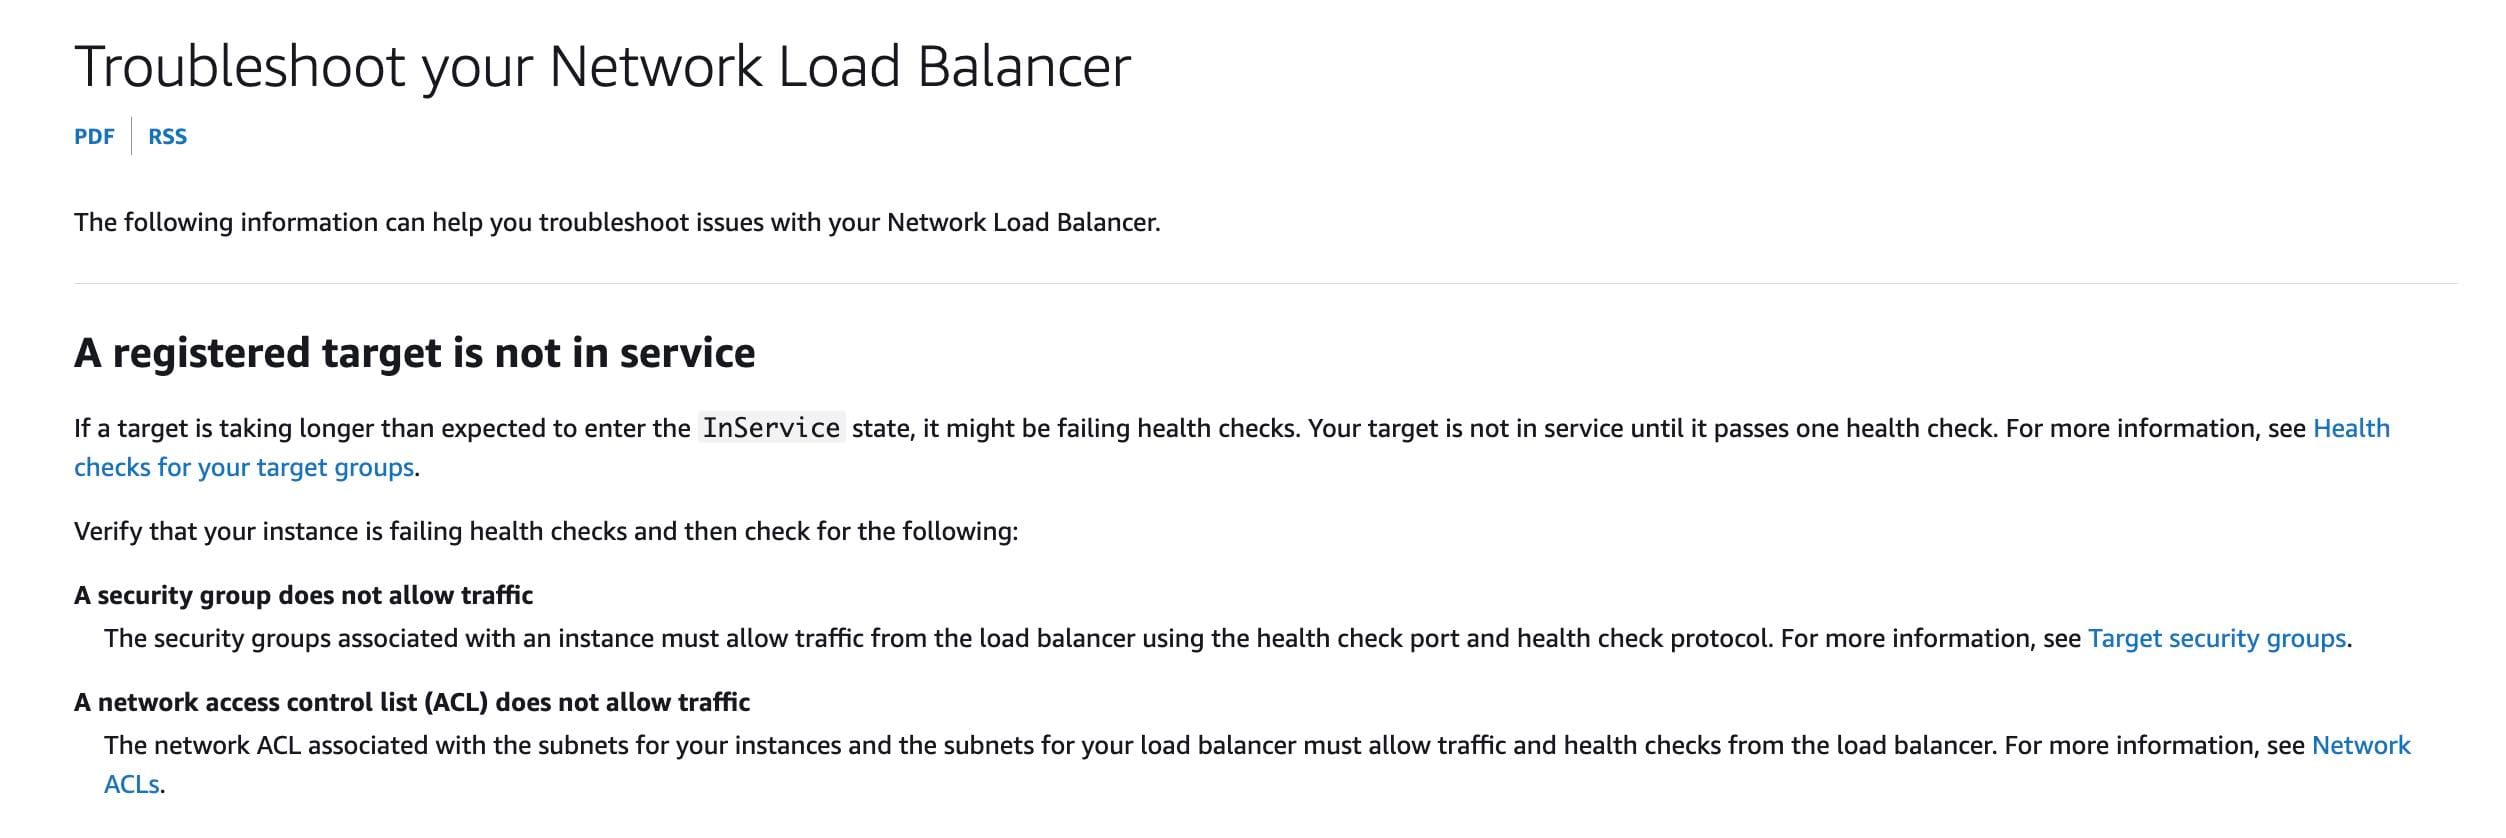 via - https://docs.aws.amazon.com/elasticloadbalancing/latest/network/load-balancer-troubleshooting.html
The target instance’s security group has rules that are not using the correct IP addresses to allow traffic from the NLB
If the target instance’s security group has rules that are not using the correct IP addresses from the list of the NLB's IP Addresses, then the NLB's health checks will fail, since the traffic from NLB will not be able to reach the instances.
Incorrect options:
The target instance’s subnet network ACL does not allow traffic from the NLB's security group - Network ACL can only permit using CIDR range in the source or destination. So, specifying the NLB's security group as a source for the network ACL rule is not possible.
The target instance’s security group does not allow traffic from the NLB's network ACL - A security group can only use a single IPv4/IPv6 address, a range of IPv4/IPv6 addresses, a prefix list, or another security group as a source or destination in the rules. Therefore, you cannot use a network ACL name as a source or destination, hence this option is incorrect.
The target instance’s security group is not using the DNS name of the NLB to allow traffic from the NLB
A security group can only use a single IPv4/IPv6 address, a range of IPv4/IPv6 addresses, a prefix list, or another security group as a source or destination in the rules. Therefore, you cannot use a DNS name as a source or destination, hence this option is incorrect.
References:
https://docs.aws.amazon.com/elasticloadbalancing/latest/network/network-load-balancers.html
https://docs.aws.amazon.com/vpc/latest/userguide/vpc-network-acls.html
https://docs.aws.amazon.com/AWSEC2/latest/UserGuide/security-group-rules.html
https://docs.aws.amazon.com/elasticloadbalancing/latest/network/load-balancer-troubleshooting.html
Explanation
Correct options:
A Network Load Balancer functions at the fourth layer of the Open Systems Interconnection (OSI) model. It can handle millions of requests per second. After the load balancer receives a connection request, it selects a target from the target group for the default rule. It attempts to open a TCP connection to the selected target on the port specified in the listener configuration.
When you create an internet-facing load balancer, you can optionally specify one Elastic IP address per subnet. If you do not choose one of your own Elastic IP addresses, Elastic Load Balancing provides one Elastic IP address per subnet for you. These Elastic IP addresses provide your load balancer with static IP addresses that will not change during the life of the load balancer. You can't change these Elastic IP addresses after you create the load balancer.
When you create an internal load balancer, you can optionally specify one private IP address per subnet. If you do not specify an IP address from the subnet, Elastic Load Balancing chooses one for you. These private IP addresses provide your load balancer with static IP addresses that will not change during the life of the load balancer. You can't change these private IP addresses after you create the load balancer.
You can associate a security group with your Network Load Balancer to control the traffic that is allowed to reach and leave the load balancer. You specify the ports, protocols, and sources to allow for inbound traffic and the ports, protocols, and destinations to allow for outbound traffic. If you don't assign a security group to your load balancer, all client traffic can reach the load balancer listeners and all traffic can leave the load balancer.
The target instance’s subnet network ACL does not allow traffic from the NLB's IP Addresses
A network access control list (ACL) allows or denies specific inbound or outbound traffic at the subnet level. If the network ACL does not allow traffic from the NLB's IP Addresses, then the NLB's health checks will fail.
The target instance’s security group has no rules that allow traffic from the NLB's IP Addresses
A security group acts as a virtual firewall for your EC2 instances to control incoming and outgoing traffic. Inbound rules control the incoming traffic to your instance, and outbound rules control the outgoing traffic from your instance. If the target instance’s security group has no rules to allow traffic from the NLB's IP Addresses, then the NLB's health checks will fail.
via - https://docs.aws.amazon.com/elasticloadbalancing/latest/network/load-balancer-troubleshooting.html
The target instance’s security group has rules that are not using the correct IP addresses to allow traffic from the NLB
If the target instance’s security group has rules that are not using the correct IP addresses from the list of the NLB's IP Addresses, then the NLB's health checks will fail, since the traffic from NLB will not be able to reach the instances.
Incorrect options:
The target instance’s subnet network ACL does not allow traffic from the NLB's security group - Network ACL can only permit using CIDR range in the source or destination. So, specifying the NLB's security group as a source for the network ACL rule is not possible.
The target instance’s security group does not allow traffic from the NLB's network ACL - A security group can only use a single IPv4/IPv6 address, a range of IPv4/IPv6 addresses, a prefix list, or another security group as a source or destination in the rules. Therefore, you cannot use a network ACL name as a source or destination, hence this option is incorrect.
The target instance’s security group is not using the DNS name of the NLB to allow traffic from the NLB
A security group can only use a single IPv4/IPv6 address, a range of IPv4/IPv6 addresses, a prefix list, or another security group as a source or destination in the rules. Therefore, you cannot use a DNS name as a source or destination, hence this option is incorrect.
References:
https://docs.aws.amazon.com/elasticloadbalancing/latest/network/network-load-balancers.html
https://docs.aws.amazon.com/vpc/latest/userguide/vpc-network-acls.html
https://docs.aws.amazon.com/AWSEC2/latest/UserGuide/security-group-rules.html
https://docs.aws.amazon.com/elasticloadbalancing/latest/network/load-balancer-troubleshooting.html
Question 16 Single Choice
A company wants to secure the objects in S3 using server-side encryption, subject to the constraint that the key material must be generated and stored in a certified FIPS 140-2 Level 3 hardware service modules (HSM) that the company manages itself. In addition, the key material must be available in multiple Regions. The size of objects in S3 ranges from 15 KB to 5 MB.
As an AWS Certified Security Specialist, which of the following would you recommend?
Explanation
Click "Show Answer" to see the explanation here
Correct option:
Leverage an AWS KMS custom key store backed by AWS CloudHSM clusters. Copy backups across Regions
You can use AWS Key Management Service (KMS) to create and control the cryptographic keys that are used to protect your data on AWS. An AWS KMS key is a logical representation of a cryptographic key. A KMS key contains metadata, such as the key ID, key spec, key usage, creation date, description, and key state. Most importantly, it contains a reference to the key material that is used when you perform cryptographic operations with the KMS key.
By default, AWS KMS creates the key material for a KMS key. However, you can import your own key material into a KMS key, or use a custom key store to create KMS keys that use key material in your AWS CloudHSM cluster or key material in an external key manager that you own and manage outside of AWS.
A key store is a secure location for storing cryptographic keys. The default key store in AWS KMS also supports methods for generating and managing the keys that its stores. By default, the cryptographic key material for the AWS KMS keys that you create in AWS KMS is generated in and protected by hardware security modules (HSMs) that are FIPS 140-2 validated cryptographic modules. A custom key store is a logical key store within AWS KMS that is backed by a key manager outside of AWS KMS that you own and manage.
The AWS CloudHSM service helps you meet corporate, contractual, and regulatory compliance requirements for data security by using dedicated Hardware Security Module (HSM) instances within the AWS cloud. A Hardware Security Module (HSM) provides secure key storage and cryptographic operations within a tamper-resistant hardware device. HSMs are designed to securely store cryptographic key material and use the key material without exposing it outside the cryptographic boundary of the hardware.
AWS KMS supports two types of custom key stores:
An AWS CloudHSM key store is an AWS KMS custom key store backed by an AWS CloudHSM cluster. AWS CloudHSM allows you to copy backups of your CloudHSM Cluster from one region to another for cross-region resilience, global workloads, and disaster recovery purposes. You can use the copied backup to create a clone of the original cluster in the new region. This simplifies the development of globally distributed or cross-region redundant workloads.
An external key store is an AWS KMS custom key store backed by an external key manager outside of AWS that you own and control.
AWS CloudHSM key stores: 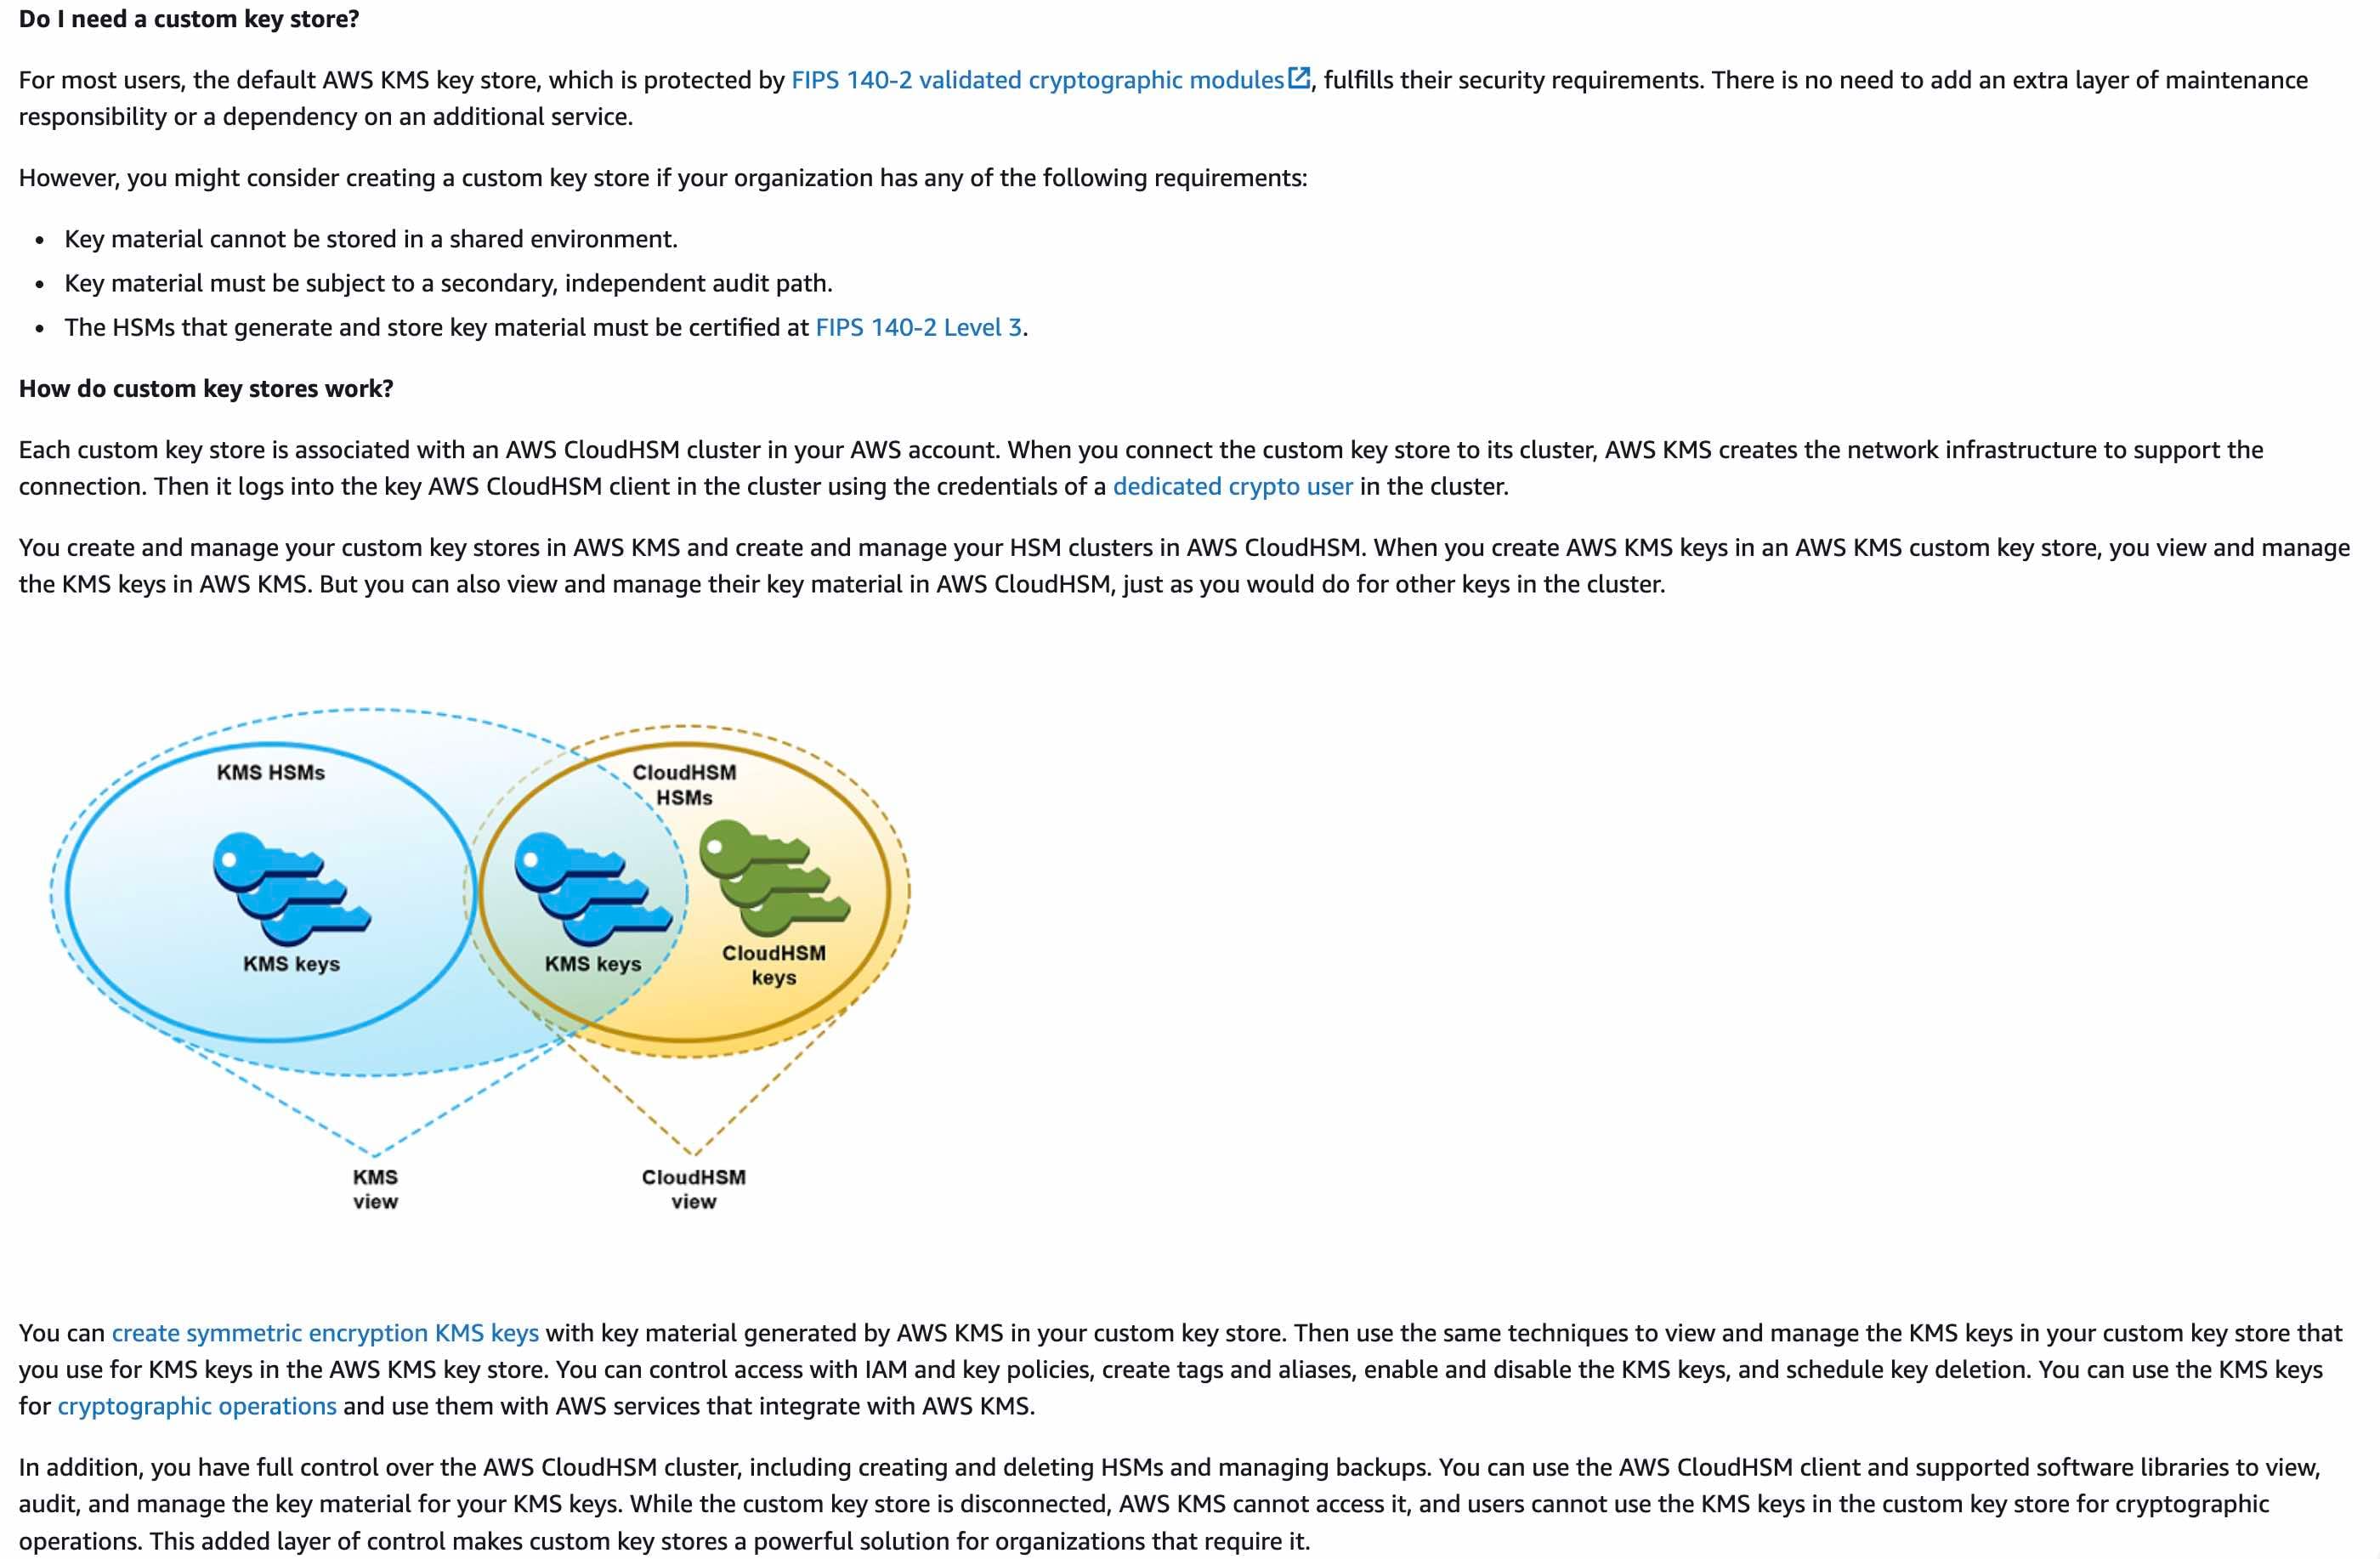 via - https://docs.aws.amazon.com/kms/latest/developerguide/keystore-cloudhsm.html
Incorrect options:
Leverage an AWS KMS customer managed key and store the key material in AWS with key replication enabled across Regions - Customer managed keys are KMS keys in your AWS account that you create, own, and manage. AWS KMS supports multi-Region keys, which let you encrypt data in one AWS Region and decrypt it in a different AWS Region. The cryptographic key material for the AWS KMS keys that you create in AWS KMS is generated in and protected by hardware security modules (HSMs) that are FIPS 140 - Level 3 compliant. However, these HSMs are managed by AWS. Therefore, this option is incorrect.
Leverage an AWS KMS customer managed key backed by AWS CloudHSM clusters. Store the key material securely in Amazon S3 with cross-Region replication enabled - Customer managed keys are KMS keys in your AWS account that you create, own, and manage. You cannot store KMS key material in Amazon S3. In addition, AWS KMS customer managed key cannot be backed by an AWS CloudHSM cluster. This option has been added as a distractor.
Leverage AWS CloudHSM to generate the key material. Copy backups across Regions. Use AWS Encryption SDK to encrypt and decrypt the data - The use case states that the objects in S3 must be secured using server-side encryption. However, AWS Encryption SDK can only be used for client-side encryption, so this option is incorrect.
References:
https://docs.aws.amazon.com/kms/latest/developerguide/custom-key-store-overview.html
https://docs.aws.amazon.com/kms/latest/developerguide/keystore-cloudhsm.html
https://docs.aws.amazon.com/kms/latest/developerguide/keystore-external.html
https://docs.aws.amazon.com/encryption-sdk/latest/developer-guide/introduction.html
https://docs.aws.amazon.com/cloudhsm/latest/userguide/copy-backup-to-region.html
Explanation
Correct option:
Leverage an AWS KMS custom key store backed by AWS CloudHSM clusters. Copy backups across Regions
You can use AWS Key Management Service (KMS) to create and control the cryptographic keys that are used to protect your data on AWS. An AWS KMS key is a logical representation of a cryptographic key. A KMS key contains metadata, such as the key ID, key spec, key usage, creation date, description, and key state. Most importantly, it contains a reference to the key material that is used when you perform cryptographic operations with the KMS key.
By default, AWS KMS creates the key material for a KMS key. However, you can import your own key material into a KMS key, or use a custom key store to create KMS keys that use key material in your AWS CloudHSM cluster or key material in an external key manager that you own and manage outside of AWS.
A key store is a secure location for storing cryptographic keys. The default key store in AWS KMS also supports methods for generating and managing the keys that its stores. By default, the cryptographic key material for the AWS KMS keys that you create in AWS KMS is generated in and protected by hardware security modules (HSMs) that are FIPS 140-2 validated cryptographic modules. A custom key store is a logical key store within AWS KMS that is backed by a key manager outside of AWS KMS that you own and manage.
The AWS CloudHSM service helps you meet corporate, contractual, and regulatory compliance requirements for data security by using dedicated Hardware Security Module (HSM) instances within the AWS cloud. A Hardware Security Module (HSM) provides secure key storage and cryptographic operations within a tamper-resistant hardware device. HSMs are designed to securely store cryptographic key material and use the key material without exposing it outside the cryptographic boundary of the hardware.
AWS KMS supports two types of custom key stores:
An AWS CloudHSM key store is an AWS KMS custom key store backed by an AWS CloudHSM cluster. AWS CloudHSM allows you to copy backups of your CloudHSM Cluster from one region to another for cross-region resilience, global workloads, and disaster recovery purposes. You can use the copied backup to create a clone of the original cluster in the new region. This simplifies the development of globally distributed or cross-region redundant workloads.
An external key store is an AWS KMS custom key store backed by an external key manager outside of AWS that you own and control.
AWS CloudHSM key stores: via - https://docs.aws.amazon.com/kms/latest/developerguide/keystore-cloudhsm.html
Incorrect options:
Leverage an AWS KMS customer managed key and store the key material in AWS with key replication enabled across Regions - Customer managed keys are KMS keys in your AWS account that you create, own, and manage. AWS KMS supports multi-Region keys, which let you encrypt data in one AWS Region and decrypt it in a different AWS Region. The cryptographic key material for the AWS KMS keys that you create in AWS KMS is generated in and protected by hardware security modules (HSMs) that are FIPS 140 - Level 3 compliant. However, these HSMs are managed by AWS. Therefore, this option is incorrect.
Leverage an AWS KMS customer managed key backed by AWS CloudHSM clusters. Store the key material securely in Amazon S3 with cross-Region replication enabled - Customer managed keys are KMS keys in your AWS account that you create, own, and manage. You cannot store KMS key material in Amazon S3. In addition, AWS KMS customer managed key cannot be backed by an AWS CloudHSM cluster. This option has been added as a distractor.
Leverage AWS CloudHSM to generate the key material. Copy backups across Regions. Use AWS Encryption SDK to encrypt and decrypt the data - The use case states that the objects in S3 must be secured using server-side encryption. However, AWS Encryption SDK can only be used for client-side encryption, so this option is incorrect.
References:
https://docs.aws.amazon.com/kms/latest/developerguide/custom-key-store-overview.html
https://docs.aws.amazon.com/kms/latest/developerguide/keystore-cloudhsm.html
https://docs.aws.amazon.com/kms/latest/developerguide/keystore-external.html
https://docs.aws.amazon.com/encryption-sdk/latest/developer-guide/introduction.html
https://docs.aws.amazon.com/cloudhsm/latest/userguide/copy-backup-to-region.html
Question 17 Single Choice
The security team at a company needs to follow the security requirements:
- Monitor all traffic leaving a particular VPC
- Monitor all traffic whose source is outside of the VPC
The purpose of this traffic monitoring is to put in place a proper content inspection, troubleshooting, and threat monitoring solution.
Which of the following options represents the best solution for the given requirement?
Explanation
Click "Show Answer" to see the explanation here
Correct option:
Configure a traffic mirror target for the monitoring appliance. Create a traffic mirror filter with a rule for outbound traffic to reject all packets that have a destination IP in the VPC CIDR block and accept all other outbound packets. Also, create another rule for inbound traffic to reject all packets that have a source IP in the VPC CIDR block and accept all other inbound packets
Consider the scenario where you want to monitor traffic leaving your VPC or traffic whose source is outside your VPC. In this case, you will mirror all traffic except traffic passing within your VPC and send it to a single monitoring appliance. You need the following traffic mirror resources:
A traffic mirror target for the appliance (Target A)
A traffic mirror filter that has two sets of rules for outbound and inbound traffic. For outbound traffic, it will reject all packets that have a destination IP in the VPC CIDR block and accept all other outbound packets. For inbound traffic, it will reject all packets that have a source IP in the VPC CIDR block and accept all other inbound packets.
A traffic mirror session that has the following:
A traffic mirror source
A traffic mirror target for the appliance (Target A)
A traffic mirror filter with a traffic mirror rule for the TCP inbound traffic (Filter F)
Incorrect options:
Enable VPC Flow Logs to capture detailed information about the traffic going to and from network interfaces in the VPC. Publish the flow log data directly to Amazon CloudWatch for further analysis and alert generation - VPC Flow Logs is a feature that enables you to capture information about the IP traffic going to and from network interfaces in your VPC. Whereas, traffic mirroring is a feature used to copy network traffic from a network interface of an Amazon EC2 instance and send it to out-of-band security and monitoring appliances for deep packet inspection. You can detect network and security anomalies, gain operational insights, implement compliance and security controls, and troubleshoot issues.
Enable VPC Flow Logs to capture detailed information about the traffic going to and from network interfaces in the VPC. Configure a traffic mirror with VPC Flow Logs as the source and the target as the appliance. Create a traffic mirroring filter with a traffic mirroring rule for the TCP inbound traffic - This is not possible and is given only as a distractor.
Configure a traffic mirror target for the monitoring appliance. Create a traffic mirror filter with a traffic mirror rule for the TCP inbound traffic. Also, create another traffic mirror filter with a traffic mirror rule for the UDP inbound traffic - This configuration is used if you want to mirror inbound TCP and UDP traffic on an instance.
References:
https://docs.aws.amazon.com/vpc/latest/userguide/monitoring.html
https://docs.aws.amazon.com/vpc/latest/mirroring/tm-example-non-vpc.html
Explanation
Correct option:
Configure a traffic mirror target for the monitoring appliance. Create a traffic mirror filter with a rule for outbound traffic to reject all packets that have a destination IP in the VPC CIDR block and accept all other outbound packets. Also, create another rule for inbound traffic to reject all packets that have a source IP in the VPC CIDR block and accept all other inbound packets
Consider the scenario where you want to monitor traffic leaving your VPC or traffic whose source is outside your VPC. In this case, you will mirror all traffic except traffic passing within your VPC and send it to a single monitoring appliance. You need the following traffic mirror resources:
A traffic mirror target for the appliance (Target A)
A traffic mirror filter that has two sets of rules for outbound and inbound traffic. For outbound traffic, it will reject all packets that have a destination IP in the VPC CIDR block and accept all other outbound packets. For inbound traffic, it will reject all packets that have a source IP in the VPC CIDR block and accept all other inbound packets.
A traffic mirror session that has the following:
A traffic mirror source
A traffic mirror target for the appliance (Target A)
A traffic mirror filter with a traffic mirror rule for the TCP inbound traffic (Filter F)
Incorrect options:
Enable VPC Flow Logs to capture detailed information about the traffic going to and from network interfaces in the VPC. Publish the flow log data directly to Amazon CloudWatch for further analysis and alert generation - VPC Flow Logs is a feature that enables you to capture information about the IP traffic going to and from network interfaces in your VPC. Whereas, traffic mirroring is a feature used to copy network traffic from a network interface of an Amazon EC2 instance and send it to out-of-band security and monitoring appliances for deep packet inspection. You can detect network and security anomalies, gain operational insights, implement compliance and security controls, and troubleshoot issues.
Enable VPC Flow Logs to capture detailed information about the traffic going to and from network interfaces in the VPC. Configure a traffic mirror with VPC Flow Logs as the source and the target as the appliance. Create a traffic mirroring filter with a traffic mirroring rule for the TCP inbound traffic - This is not possible and is given only as a distractor.
Configure a traffic mirror target for the monitoring appliance. Create a traffic mirror filter with a traffic mirror rule for the TCP inbound traffic. Also, create another traffic mirror filter with a traffic mirror rule for the UDP inbound traffic - This configuration is used if you want to mirror inbound TCP and UDP traffic on an instance.
References:
https://docs.aws.amazon.com/vpc/latest/userguide/monitoring.html
https://docs.aws.amazon.com/vpc/latest/mirroring/tm-example-non-vpc.html
Question 18 Single Choice
A Security Engineer has been asked to create an identity-based policy that allows access to add objects to an Amazon S3 bucket. But, the access should be given from April 1, 2023, through April 30, 2023 (UTC) inclusive.
How will you define this identity-based policy?
Explanation
Click "Show Answer" to see the explanation here
Correct option:
{ "Version": "2012-10-17", "Statement": [ { "Effect": "Allow", "Action": "s3:PutObject", "Resource": "*", "Condition": { "DateGreaterThan": {"aws:CurrentTime": "2023-04-01T00:00:00Z"}, "DateLessThan": {"aws:CurrentTime": "2023-04-30T23:59:59Z"} } } ] } This identity-based policy allows access to actions based on date and time. This policy restricts access to actions that occur between April 1, 2023, and April 30, 2023 (UTC), inclusive. This policy grants the permissions necessary to complete this action programmatically from the AWS API or AWS CLI.
Incorrect options:
{ "Version": "2012-10-17", "Statement": [ { "Effect": "Allow", "Action": "s3:PutObject", "Resource": "*", "Condition": { "DateGreaterThan": {"{aws:logintime}": "2023-04-01T00:00:00Z"}, "DateLessThan": {"{aws:logintime}": "2023-04-30T23:59:59Z"} } } ] } This policy definition is incorrect. You cannot use a policy variable with the Date condition operator. In addition, using the {aws:logintime} policy variable is incorrect for the given use case.
{ "Version": "2012-10-17", "Statement": [ { "Effect": "Deny", "Action": "s3:PutObject", "Resource": "*", "Condition": { "DateGreaterThan": {"{aws:logintime}": "2023-04-01T00:00:00Z"}, "DateLessThan": {"{aws:logintime}": "2023-04-30T23:59:59Z"} } } ] } This policy definition is incorrect. You cannot use a policy variable with the Date condition operator. In addition, using the {aws:logintime} policy variable is incorrect for the given use case. You should also note that the Deny Effect is logically opposite of what the use case requires.
{ "Version": "2012-10-17", "Statement": [ { "Effect": "Allow", "Action": "s3:PutObject", "Principal": "*", "Condition": { "DateGreaterThan": {"aws:CurrentTime": "2023-04-01T00:00:00Z"}, "DateLessThan": {"aws:CurrentTime": "2023-04-30T23:59:59Z"} } } ] } This policy definition is incorrect. You cannot use the Principal element in an identity-based policy. Identity-based policies are permissions policies that you attach to IAM identities (users, groups, or roles). In those cases, the principal is implicitly the identity where the policy is attached.
References:
https://docs.aws.amazon.com/IAM/latest/UserGuide/reference_policies_examples_aws-dates.html
https://docs.aws.amazon.com/IAM/latest/UserGuide/reference_policies_variables.html
https://docs.aws.amazon.com/IAM/latest/UserGuide/reference_policies_elements_principal.html
Explanation
Correct option:
{ "Version": "2012-10-17", "Statement": [ { "Effect": "Allow", "Action": "s3:PutObject", "Resource": "*", "Condition": { "DateGreaterThan": {"aws:CurrentTime": "2023-04-01T00:00:00Z"}, "DateLessThan": {"aws:CurrentTime": "2023-04-30T23:59:59Z"} } } ] } This identity-based policy allows access to actions based on date and time. This policy restricts access to actions that occur between April 1, 2023, and April 30, 2023 (UTC), inclusive. This policy grants the permissions necessary to complete this action programmatically from the AWS API or AWS CLI.
Incorrect options:
{ "Version": "2012-10-17", "Statement": [ { "Effect": "Allow", "Action": "s3:PutObject", "Resource": "*", "Condition": { "DateGreaterThan": {"{aws:logintime}": "2023-04-01T00:00:00Z"}, "DateLessThan": {"{aws:logintime}": "2023-04-30T23:59:59Z"} } } ] } This policy definition is incorrect. You cannot use a policy variable with the Date condition operator. In addition, using the {aws:logintime} policy variable is incorrect for the given use case.
{ "Version": "2012-10-17", "Statement": [ { "Effect": "Deny", "Action": "s3:PutObject", "Resource": "*", "Condition": { "DateGreaterThan": {"{aws:logintime}": "2023-04-01T00:00:00Z"}, "DateLessThan": {"{aws:logintime}": "2023-04-30T23:59:59Z"} } } ] } This policy definition is incorrect. You cannot use a policy variable with the Date condition operator. In addition, using the {aws:logintime} policy variable is incorrect for the given use case. You should also note that the Deny Effect is logically opposite of what the use case requires.
{ "Version": "2012-10-17", "Statement": [ { "Effect": "Allow", "Action": "s3:PutObject", "Principal": "*", "Condition": { "DateGreaterThan": {"aws:CurrentTime": "2023-04-01T00:00:00Z"}, "DateLessThan": {"aws:CurrentTime": "2023-04-30T23:59:59Z"} } } ] } This policy definition is incorrect. You cannot use the Principal element in an identity-based policy. Identity-based policies are permissions policies that you attach to IAM identities (users, groups, or roles). In those cases, the principal is implicitly the identity where the policy is attached.
References:
https://docs.aws.amazon.com/IAM/latest/UserGuide/reference_policies_examples_aws-dates.html
https://docs.aws.amazon.com/IAM/latest/UserGuide/reference_policies_variables.html
https://docs.aws.amazon.com/IAM/latest/UserGuide/reference_policies_elements_principal.html
Question 19 Multiple Choice
A company has recently set up AWS Organizations to get all its AWS accounts under one organization to standardize the monitoring and compliance needs of the company. The company has the following requirements:
a) All user actions have to be logged. b) Based on the company's security needs, define alarms that respond to specific user actions. c) Send real-time alerts for the alarms raised.
Which of the following options can be combined to create an optimal solution for the given requirements? (Select two)
Explanation
Click "Show Answer" to see the explanation here
Correct options:
Implement an AWS CloudTrail trail as an organizational trail. Configure the trail to forward the trail data to an Amazon CloudWatch Logs log group
In CloudWatch Logs, set a metric filter for any user action event the company needs to track. Create an Amazon CloudWatch alarm against the metric. When triggered, the alarm sends notifications to the subscribed users through an Amazon Simple Notification Service (Amazon SNS) topic
You can configure CloudTrail with CloudWatch Logs to monitor your trail logs and be notified when specific activity occurs.
Configure your trail to send log events to CloudWatch Logs.
Define CloudWatch Logs metric filters to evaluate log events for matches in terms, phrases, or values. For example, you can monitor for ConsoleLogin events.
Assign CloudWatch metrics to the metric filters.
Create CloudWatch alarms that are triggered according to thresholds and time periods that you specify. You can configure alarms to send notifications when alarms are triggered so that you can take action.
Note: Only the management account for an AWS Organizations organization can configure a CloudWatch Logs log group for an organization trail.
Incorrect options:
Define an AWS Lambda function to process the logs and send messages to an Amazon Simple Queue Service (Amazon SQS) queue - Amazon SQS is ruled out since we need a near real-time notification solution and not a queue-based solution.
Implement an AWS CloudTrail trail as an organizational trail. Configure the trail to store logs in an Amazon S3 bucket
Use Amazon Athena to analyze the logs and trigger a notification to an Amazon Simple Notification Service (Amazon SNS) topic
While it is possible to configure AWS CloudTrail to send trail logs to an Amazon S3 bucket and then use Amazon Athena to analyze the logs and trigger SNS notification, this is not an optimal solution for the given use case. As mentioned earlier, CloudWatch metrics and alarms can get the job done more optimally.
References:
https://docs.aws.amazon.com/sns/latest/dg/sns-event-sources.html
Explanation
Correct options:
Implement an AWS CloudTrail trail as an organizational trail. Configure the trail to forward the trail data to an Amazon CloudWatch Logs log group
In CloudWatch Logs, set a metric filter for any user action event the company needs to track. Create an Amazon CloudWatch alarm against the metric. When triggered, the alarm sends notifications to the subscribed users through an Amazon Simple Notification Service (Amazon SNS) topic
You can configure CloudTrail with CloudWatch Logs to monitor your trail logs and be notified when specific activity occurs.
Configure your trail to send log events to CloudWatch Logs.
Define CloudWatch Logs metric filters to evaluate log events for matches in terms, phrases, or values. For example, you can monitor for ConsoleLogin events.
Assign CloudWatch metrics to the metric filters.
Create CloudWatch alarms that are triggered according to thresholds and time periods that you specify. You can configure alarms to send notifications when alarms are triggered so that you can take action.
Note: Only the management account for an AWS Organizations organization can configure a CloudWatch Logs log group for an organization trail.
Incorrect options:
Define an AWS Lambda function to process the logs and send messages to an Amazon Simple Queue Service (Amazon SQS) queue - Amazon SQS is ruled out since we need a near real-time notification solution and not a queue-based solution.
Implement an AWS CloudTrail trail as an organizational trail. Configure the trail to store logs in an Amazon S3 bucket
Use Amazon Athena to analyze the logs and trigger a notification to an Amazon Simple Notification Service (Amazon SNS) topic
While it is possible to configure AWS CloudTrail to send trail logs to an Amazon S3 bucket and then use Amazon Athena to analyze the logs and trigger SNS notification, this is not an optimal solution for the given use case. As mentioned earlier, CloudWatch metrics and alarms can get the job done more optimally.
References:
https://docs.aws.amazon.com/sns/latest/dg/sns-event-sources.html
Question 20 Multiple Choice
A hybrid AWS network is configured to route internet traffic such that it egresses from an on-premises gateway rather than from a VPC Internet Gateway (IGW). Since enabling Amazon GuardDuty, an error has been repeatedly seen in the GuardDuty findings: UnauthorizedAccess:IAMUser/InstanceCredentialExfiltration.OutsideAWS. This finding informs you that a host outside of AWS has attempted to run AWS API operations using temporary AWS credentials that were created on an EC2 instance in your AWS environment. The listed EC2 instance might be compromised, and the temporary credentials from this instance might have been exfiltrated to a remote host outside of AWS.
As a Security engineer, what steps would you take to address this issue, so that the VPC's internet traffic that egresses from an on-premises gateway does not trigger the given error? (Select two)
Explanation
Click "Show Answer" to see the explanation here
Correct options:
Use suppression rules and create a rule that consists of two filter criteria. The first criterion is finding type, which should be UnauthorizedAccess:IAMUser/InstanceCredentialExfiltration
The second filter criterion is API caller IPv4 address with the IP address or CIDR range of the on-premises internet gateway
A suppression rule is a set of criteria, consisting of a filter attribute paired with a value, used to filter findings by automatically archiving new findings that match the specified criteria. Suppression rules can be used to filter low-value findings, false positive findings, or threats you do not intend to act on, to make it easier to recognize the security threats with the most impact on your environment.
After you create a suppression rule, new findings that match the criteria defined in the rule are automatically archived as long as the suppression rule is in place. You can use an existing filter to create a suppression rule or create a suppression rule from a new filter you define. You can configure suppression rules to suppress entire finding types or define more granular filter criteria to suppress only specific instances of a particular finding type. Your suppression rules can be edited at any time.
GuardDuty continues to generate findings even when they match your suppression rules, however, those findings are automatically marked as archived. The archived finding is stored in GuardDuty for 90 days and can be viewed at any time during that period. You can view suppressed findings in the GuardDuty console by selecting Archived from the findings table, or through the GuardDuty API using the ListFindings API with a findingCriteria criterion of service.archived equal to true.
UnauthorizedAccess:IAMUser/InstanceCredentialExfiltration.OutsideAWS finding informs you that a host outside of AWS has attempted to run AWS API operations using temporary AWS credentials that were created on an EC2 instance in your AWS environment. The listed EC2 instance might be compromised, and the temporary credentials from this instance might have been exfiltrated to a remote host outside of AWS.
However, authorized users can export credentials from their EC2 instances to make legitimate API calls. To rule out a potential attack and verify the legitimacy of the activity, validate if the use of instance credentials from the remote IP in the finding is expected.
Suppression rule for UnauthorizedAccess:IAMUser/InstanceCredentialExfiltration.OutsideAWS: 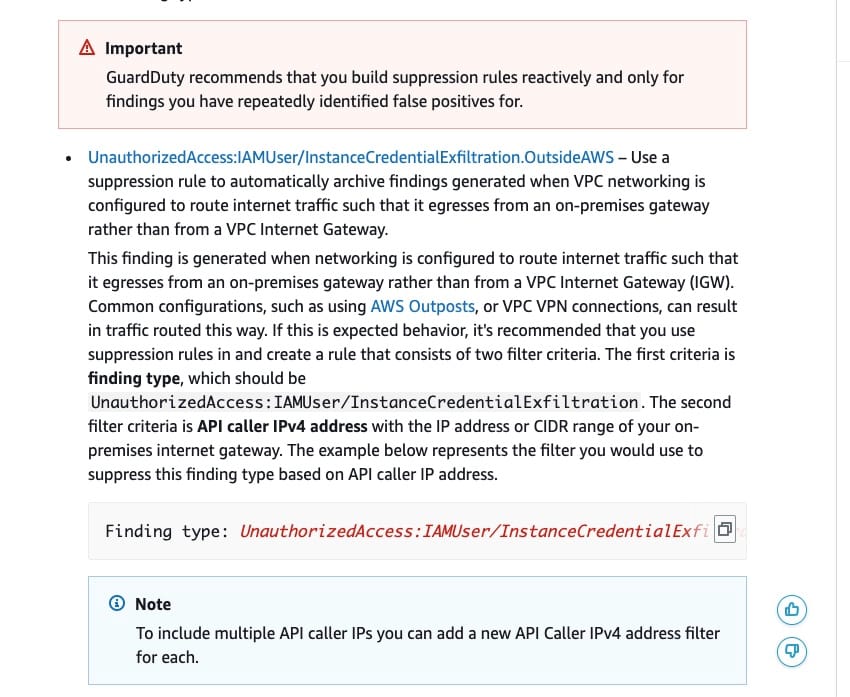 via - https://docs.aws.amazon.com/guardduty/latest/ug/findings_suppression-rule.html
Incorrect options:
Use suppression rules and create a rule that consists of two filter criteria. The first criterion is finding type, which should be UnauthorizedAccess:EC2/SSHBruteForce - UnauthorizedAccess:EC2/SSHBruteForce is incorrect as it is not relevant to the given use case.
Create a finding filter from the GuardDuty console for two different criteria. The first criterion is finding type, which should be UnauthorizedAccess:IAMUser/InstanceCredentialExfiltration - Creating a finding filter only narrows down the search from the findings created by GuardDuty. A suppression rule is required for this use case, so the GuardDuty findings are immediately archived and not sent for further analysis.
The second filter criterion is Trusted IP list to which you add the IP address or CIDR range of the on-premises internet gateway - Trusted IP lists prevent non-DNS findings from being generated from IPs you consider trusted. This is another important feature (like suppression rules) of GuardDuty to help sort, store, and manage GuardDuty findings. However, this option is not relevant to the given use case.
References:
https://docs.aws.amazon.com/guardduty/latest/ug/findings_suppression-rule.html
Explanation
Correct options:
Use suppression rules and create a rule that consists of two filter criteria. The first criterion is finding type, which should be UnauthorizedAccess:IAMUser/InstanceCredentialExfiltration
The second filter criterion is API caller IPv4 address with the IP address or CIDR range of the on-premises internet gateway
A suppression rule is a set of criteria, consisting of a filter attribute paired with a value, used to filter findings by automatically archiving new findings that match the specified criteria. Suppression rules can be used to filter low-value findings, false positive findings, or threats you do not intend to act on, to make it easier to recognize the security threats with the most impact on your environment.
After you create a suppression rule, new findings that match the criteria defined in the rule are automatically archived as long as the suppression rule is in place. You can use an existing filter to create a suppression rule or create a suppression rule from a new filter you define. You can configure suppression rules to suppress entire finding types or define more granular filter criteria to suppress only specific instances of a particular finding type. Your suppression rules can be edited at any time.
GuardDuty continues to generate findings even when they match your suppression rules, however, those findings are automatically marked as archived. The archived finding is stored in GuardDuty for 90 days and can be viewed at any time during that period. You can view suppressed findings in the GuardDuty console by selecting Archived from the findings table, or through the GuardDuty API using the ListFindings API with a findingCriteria criterion of service.archived equal to true.
UnauthorizedAccess:IAMUser/InstanceCredentialExfiltration.OutsideAWS finding informs you that a host outside of AWS has attempted to run AWS API operations using temporary AWS credentials that were created on an EC2 instance in your AWS environment. The listed EC2 instance might be compromised, and the temporary credentials from this instance might have been exfiltrated to a remote host outside of AWS.
However, authorized users can export credentials from their EC2 instances to make legitimate API calls. To rule out a potential attack and verify the legitimacy of the activity, validate if the use of instance credentials from the remote IP in the finding is expected.
Suppression rule for UnauthorizedAccess:IAMUser/InstanceCredentialExfiltration.OutsideAWS: via - https://docs.aws.amazon.com/guardduty/latest/ug/findings_suppression-rule.html
Incorrect options:
Use suppression rules and create a rule that consists of two filter criteria. The first criterion is finding type, which should be UnauthorizedAccess:EC2/SSHBruteForce - UnauthorizedAccess:EC2/SSHBruteForce is incorrect as it is not relevant to the given use case.
Create a finding filter from the GuardDuty console for two different criteria. The first criterion is finding type, which should be UnauthorizedAccess:IAMUser/InstanceCredentialExfiltration - Creating a finding filter only narrows down the search from the findings created by GuardDuty. A suppression rule is required for this use case, so the GuardDuty findings are immediately archived and not sent for further analysis.
The second filter criterion is Trusted IP list to which you add the IP address or CIDR range of the on-premises internet gateway - Trusted IP lists prevent non-DNS findings from being generated from IPs you consider trusted. This is another important feature (like suppression rules) of GuardDuty to help sort, store, and manage GuardDuty findings. However, this option is not relevant to the given use case.
References:
https://docs.aws.amazon.com/guardduty/latest/ug/findings_suppression-rule.html