AWS Certified SysOps Administrator - Associate - (SOA-C02) Exam Questions
Total Questions
Last Updated
1st Try Guaranteed

Experts Verified
Question 11 Single Choice
A hospitality company runs their applications on its on-premises infrastructure but stores the critical customer data on AWS Cloud using AWS Storage Gateway. At a recent audit, the company has been asked if the customer data is secure while in-transit and at rest in the Cloud.
What is the correct answer to the auditor's question? And what should the company change to meet the security requirements?
Explanation

Click "Show Answer" to see the explanation here
Correct option:
AWS Storage Gateway uses SSL/TLS (Secure Socket Layers/Transport Layer Security) to encrypt data that is transferred between your gateway appliance and AWS storage. By default, Storage Gateway uses Amazon S3-Managed Encryption Keys to server-side encrypt all data it stores in Amazon S3
AWS Storage Gateway uses SSL/TLS (Secure Socket Layers/Transport Layer Security) to encrypt data that is transferred between your gateway appliance and AWS storage. By default, Storage Gateway uses Amazon S3-Managed Encryption Keys (SSE-S3) to server-side encrypt all data it stores in Amazon S3. You have an option to use the Storage Gateway API to configure your gateway to encrypt data stored in the cloud using server-side encryption with AWS Key Management Service (SSE-KMS) customer master keys (CMKs).
File, Volume and Tape Gateway data is stored in Amazon S3 buckets by AWS Storage Gateway. Tape Gateway supports backing data to Amazon S3 Glacier apart from the standard storage.
Encrypting a file share: For a file share, you can configure your gateway to encrypt your objects with AWS KMS–managed keys by using SSE-KMS.
Encrypting a volume: For cached and stored volumes, you can configure your gateway to encrypt volume data stored in the cloud with AWS KMS–managed keys by using the Storage Gateway API.
Encrypting a tape: For a virtual tape, you can configure your gateway to encrypt tape data stored in the cloud with AWS KMS–managed keys by using the Storage Gateway API.
Incorrect options:
AWS Storage Gateway uses IPsec to encrypt data that is transferred between your gateway appliance and AWS storage. File and Volume Gateway data stored on Amazon S3 is encrypted. Tape Gateway data cannot be encrypted at-rest
AWS Storage Gateway uses IPsec to encrypt data that is transferred between your gateway appliance and AWS storage. All three Gateway types store data in encrypted form at-rest
There is no such thing as using IPSec for encrypting in-transit data between your gateway appliance and AWS storage. You need to use SSL/TLS for this. So both these options are incorrect.
AWS Storage Gateway uses SSL/TLS (Secure Socket Layers/Transport Layer Security) to encrypt data that is transferred between your gateway appliance and AWS storage. File and Volume Gateway data stored on Amazon S3 is encrypted. Tape Gateway data cannot be encrypted at-rest - For a virtual tape, you can configure your gateway to encrypt tape data stored in the cloud with AWS KMS–managed keys by using the Storage Gateway API. So this option is incorrect.
Reference:
https://docs.aws.amazon.com/storagegateway/latest/userguide/encryption.html
Explanation
Correct option:
AWS Storage Gateway uses SSL/TLS (Secure Socket Layers/Transport Layer Security) to encrypt data that is transferred between your gateway appliance and AWS storage. By default, Storage Gateway uses Amazon S3-Managed Encryption Keys to server-side encrypt all data it stores in Amazon S3
AWS Storage Gateway uses SSL/TLS (Secure Socket Layers/Transport Layer Security) to encrypt data that is transferred between your gateway appliance and AWS storage. By default, Storage Gateway uses Amazon S3-Managed Encryption Keys (SSE-S3) to server-side encrypt all data it stores in Amazon S3. You have an option to use the Storage Gateway API to configure your gateway to encrypt data stored in the cloud using server-side encryption with AWS Key Management Service (SSE-KMS) customer master keys (CMKs).
File, Volume and Tape Gateway data is stored in Amazon S3 buckets by AWS Storage Gateway. Tape Gateway supports backing data to Amazon S3 Glacier apart from the standard storage.
Encrypting a file share: For a file share, you can configure your gateway to encrypt your objects with AWS KMS–managed keys by using SSE-KMS.
Encrypting a volume: For cached and stored volumes, you can configure your gateway to encrypt volume data stored in the cloud with AWS KMS–managed keys by using the Storage Gateway API.
Encrypting a tape: For a virtual tape, you can configure your gateway to encrypt tape data stored in the cloud with AWS KMS–managed keys by using the Storage Gateway API.
Incorrect options:
AWS Storage Gateway uses IPsec to encrypt data that is transferred between your gateway appliance and AWS storage. File and Volume Gateway data stored on Amazon S3 is encrypted. Tape Gateway data cannot be encrypted at-rest
AWS Storage Gateway uses IPsec to encrypt data that is transferred between your gateway appliance and AWS storage. All three Gateway types store data in encrypted form at-rest
There is no such thing as using IPSec for encrypting in-transit data between your gateway appliance and AWS storage. You need to use SSL/TLS for this. So both these options are incorrect.
AWS Storage Gateway uses SSL/TLS (Secure Socket Layers/Transport Layer Security) to encrypt data that is transferred between your gateway appliance and AWS storage. File and Volume Gateway data stored on Amazon S3 is encrypted. Tape Gateway data cannot be encrypted at-rest - For a virtual tape, you can configure your gateway to encrypt tape data stored in the cloud with AWS KMS–managed keys by using the Storage Gateway API. So this option is incorrect.
Reference:
https://docs.aws.amazon.com/storagegateway/latest/userguide/encryption.html
Question 12 Single Choice
The development team at a retail company manages the deployment and scaling of their web application through AWS Elastic Beanstalk. After configuring the Elastic Beanstalk environment, the team has realized that Beanstalk is not handling the scaling activities the way they expected. This has impacted the application's ability to respond to the variations in traffic.
How should the environment be configured to get the best of Beanstalk's auto-scaling capabilities?
Explanation
Click "Show Answer" to see the explanation here
Correct option:
The Auto Scaling group in your Elastic Beanstalk environment uses two default Amazon CloudWatch alarms to trigger scaling operations. These alarms must be configured based on the parameters appropriate for your application
The Auto Scaling group in your Elastic Beanstalk environment uses two Amazon CloudWatch alarms to trigger scaling operations. Default Auto Scaling triggers are configured to scale when the average outbound network traffic (NetworkOut) from each instance is higher than 6 MB or lower than 2 MB over a period of five minutes.
For more efficient Amazon EC2 Auto Scaling, configure triggers that are appropriate for your application, instance type, and service requirements. You can scale based on several statistics including latency, disk I/O, CPU utilization, and request count.
Incorrect options:
The IAM Role attached to the Auto Scaling group might not have enough permissions to scale instances on-demand - The Auto Scaling group will not be able to spin up Amazon EC2 instances if the IAM Role associated with Beanstalk does not have enough permissions. Since the current use-case talks about scaling not happening at the expected rate, this should not be the issue.
By default, Auto Scaling group created from Beanstalk uses Elastic Load Balancing health checks. Configure the Beanstalk to use Amazon EC2 status checks - This statement is incorrect. By default, Auto Scaling group created from Beanstalk uses Amazon EC2 status checks.
The Auto Scaling group in your Elastic Beanstalk environment uses the number of logged-in users, as the criteria to trigger auto-scaling action. These alarms must be configured based on the parameters appropriate for your application - The default scaling criteria has already been discussed above (and it is not the number of logged-in users).
Reference:
https://docs.aws.amazon.com/elasticbeanstalk/latest/dg/using-features.alarms.html
Explanation
Correct option:
The Auto Scaling group in your Elastic Beanstalk environment uses two default Amazon CloudWatch alarms to trigger scaling operations. These alarms must be configured based on the parameters appropriate for your application
The Auto Scaling group in your Elastic Beanstalk environment uses two Amazon CloudWatch alarms to trigger scaling operations. Default Auto Scaling triggers are configured to scale when the average outbound network traffic (NetworkOut) from each instance is higher than 6 MB or lower than 2 MB over a period of five minutes.
For more efficient Amazon EC2 Auto Scaling, configure triggers that are appropriate for your application, instance type, and service requirements. You can scale based on several statistics including latency, disk I/O, CPU utilization, and request count.
Incorrect options:
The IAM Role attached to the Auto Scaling group might not have enough permissions to scale instances on-demand - The Auto Scaling group will not be able to spin up Amazon EC2 instances if the IAM Role associated with Beanstalk does not have enough permissions. Since the current use-case talks about scaling not happening at the expected rate, this should not be the issue.
By default, Auto Scaling group created from Beanstalk uses Elastic Load Balancing health checks. Configure the Beanstalk to use Amazon EC2 status checks - This statement is incorrect. By default, Auto Scaling group created from Beanstalk uses Amazon EC2 status checks.
The Auto Scaling group in your Elastic Beanstalk environment uses the number of logged-in users, as the criteria to trigger auto-scaling action. These alarms must be configured based on the parameters appropriate for your application - The default scaling criteria has already been discussed above (and it is not the number of logged-in users).
Reference:
https://docs.aws.amazon.com/elasticbeanstalk/latest/dg/using-features.alarms.html
Question 13 Single Choice
A production-ready application has just been deployed to Amazon EC2 instance that uses MySQL RDS as the database. The team is looking at making the RDS deployment highly available and failure-proof.
As a SysOps Administrator, can you suggest an easy and effective way of configuring this requirement?
Explanation
Click "Show Answer" to see the explanation here
Correct option:
Configure the RDS to be a multi Availability Zone (AZ) deployment - Amazon RDS provides high availability and failover support for DB instances using Multi-AZ deployments.
In a Multi-AZ deployment, Amazon RDS automatically provisions and maintains a synchronous standby replica in a different Availability Zone. The primary DB instance is synchronously replicated across Availability Zones to a standby replica to provide data redundancy, eliminate I/O freezes, and minimize latency spikes during system backups. Running a DB instance with high availability can enhance availability during planned system maintenance, and help protect your databases against DB instance failure and Availability Zone disruption.
Using the RDS console, you can create a Multi-AZ deployment by simply specifying Multi-AZ when creating a DB instance. You can use the console to convert existing DB instances to Multi-AZ deployments by modifying the DB instance and specifying the Multi-AZ option. You can also specify a Multi-AZ deployment with the AWS CLI or Amazon RDS API. Use the create-db-instance or modify-db-instance CLI command, or the CreateDBInstance or ModifyDBInstance API operation.
Incorrect options:
Configure automated backups for the RDS instance, to retrieve data and instance status, if needed after a failure - The automated backup feature of Amazon RDS enables point-in-time recovery for your database instance. Amazon RDS will backup your database and transaction logs and store both for a user-specified retention period. Backups do not make the architecture highly available, a critical database should be deployed as a multi-AZ deployment, to cater to failures.
Scale up your DB instance when you are approaching storage capacity limits - This is vertical scaling and is not helpful when the requirement is high availability since there is still only one instance.
Configure your JVM with a TTL value of no more than 60 seconds, to help you re-establish the connection to your database, in case of failure - This change is part of high availability configuration and is needed when failover happens. But, multi -Z deployment is a pre-requisite for the DB architecture to be highly available.
Reference:
https://docs.aws.amazon.com/AmazonRDS/latest/UserGuide/Concepts.MultiAZ.html
Explanation
Correct option:
Configure the RDS to be a multi Availability Zone (AZ) deployment - Amazon RDS provides high availability and failover support for DB instances using Multi-AZ deployments.
In a Multi-AZ deployment, Amazon RDS automatically provisions and maintains a synchronous standby replica in a different Availability Zone. The primary DB instance is synchronously replicated across Availability Zones to a standby replica to provide data redundancy, eliminate I/O freezes, and minimize latency spikes during system backups. Running a DB instance with high availability can enhance availability during planned system maintenance, and help protect your databases against DB instance failure and Availability Zone disruption.
Using the RDS console, you can create a Multi-AZ deployment by simply specifying Multi-AZ when creating a DB instance. You can use the console to convert existing DB instances to Multi-AZ deployments by modifying the DB instance and specifying the Multi-AZ option. You can also specify a Multi-AZ deployment with the AWS CLI or Amazon RDS API. Use the create-db-instance or modify-db-instance CLI command, or the CreateDBInstance or ModifyDBInstance API operation.
Incorrect options:
Configure automated backups for the RDS instance, to retrieve data and instance status, if needed after a failure - The automated backup feature of Amazon RDS enables point-in-time recovery for your database instance. Amazon RDS will backup your database and transaction logs and store both for a user-specified retention period. Backups do not make the architecture highly available, a critical database should be deployed as a multi-AZ deployment, to cater to failures.
Scale up your DB instance when you are approaching storage capacity limits - This is vertical scaling and is not helpful when the requirement is high availability since there is still only one instance.
Configure your JVM with a TTL value of no more than 60 seconds, to help you re-establish the connection to your database, in case of failure - This change is part of high availability configuration and is needed when failover happens. But, multi -Z deployment is a pre-requisite for the DB architecture to be highly available.
Reference:
https://docs.aws.amazon.com/AmazonRDS/latest/UserGuide/Concepts.MultiAZ.html
Question 14 Single Choice
A developer has created rules for different events on Amazon EventBridge with AWS Lambda function as a target. The developer has also created an IAM Role with the necessary permissions and associated it with the rule. The rule however is failing, and on initial analysis, it is clear that the IAM Role associated with the rule is not being used when calling the Lambda function.
What could have gone wrong with the configuration and how can you fix the issue?
Explanation
Click "Show Answer" to see the explanation here
Correct option:
For Lambda functions configured as a target to EventBridge, you need to provide resource-based policy. IAM Roles will not work - IAM roles for rules are only used for events related to Kinesis Streams. For Lambda functions and Amazon SNS topics, you need to provide resource-based permissions.
When a rule is triggered in EventBridge, all the targets associated with the rule are invoked. Invocation means invoking the AWS Lambda functions, publishing to the Amazon SNS topics, and relaying the event to the Kinesis streams. In order to be able to make API calls against the resources you own, EventBridge needs the appropriate permissions. For Lambda, Amazon SNS, Amazon SQS, and Amazon CloudWatch Logs resources, EventBridge relies on resource-based policies. For Kinesis streams, EventBridge relies on IAM roles.
Incorrect options:
The IAM Role is wrongly configured. Delete the existing Role and recreate with necessary permissions and associate the newly created Role with the EventBridge rule - This option has been added as a distractor.
For Lambda, EventBridge relies on Access Control Lists (ACLs) to define permissions. IAM Roles will not work for Lambda when configured as a target for an EventBridge rule - Access Control Lists are not used with EventBridge and ACLs are defined at the account level and not at the individual user level.
AWS Command Line Interface (CLI) should not be used to add permissions to EventBridge targets - This statement is incorrect. AWS CLI can be used to add permissions to targets for EventBridge rules.
References:
https://docs.aws.amazon.com/eventbridge/latest/userguide/resource-based-policies-eventbridge.html
https://docs.aws.amazon.com/eventbridge/latest/userguide/eventbridge-troubleshooting.html
Explanation
Correct option:
For Lambda functions configured as a target to EventBridge, you need to provide resource-based policy. IAM Roles will not work - IAM roles for rules are only used for events related to Kinesis Streams. For Lambda functions and Amazon SNS topics, you need to provide resource-based permissions.
When a rule is triggered in EventBridge, all the targets associated with the rule are invoked. Invocation means invoking the AWS Lambda functions, publishing to the Amazon SNS topics, and relaying the event to the Kinesis streams. In order to be able to make API calls against the resources you own, EventBridge needs the appropriate permissions. For Lambda, Amazon SNS, Amazon SQS, and Amazon CloudWatch Logs resources, EventBridge relies on resource-based policies. For Kinesis streams, EventBridge relies on IAM roles.
Incorrect options:
The IAM Role is wrongly configured. Delete the existing Role and recreate with necessary permissions and associate the newly created Role with the EventBridge rule - This option has been added as a distractor.
For Lambda, EventBridge relies on Access Control Lists (ACLs) to define permissions. IAM Roles will not work for Lambda when configured as a target for an EventBridge rule - Access Control Lists are not used with EventBridge and ACLs are defined at the account level and not at the individual user level.
AWS Command Line Interface (CLI) should not be used to add permissions to EventBridge targets - This statement is incorrect. AWS CLI can be used to add permissions to targets for EventBridge rules.
References:
https://docs.aws.amazon.com/eventbridge/latest/userguide/resource-based-policies-eventbridge.html
https://docs.aws.amazon.com/eventbridge/latest/userguide/eventbridge-troubleshooting.html
Question 15 Single Choice
An organization has multiple AWS accounts to manage different lines of business. A user from the Finance account has to access reports stored in Amazon S3 buckets of two other AWS accounts (belonging to the HR and Audit departments) and copy these reports back to the S3 bucket in the Finance account. The user has requested the necessary permissions from the systems administrator to perform this task.
As a SysOps Administrator, how will you configure a solution for this requirement?
Explanation
Click "Show Answer" to see the explanation here
Correct option:
Create identity-based IAM policy in the Finance account that allows the user to make a request to the S3 buckets in the HR and Audit accounts. Also, create resource-based IAM policies in the HR, Audit accounts that will allow the requester from the Finance account to access the respective S3 buckets
Identity-based policies are attached to an IAM user, group, or role. These policies let you specify what that identity can do (its permissions).
Resource-based policies are attached to a resource. For example, you can attach resource-based policies to Amazon S3 buckets, Amazon SQS queues, and AWS Key Management Service encryption keys.
Identity-based policies and resource-based policies are both permissions policies and are evaluated together. For a request to which only permissions policies apply, AWS first checks all policies for a Deny. If one exists, then the request is denied. Then AWS checks for each Allow. If at least one policy statement allows the action in the request, the request is allowed. It doesn't matter whether the Allow is in the identity-based policy or the resource-based policy.
For requests made from one account to another, the requester in Account A must have an identity-based policy that allows them to make a request to the resource in Account B. Also, the resource-based policy in Account B must allow the requester in Account A to access the resource. There must be policies in both accounts that allow the operation, otherwise, the request fails.
Comparing IAM policies: 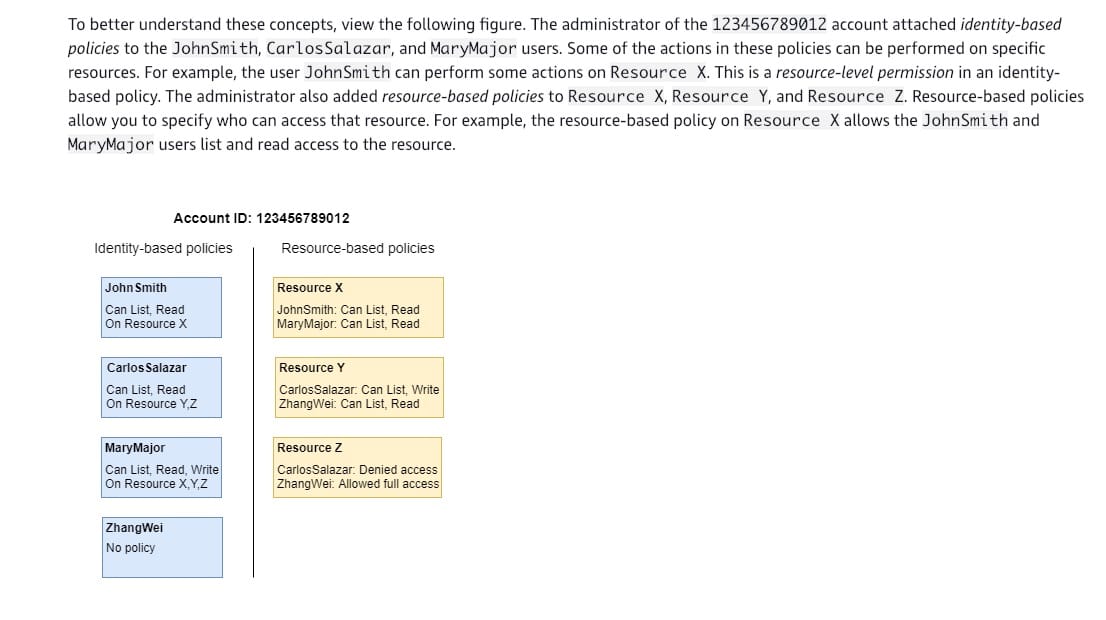 via - https://docs.aws.amazon.com/IAM/latest/UserGuide/access_policies_identity-vs-resource.html
Incorrect options:
Create resource-based policies in the HR, Audit accounts that will allow the requester from the Finance account to access the respective S3 buckets - Creating resource-based policy alone will be sufficient when the request is made within a single AWS account.
Create resource-level permissions in the HR, Audit accounts to allow access to respective S3 buckets for the user in the Finance account - Resource-based policies differ from resource-level permissions. You can attach resource-based policies directly to a resource, as described in this topic. Resource-level permissions refer to the ability to use ARNs to specify individual resources in a policy. Resource-based policies are supported only by some AWS services.
Create IAM roles in the HR, Audit accounts, which can be assumed by the user from the Finance account when the user needs to access the S3 buckets of the accounts - Cross-account access with a resource-based policy has some advantages over cross-account access with a role. With a resource that is accessed through a resource-based policy, the principal still works in the trusted account and does not have to give up his or her permissions to receive the role permissions. In other words, the principal continues to have access to resources in the trusted account at the same time as he or she has access to the resource in the trusting account. This is useful for tasks such as copying information to or from the shared resource in the other account.
We chose resource-based policy, so the user from the Finance account will continue to have access to resources in his own account while also getting permissions on resources from other accounts.
References:
https://docs.aws.amazon.com/IAM/latest/UserGuide/access_policies_identity-vs-resource.html
https://docs.aws.amazon.com/IAM/latest/UserGuide/id_roles_compare-resource-policies.html
Explanation
Correct option:
Create identity-based IAM policy in the Finance account that allows the user to make a request to the S3 buckets in the HR and Audit accounts. Also, create resource-based IAM policies in the HR, Audit accounts that will allow the requester from the Finance account to access the respective S3 buckets
Identity-based policies are attached to an IAM user, group, or role. These policies let you specify what that identity can do (its permissions).
Resource-based policies are attached to a resource. For example, you can attach resource-based policies to Amazon S3 buckets, Amazon SQS queues, and AWS Key Management Service encryption keys.
Identity-based policies and resource-based policies are both permissions policies and are evaluated together. For a request to which only permissions policies apply, AWS first checks all policies for a Deny. If one exists, then the request is denied. Then AWS checks for each Allow. If at least one policy statement allows the action in the request, the request is allowed. It doesn't matter whether the Allow is in the identity-based policy or the resource-based policy.
For requests made from one account to another, the requester in Account A must have an identity-based policy that allows them to make a request to the resource in Account B. Also, the resource-based policy in Account B must allow the requester in Account A to access the resource. There must be policies in both accounts that allow the operation, otherwise, the request fails.
Comparing IAM policies: via - https://docs.aws.amazon.com/IAM/latest/UserGuide/access_policies_identity-vs-resource.html
Incorrect options:
Create resource-based policies in the HR, Audit accounts that will allow the requester from the Finance account to access the respective S3 buckets - Creating resource-based policy alone will be sufficient when the request is made within a single AWS account.
Create resource-level permissions in the HR, Audit accounts to allow access to respective S3 buckets for the user in the Finance account - Resource-based policies differ from resource-level permissions. You can attach resource-based policies directly to a resource, as described in this topic. Resource-level permissions refer to the ability to use ARNs to specify individual resources in a policy. Resource-based policies are supported only by some AWS services.
Create IAM roles in the HR, Audit accounts, which can be assumed by the user from the Finance account when the user needs to access the S3 buckets of the accounts - Cross-account access with a resource-based policy has some advantages over cross-account access with a role. With a resource that is accessed through a resource-based policy, the principal still works in the trusted account and does not have to give up his or her permissions to receive the role permissions. In other words, the principal continues to have access to resources in the trusted account at the same time as he or she has access to the resource in the trusting account. This is useful for tasks such as copying information to or from the shared resource in the other account.
We chose resource-based policy, so the user from the Finance account will continue to have access to resources in his own account while also getting permissions on resources from other accounts.
References:
https://docs.aws.amazon.com/IAM/latest/UserGuide/access_policies_identity-vs-resource.html
https://docs.aws.amazon.com/IAM/latest/UserGuide/id_roles_compare-resource-policies.html
Question 16 Single Choice
A systems administrator is configuring Amazon EC2 status check alarm to publish a notification to an SNS topic when the instance fails either the instance check or system status check.
Which CloudWatch metric is the right choice for this configuration?
Explanation
Click "Show Answer" to see the explanation here
Correct option:
StatusCheckFailed - The AWS/EC2 namespace includes a few status check metrics. By default, status check metrics are available at a 1-minute frequency at no charge. For a newly-launched instance, status check metric data is only available after the instance has completed the initialization state (within a few minutes of the instance entering the running state).
StatusCheckFailed - Reports whether the instance has passed both the instance status check and the system status check in the last minute. This metric can be either 0 (passed) or 1 (failed). By default, this metric is available at a 1-minute frequency at no charge.
List of EC2 status check metrics: 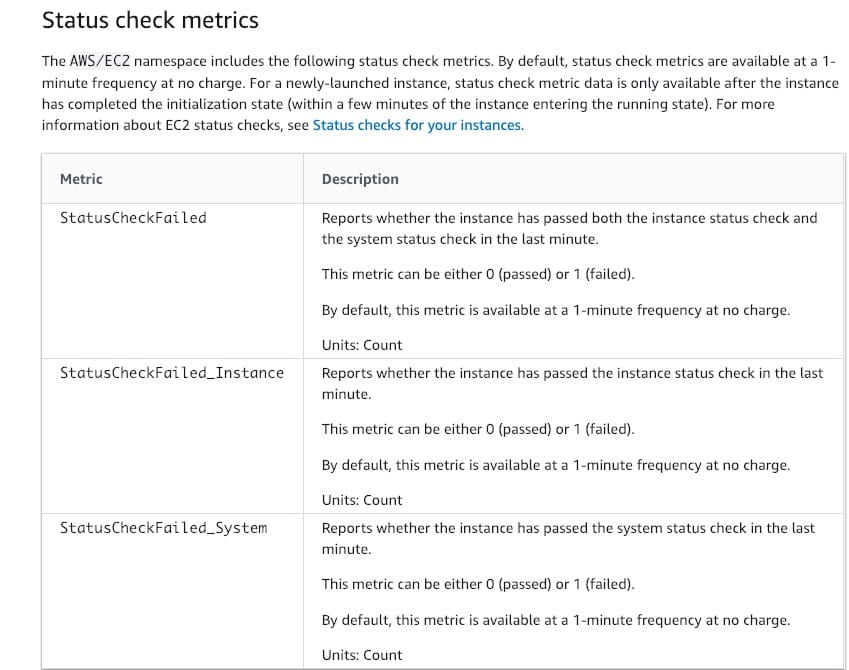 via - https://docs.aws.amazon.com/AWSEC2/latest/UserGuide/viewing_metrics_with_cloudwatch.html#status-check-metrics
Incorrect options:
CombinedStatusCheckFailed - This is a made-up option, given only as a distractor.
`StatusCheckFailed_Instance - Reports whether the instance has passed the instance status check in the last minute. This metric can be either 0 (passed) or 1 (failed).
StatusCheckFailed_System - Reports whether the instance has passed the system status check in the last minute. This metric can be either 0 (passed) or 1 (failed).
Reference:
Explanation
Correct option:
StatusCheckFailed - The AWS/EC2 namespace includes a few status check metrics. By default, status check metrics are available at a 1-minute frequency at no charge. For a newly-launched instance, status check metric data is only available after the instance has completed the initialization state (within a few minutes of the instance entering the running state).
StatusCheckFailed - Reports whether the instance has passed both the instance status check and the system status check in the last minute. This metric can be either 0 (passed) or 1 (failed). By default, this metric is available at a 1-minute frequency at no charge.
List of EC2 status check metrics: via - https://docs.aws.amazon.com/AWSEC2/latest/UserGuide/viewing_metrics_with_cloudwatch.html#status-check-metrics
Incorrect options:
CombinedStatusCheckFailed - This is a made-up option, given only as a distractor.
`StatusCheckFailed_Instance - Reports whether the instance has passed the instance status check in the last minute. This metric can be either 0 (passed) or 1 (failed).
StatusCheckFailed_System - Reports whether the instance has passed the system status check in the last minute. This metric can be either 0 (passed) or 1 (failed).
Reference:
Question 17 Single Choice
An IT company runs its server infrastructure on Amazon EC2 instances configured in an Auto Scaling Group (ASG) fronted by an Elastic Load Balancer (ELB). For ease of deployment and flexibility in scaling, this AWS architecture is maintained via an Elastic Beanstalk environment. The Technology Lead of a project has requested to automate the replacement of unhealthy Amazon EC2 instances in the Elastic Beanstalk environment.
How will you configure a solution for this requirement?
Explanation
Click "Show Answer" to see the explanation here
Correct option:
To automate the replacement of unhealthy EC2 instances, you must change the health check type of your instance's Auto Scaling group from EC2 to ELB by using a configuration file of your Beanstalk environment
By default, the health check configuration of your Auto Scaling group is set as an EC2 type that performs a status check of EC2 instances. To automate the replacement of unhealthy EC2 instances, you must change the health check type of your instance's Auto Scaling group from EC2 to ELB by using a configuration file.
The following are some important points to remember:
Status checks cover only an EC2 instance's health, and not the health of your application, server, or any Docker containers running on the instance.
If your application crashes, the load balancer removes the unhealthy instances from its target. However, your Auto Scaling group doesn't automatically replace the unhealthy instances marked by the load balancer.
By changing the health check type of your Auto Scaling group from EC2 to ELB, you enable the Auto Scaling group to automatically replace the unhealthy instances when the health check fails.
Complete list of steps to configure the above: 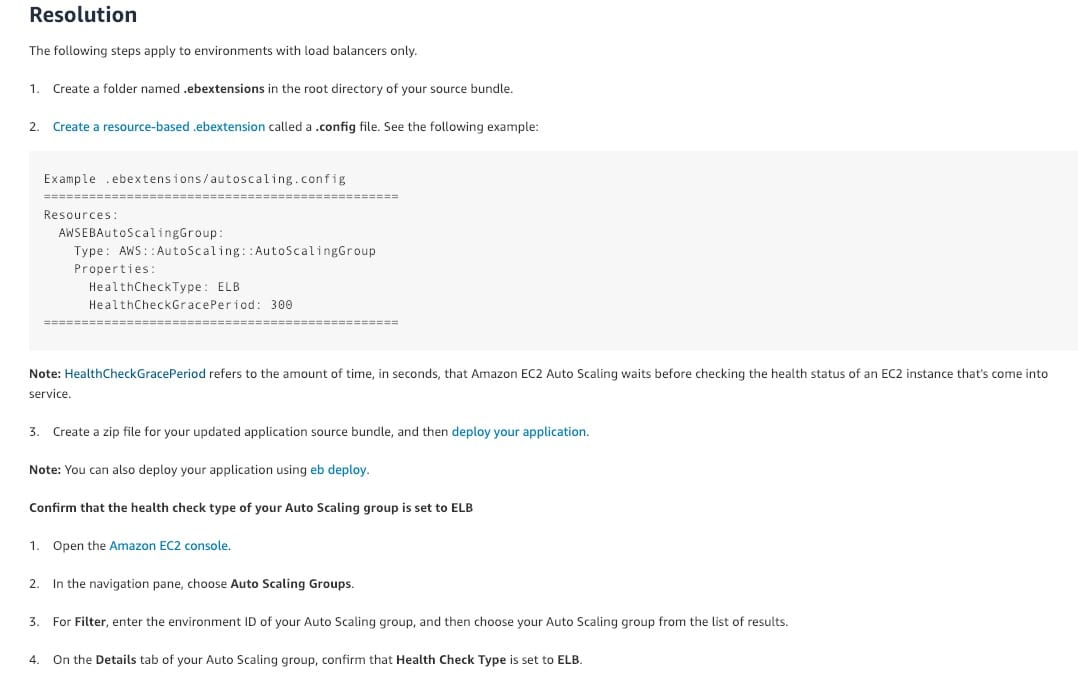 via - https://aws.amazon.com/premiumsupport/knowledge-center/elastic-beanstalk-instance-automation/
Incorrect options:
To automate the replacement of unhealthy EC2 instances, you must change the health check type of your instance's Auto Scaling group from ELB to EC2 by using a configuration file of your Beanstalk environment - As mentioned earlier, the health check type of your instance's Auto Scaling group should be changed from EC2 to ELB.
Modify the Auto Scaling Group from Amazon EC2 console directly to change the health check type to ELB
Modify the Auto Scaling Group from Amazon EC2 console directly to change the health check type to EC2
You should configure your Amazon EC2 instances in an Elastic Beanstalk environment by using Elastic Beanstalk configuration files (.ebextensions). Configuration changes made to your Elastic Beanstalk environment won't persist if you use the following configuration methods:
Configuring an Elastic Beanstalk resource directly from the console of a specific AWS service.
Installing a package, creating a file, or running a command directly from your Amazon EC2 instance.
Both these options contradict the above explanation and therefore these two options are incorrect.
Reference:
https://aws.amazon.com/premiumsupport/knowledge-center/elastic-beanstalk-configuration-files/
Explanation
Correct option:
To automate the replacement of unhealthy EC2 instances, you must change the health check type of your instance's Auto Scaling group from EC2 to ELB by using a configuration file of your Beanstalk environment
By default, the health check configuration of your Auto Scaling group is set as an EC2 type that performs a status check of EC2 instances. To automate the replacement of unhealthy EC2 instances, you must change the health check type of your instance's Auto Scaling group from EC2 to ELB by using a configuration file.
The following are some important points to remember:
Status checks cover only an EC2 instance's health, and not the health of your application, server, or any Docker containers running on the instance.
If your application crashes, the load balancer removes the unhealthy instances from its target. However, your Auto Scaling group doesn't automatically replace the unhealthy instances marked by the load balancer.
By changing the health check type of your Auto Scaling group from EC2 to ELB, you enable the Auto Scaling group to automatically replace the unhealthy instances when the health check fails.
Complete list of steps to configure the above: via - https://aws.amazon.com/premiumsupport/knowledge-center/elastic-beanstalk-instance-automation/
Incorrect options:
To automate the replacement of unhealthy EC2 instances, you must change the health check type of your instance's Auto Scaling group from ELB to EC2 by using a configuration file of your Beanstalk environment - As mentioned earlier, the health check type of your instance's Auto Scaling group should be changed from EC2 to ELB.
Modify the Auto Scaling Group from Amazon EC2 console directly to change the health check type to ELB
Modify the Auto Scaling Group from Amazon EC2 console directly to change the health check type to EC2
You should configure your Amazon EC2 instances in an Elastic Beanstalk environment by using Elastic Beanstalk configuration files (.ebextensions). Configuration changes made to your Elastic Beanstalk environment won't persist if you use the following configuration methods:
Configuring an Elastic Beanstalk resource directly from the console of a specific AWS service.
Installing a package, creating a file, or running a command directly from your Amazon EC2 instance.
Both these options contradict the above explanation and therefore these two options are incorrect.
Reference:
https://aws.amazon.com/premiumsupport/knowledge-center/elastic-beanstalk-configuration-files/
Question 18 Single Choice
The technology team at a retail company has set the DisableApiTermination attribute for a business-critical Amazon EC2 Windows instance to prevent termination of the instance via an API. This instance is behind an Auto Scaling Group (ASG) and the InstanceInitiatedShutdownBehavior attribute is set for the instance. A developer has initiated shutdown from the instance using operating system commands.
What will be the outcome of the above scenario?
Explanation
Click "Show Answer" to see the explanation here
Correct option:
The instance will be terminated - By default, you can terminate your instance using the Amazon EC2 console, command line interface, or API. To prevent your instance from being accidentally terminated using Amazon EC2, you can enable termination protection for the instance. The DisableApiTermination attribute controls whether the instance can be terminated using the console, CLI, or API. By default, termination protection is disabled for your instance. You can set the value of this attribute when you launch the instance, while the instance is running, or while the instance is stopped (for Amazon EBS-backed instances).
The DisableApiTermination attribute does not prevent you from terminating an instance by initiating shutdown from the instance (using an operating system command for system shutdown) when the InstanceInitiatedShutdownBehavior attribute is set.
Incorrect options:
The instance will not shutdown because DisableApiTermination attribute is set - As discussed above, this flag is only for controlling instance termination from console, command line interface, or API. If does not protect from shutdown commands issued from the operating system of the instance if the InstanceInitiatedShutdownBehavior attribute is set.
The operating system of the instance will send an Amazon SNS notification to the concerned person, that was configured when DisableApiTermination attribute was set. The operating system will hold the shutdown for few configured minutes and then progress with instance shutdown - This is a made-up option and given only as a distractor.
ASG cannot terminate an instance whose DisableApiTermination attribute is set - This statement is false. The DisableApiTermination attribute does not prevent Amazon EC2 Auto Scaling from terminating an instance.
Reference:
Explanation
Correct option:
The instance will be terminated - By default, you can terminate your instance using the Amazon EC2 console, command line interface, or API. To prevent your instance from being accidentally terminated using Amazon EC2, you can enable termination protection for the instance. The DisableApiTermination attribute controls whether the instance can be terminated using the console, CLI, or API. By default, termination protection is disabled for your instance. You can set the value of this attribute when you launch the instance, while the instance is running, or while the instance is stopped (for Amazon EBS-backed instances).
The DisableApiTermination attribute does not prevent you from terminating an instance by initiating shutdown from the instance (using an operating system command for system shutdown) when the InstanceInitiatedShutdownBehavior attribute is set.
Incorrect options:
The instance will not shutdown because DisableApiTermination attribute is set - As discussed above, this flag is only for controlling instance termination from console, command line interface, or API. If does not protect from shutdown commands issued from the operating system of the instance if the InstanceInitiatedShutdownBehavior attribute is set.
The operating system of the instance will send an Amazon SNS notification to the concerned person, that was configured when DisableApiTermination attribute was set. The operating system will hold the shutdown for few configured minutes and then progress with instance shutdown - This is a made-up option and given only as a distractor.
ASG cannot terminate an instance whose DisableApiTermination attribute is set - This statement is false. The DisableApiTermination attribute does not prevent Amazon EC2 Auto Scaling from terminating an instance.
Reference:
Question 19 Single Choice
Your company has decided that certain users should have Multi-Factor Authentication (MFA) enabled for their sign-in credentials. A newly hired manager has a Gemalto MFA device that he used in his earlier company. He has approached you to configure it for his AWS account.
How will you configure his existing Gemalto MFA device so he can seamlessly connect with AWS services in the new company?
Explanation
Click "Show Answer" to see the explanation here
Correct option:
AWS MFA does not support the use of your existing Gemalto device - AWS MFA relies on knowing a unique secret associated with your hardware MFA (Gemalto) device in order to support its use. Because of security constraints that mandate such secrets never be shared between multiple parties, AWS MFA cannot support the use of your existing Gemalto device. Only a compatible hardware MFA device purchased from Gemalto can be used with AWS MFA. You can re-use an existing U2F security key with AWS MFA, as U2F security keys do not share any secrets between multiple parties.
Incorrect options:
You can re-use an existing Gemalto device with AWS MFA, as Gemalto devices do not share any secrets between multiple parties - As discussed above, you cannot re-use an existing Gemalto device with AWS MFA because secrets cannot be shared with multiple parties.
AWS MFA relies on knowing a unique secret associated with your hardware MFA. This has to be generated again with AWS MFA for the Gemalto device to work with AWS - As discussed above, an existing Gemalto device cannot be used with AWS MFA.
Security constraints mandate that sharing of secrets between multiple parties can only happen in edge cases. Hence, formal approval is needed between AWS and the previous company to use the same Gemalto device - This is a made-up option, given only as a distractor.
Reference:
Explanation
Correct option:
AWS MFA does not support the use of your existing Gemalto device - AWS MFA relies on knowing a unique secret associated with your hardware MFA (Gemalto) device in order to support its use. Because of security constraints that mandate such secrets never be shared between multiple parties, AWS MFA cannot support the use of your existing Gemalto device. Only a compatible hardware MFA device purchased from Gemalto can be used with AWS MFA. You can re-use an existing U2F security key with AWS MFA, as U2F security keys do not share any secrets between multiple parties.
Incorrect options:
You can re-use an existing Gemalto device with AWS MFA, as Gemalto devices do not share any secrets between multiple parties - As discussed above, you cannot re-use an existing Gemalto device with AWS MFA because secrets cannot be shared with multiple parties.
AWS MFA relies on knowing a unique secret associated with your hardware MFA. This has to be generated again with AWS MFA for the Gemalto device to work with AWS - As discussed above, an existing Gemalto device cannot be used with AWS MFA.
Security constraints mandate that sharing of secrets between multiple parties can only happen in edge cases. Hence, formal approval is needed between AWS and the previous company to use the same Gemalto device - This is a made-up option, given only as a distractor.
Reference:
Question 20 Single Choice
A retail company has built its server infrastructure on Amazon EC2 instances that run on Windows OS. The development team has defined a few custom metrics that need to be collected by the unified CloudWatch agent.
As a SysOps Administrator, can you identify the correct configuration to be used for this scenario?
Explanation
Click "Show Answer" to see the explanation here
Correct option:
Configure the CloudWatch agent with StatsD protocol to collect the necessary system metrics - You can retrieve custom metrics from your applications or services using the StatsD and collectd protocols. StatsD is supported on both Linux servers and servers running Windows Server. collectd is supported only on Linux servers. Here, the instances are running on Windows servers, hence StatsD is the right protocol.
More information on Collecting Metrics and Logs from Amazon EC2 Instances: 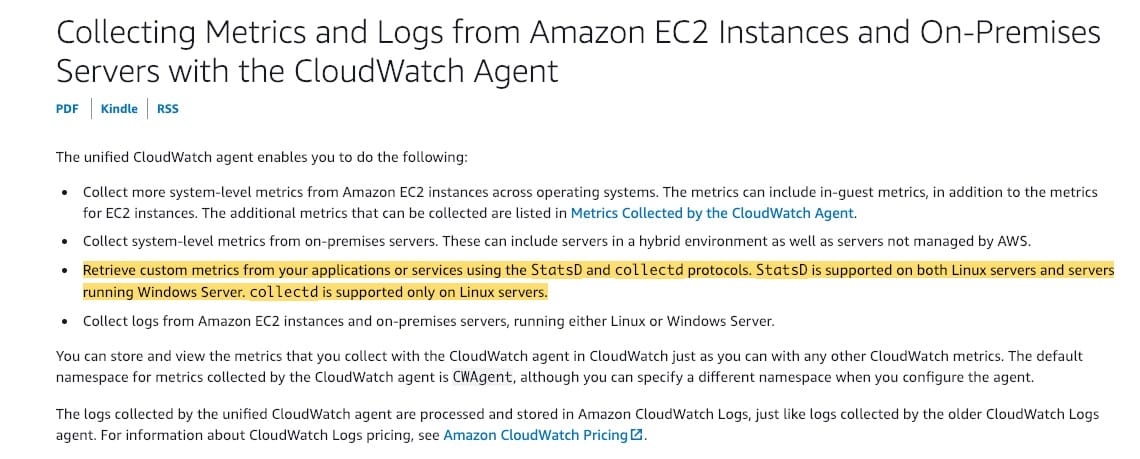 via - https://docs.aws.amazon.com/AmazonCloudWatch/latest/monitoring/Install-CloudWatch-Agent.html
Incorrect options:
Configure the CloudWatch agent with collectd protocol to collect the necessary system metrics - collectd is supported only on Linux servers and hence it is not the correct choice here.
CloudWatch agent can be configured with either StatsD protocol or collectd protocol to collect the necessary system metrics on windows servers - StatsD is supported on both Linux servers and servers running Windows Server. collectd is supported only on Linux servers.
Unified CloudWatch agent cannot be custom configured - This is an incorrect statement and used only as a distractor.
Reference:
https://docs.aws.amazon.com/AmazonCloudWatch/latest/monitoring/Install-CloudWatch-Agent.html
Explanation
Correct option:
Configure the CloudWatch agent with StatsD protocol to collect the necessary system metrics - You can retrieve custom metrics from your applications or services using the StatsD and collectd protocols. StatsD is supported on both Linux servers and servers running Windows Server. collectd is supported only on Linux servers. Here, the instances are running on Windows servers, hence StatsD is the right protocol.
More information on Collecting Metrics and Logs from Amazon EC2 Instances: via - https://docs.aws.amazon.com/AmazonCloudWatch/latest/monitoring/Install-CloudWatch-Agent.html
Incorrect options:
Configure the CloudWatch agent with collectd protocol to collect the necessary system metrics - collectd is supported only on Linux servers and hence it is not the correct choice here.
CloudWatch agent can be configured with either StatsD protocol or collectd protocol to collect the necessary system metrics on windows servers - StatsD is supported on both Linux servers and servers running Windows Server. collectd is supported only on Linux servers.
Unified CloudWatch agent cannot be custom configured - This is an incorrect statement and used only as a distractor.
Reference:
https://docs.aws.amazon.com/AmazonCloudWatch/latest/monitoring/Install-CloudWatch-Agent.html