
Microsoft Certified: Power Platform Functional Consultant Associate - (PL-200) Exam Questions
Total Questions
Last Updated
1st Try Guaranteed

Experts Verified
Question 1 Single Choice
While the existing DLP model does support custom connectors, by default, they don't show up in the DLP policy editor inside the Power Platform Admin Centre. The default behaviour for custom connectors is that they're managed as part of the default data group that you specify. However, the custom connectors won't appear within the user interface in the Power Automate Admin Centre.
Additional actions must be taken by an administrator to have custom connectors show up in DLP policies.
Which of the following must be used?
Explanation

Click "Show Answer" to see the explanation here
While the existing DLP model does support custom connectors, by default, they don't show up in the DLP policy editor inside the Power Platform Admin Centre. The default behaviour for custom connectors is that they're managed as part of the default data group that you specify. However, the custom connectors won't appear within the user interface in the Power Automate Admin Centre.
Additional actions must be taken by an administrator to have custom connectors show up in DLP policies that include either of the following tables:
Power Platform Management connector
Power Apps and Power Automate PowerShell cmdlets
Using PowerShell to add custom connectors to a DLP policy is the simplest way to manage custom connectors.
Explanation
While the existing DLP model does support custom connectors, by default, they don't show up in the DLP policy editor inside the Power Platform Admin Centre. The default behaviour for custom connectors is that they're managed as part of the default data group that you specify. However, the custom connectors won't appear within the user interface in the Power Automate Admin Centre.
Additional actions must be taken by an administrator to have custom connectors show up in DLP policies that include either of the following tables:
Power Platform Management connector
Power Apps and Power Automate PowerShell cmdlets
Using PowerShell to add custom connectors to a DLP policy is the simplest way to manage custom connectors.
Question 2 Single Choice
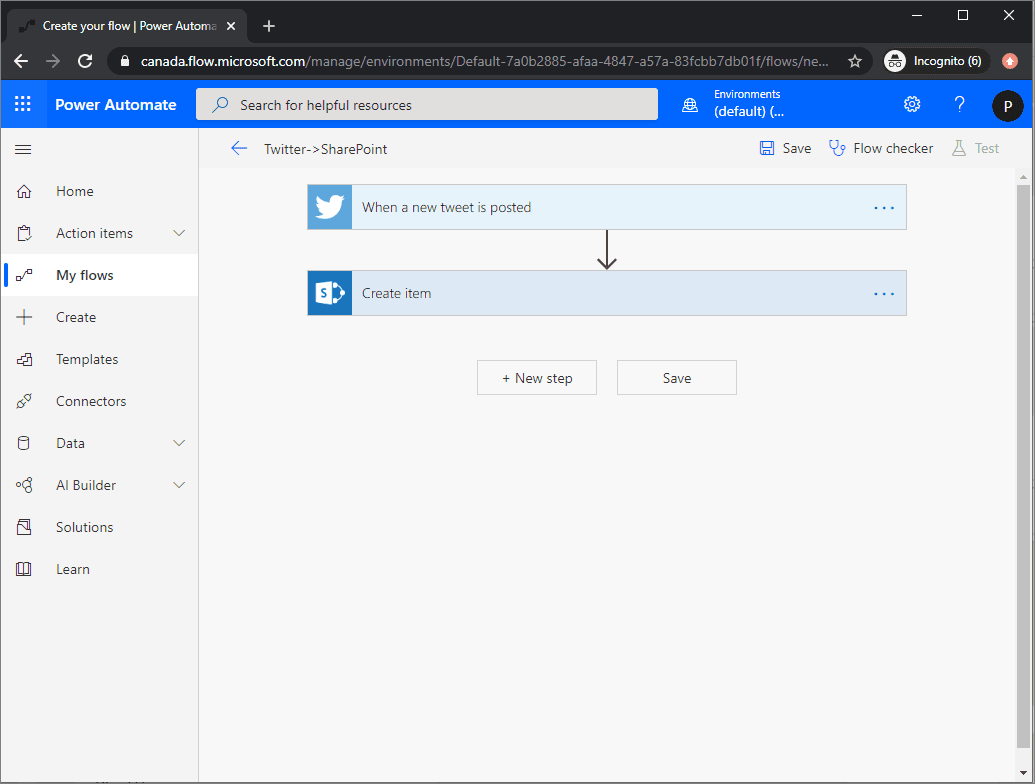
Consider: SharePoint and Twitter connectors used within the same flow.
The concern that an administrator might have is that sensitive data could leak from SharePoint to Twitter. This type of scenario might pose concerns for administrators, as would an alternative scenario where data flowed the opposite way, from Twitter to SharePoint. The likelihood of that scenario occurring is low because it involves bringing a public dataset into the enterprise.
Currently, DLP policies do not have a notion of directionality. The first step in accomplishing directional data governance is to create a DLP policy.
Where would you create this policy from?
Explanation
Click "Show Answer" to see the explanation here
SharePoint and Twitter connectors used within the same flow
The concern that an administrator might have is that sensitive data could leak from SharePoint to Twitter. This type of scenario might pose concerns for administrators, as would an alternative scenario where data flowed the opposite way, from Twitter to SharePoint. The likelihood of that scenario occurring is low because it involves bringing a public dataset into the enterprise.
Currently, DLP policies do not have a notion of directionality; however, you can implement directionality by using Power Platform Management connectors.
The first step in accomplishing directional data governance is to create a DLP policy, from the Power Automate Admin Centre, that includes the SharePoint and Twitter connectors in the Business data group. By using this configuration, you are allowing makers to build flows that include both of these connectors.

Next, you will transition to the Power Automate Maker Portal and sign in by using your administrator account so you can build your governance flow. Your goal is to build a scheduled flow that will run every hour.
A Recurrence trigger will automatically be added to your flow. You will now add an Initialize variable action to your flow. Name this variable previousTimestamp and then include an expression of ticks(addMinutes(utcNow(),-60)). This expression will calculate the number of ticks as of 60 minutes ago. The reason for including this expression is that you want to see if any flows have been created or modified since the last time your flow ran, which would have been 60 minutes ago.
Add another variable called isFlowAction that is of type Boolean and has a default value of false. You will use this variable later in your flow when you detect that a flow includes a Twitter action.
Next, use the PowerPlatform for Admins connector and the List Environments as Admin action that will provide your flow with a complete list of environments in your tenant. Then, subsequently, loop through each environment so that you can look for flows that include Twitter actions.
After listing all environments, you will add the Flow management connector and use the List Flows as Admin action that will provide a listing of all flows for a given environment.
The List Flows as Admin action requires the name of an environment as an input parameter. Use the Name column that is returned from your List Environments as Admin call. When you provide this input, an Apply to each action will automatically be added that will allow you to iterate through all environments.
Because you are only interested in exploring recently modified flows, you will add a condition to your flow and will compare the ticks of the flow's last modified timestamp to that of the variable that you established earlier in your flow. To accomplish this task, use an expression to calculate the ticks of your last modified timestamp. The complete statement is ticks(items('Apply_to_each_2')?['properties']?['lastModifiedTime']) is greater than previousTimestamp.
When you detect that a flow has been modified within the past 60 minutes, you will want to ensure that it doesn't belong to your administrator. This verification will help avoid an error when you try to add the administrator as co-owner of a flow in a future step. To detect if the current flow belongs to your administrator, use the Office 365 Users connector and the Get my profile (v2) action. This step will return information about the user who established a connection to the connector, which in this case is the administrator. Next, add the Office 365 Users action to the If yes branch.
Now, you will add another condition that will verify if the Creator object ID (from the List Flows as Admin action) is not equal to ID (from the Get my profile (V2) action). In the If yes branch, add the Edit Flow Owner Role as Admin action that belongs to the Microsoft Flow for Admins connector. This action will add your administrator user as a co-owner of the flow and will help extract the flow definition, which requires you to be a co-owner of the flow. You will retrieve the flow definition in an upcoming step, but for now, provide the current Environment Name, current Flow Name, and details about your administrator user such as email address, display name, and ID. These values are accessible from your Get my profile (V2) action.
After you have added your administrator account as a co-owner of the flow, you can call the Get Flow as Admin action from the Flow management connector.
The inputs to the Get Flow as Admin action includes the current Environment Name and Flow Name. The output of this action includes the flow definition that will allow you to determine if a Twitter action exists.
To check whether a Twitter action is being used, add a condition to your flow and verify if the Action Api name (from the Get Flow as Admin action) is equal to shared_twitter. After you have added this condition, an Apply to each loop will be applied because the Action Api name attribute is part of an array because each flow can have many actions.
Within the If yes branch, update your isFlowAction variable to be set to true because you have now found a flow that includes a Twitter action. You will use this variable later in your flow to determine whether you need to disable a flow and send an email to the flow owner.
Outside the Apply to each variable that allows you to iterate through all actions in your flow, add another condition. This condition will verify if the value of your isFlowAction variable is true.
In the If yes branch, add the Microsoft Flow for Admins connector and then select the Disable Flow as Admin action. This action will allow you to disable the flow so that information cannot be sent to Twitter. To call this action, include the current Environment Name and Flow Name.
When disabling someone's flow, you will want to send an email to them so they are aware that their flow is no longer running. To get the flow owner's email address, use the Office 365 Users connector and use the Get user profile (V2) action to return the owner's email address. To get their email address, you will need to add the Creator object ID, which can be retrieved from the List Flows as Admin action.
Send an email to the flow owner by using the Office 365 Outlook connector and the Send an email (V2) action. Use the information that is returned from the Get user profile (V2) action to send this email, including the Mail and Given Name attributes. In addition, you can include the name of the flow by adding the Flow Display Name attribute found in the List Flows as Admin output.
Because you are looping through all flows in your tenant, you will need to set your isFlowAction variable back to false so that you can look for other flows that might have a Twitter action. You can now save your administrative flow.
To test your flow, sign in to the Power Automate maker portal by using a different account. Now, you will create a simple flow that includes a SharePoint trigger and a Twitter action. This scenario will not be blocked by your DLP policy, but it should be detected by the administrative flow that you created.
Now, you can run your Detect Twitter Actions flow that you previously created as an administrator. When this flow runs, it should detect that a flow was recently modified and that it includes a Twitter action. As a result, an email will be sent to the flow owner.
If you examine the SharePoint to Twitter flow, you will discover that it has been disabled as a result of your administrator disabling the flow.
However, retrieving information from Twitter and sending it to SharePoint does not violate your governance rules. As a result, you can create another flow by using your flow maker's account, which includes a Twitter trigger and a SharePoint action. When you run your Detect Twitter Actions governance flow, it remains functional and is not disabled because this is a permitted use case.
Explanation
SharePoint and Twitter connectors used within the same flow
The concern that an administrator might have is that sensitive data could leak from SharePoint to Twitter. This type of scenario might pose concerns for administrators, as would an alternative scenario where data flowed the opposite way, from Twitter to SharePoint. The likelihood of that scenario occurring is low because it involves bringing a public dataset into the enterprise.
Currently, DLP policies do not have a notion of directionality; however, you can implement directionality by using Power Platform Management connectors.
The first step in accomplishing directional data governance is to create a DLP policy, from the Power Automate Admin Centre, that includes the SharePoint and Twitter connectors in the Business data group. By using this configuration, you are allowing makers to build flows that include both of these connectors.
Next, you will transition to the Power Automate Maker Portal and sign in by using your administrator account so you can build your governance flow. Your goal is to build a scheduled flow that will run every hour.
A Recurrence trigger will automatically be added to your flow. You will now add an Initialize variable action to your flow. Name this variable previousTimestamp and then include an expression of ticks(addMinutes(utcNow(),-60)). This expression will calculate the number of ticks as of 60 minutes ago. The reason for including this expression is that you want to see if any flows have been created or modified since the last time your flow ran, which would have been 60 minutes ago.
Add another variable called isFlowAction that is of type Boolean and has a default value of false. You will use this variable later in your flow when you detect that a flow includes a Twitter action.
Next, use the PowerPlatform for Admins connector and the List Environments as Admin action that will provide your flow with a complete list of environments in your tenant. Then, subsequently, loop through each environment so that you can look for flows that include Twitter actions.
After listing all environments, you will add the Flow management connector and use the List Flows as Admin action that will provide a listing of all flows for a given environment.
The List Flows as Admin action requires the name of an environment as an input parameter. Use the Name column that is returned from your List Environments as Admin call. When you provide this input, an Apply to each action will automatically be added that will allow you to iterate through all environments.
Because you are only interested in exploring recently modified flows, you will add a condition to your flow and will compare the ticks of the flow's last modified timestamp to that of the variable that you established earlier in your flow. To accomplish this task, use an expression to calculate the ticks of your last modified timestamp. The complete statement is ticks(items('Apply_to_each_2')?['properties']?['lastModifiedTime']) is greater than previousTimestamp.
When you detect that a flow has been modified within the past 60 minutes, you will want to ensure that it doesn't belong to your administrator. This verification will help avoid an error when you try to add the administrator as co-owner of a flow in a future step. To detect if the current flow belongs to your administrator, use the Office 365 Users connector and the Get my profile (v2) action. This step will return information about the user who established a connection to the connector, which in this case is the administrator. Next, add the Office 365 Users action to the If yes branch.
Now, you will add another condition that will verify if the Creator object ID (from the List Flows as Admin action) is not equal to ID (from the Get my profile (V2) action). In the If yes branch, add the Edit Flow Owner Role as Admin action that belongs to the Microsoft Flow for Admins connector. This action will add your administrator user as a co-owner of the flow and will help extract the flow definition, which requires you to be a co-owner of the flow. You will retrieve the flow definition in an upcoming step, but for now, provide the current Environment Name, current Flow Name, and details about your administrator user such as email address, display name, and ID. These values are accessible from your Get my profile (V2) action.
After you have added your administrator account as a co-owner of the flow, you can call the Get Flow as Admin action from the Flow management connector.
The inputs to the Get Flow as Admin action includes the current Environment Name and Flow Name. The output of this action includes the flow definition that will allow you to determine if a Twitter action exists.
To check whether a Twitter action is being used, add a condition to your flow and verify if the Action Api name (from the Get Flow as Admin action) is equal to shared_twitter. After you have added this condition, an Apply to each loop will be applied because the Action Api name attribute is part of an array because each flow can have many actions.
Within the If yes branch, update your isFlowAction variable to be set to true because you have now found a flow that includes a Twitter action. You will use this variable later in your flow to determine whether you need to disable a flow and send an email to the flow owner.
Outside the Apply to each variable that allows you to iterate through all actions in your flow, add another condition. This condition will verify if the value of your isFlowAction variable is true.
In the If yes branch, add the Microsoft Flow for Admins connector and then select the Disable Flow as Admin action. This action will allow you to disable the flow so that information cannot be sent to Twitter. To call this action, include the current Environment Name and Flow Name.
When disabling someone's flow, you will want to send an email to them so they are aware that their flow is no longer running. To get the flow owner's email address, use the Office 365 Users connector and use the Get user profile (V2) action to return the owner's email address. To get their email address, you will need to add the Creator object ID, which can be retrieved from the List Flows as Admin action.
Send an email to the flow owner by using the Office 365 Outlook connector and the Send an email (V2) action. Use the information that is returned from the Get user profile (V2) action to send this email, including the Mail and Given Name attributes. In addition, you can include the name of the flow by adding the Flow Display Name attribute found in the List Flows as Admin output.
Because you are looping through all flows in your tenant, you will need to set your isFlowAction variable back to false so that you can look for other flows that might have a Twitter action. You can now save your administrative flow.
To test your flow, sign in to the Power Automate maker portal by using a different account. Now, you will create a simple flow that includes a SharePoint trigger and a Twitter action. This scenario will not be blocked by your DLP policy, but it should be detected by the administrative flow that you created.
Now, you can run your Detect Twitter Actions flow that you previously created as an administrator. When this flow runs, it should detect that a flow was recently modified and that it includes a Twitter action. As a result, an email will be sent to the flow owner.
If you examine the SharePoint to Twitter flow, you will discover that it has been disabled as a result of your administrator disabling the flow.
However, retrieving information from Twitter and sending it to SharePoint does not violate your governance rules. As a result, you can create another flow by using your flow maker's account, which includes a Twitter trigger and a SharePoint action. When you run your Detect Twitter Actions governance flow, it remains functional and is not disabled because this is a permitted use case.
Question 3 Single Choice
In the context of cloud-based automation platforms (like Microsoft Power Automate, Azure Logic Apps, or other integration services), how are HTTP triggers and actions managed?
Explanation
Click "Show Answer" to see the explanation here
In the context of cloud-based automation platforms (like Microsoft Power Automate, Azure Logic Apps, or other integration services), HTTP triggers and actions are managed as part of workflows that interact with web-based APIs.
HTTP triggers and actions are managed through the existing DLP editor. This allows administrators to enforce Data Loss Prevention (DLP) policies, ensuring secure and controlled use of connectors within environments.
HTTP triggers and actions are fully supported and integral to services like Azure Functions and Azure Logic Apps.
In the context of cloud-based automation platforms (like Microsoft Power Automate, Azure Logic Apps, or other integration services), HTTP triggers and actions are managed as part of workflows that interact with web-based APIs. Here's how they generally work:
HTTP Triggers
An HTTP trigger initiates a workflow when it receives an HTTP request.
Setup: You define the HTTP trigger in your workflow with an expected method (GET, POST, etc.) and optionally, headers or a body schema.
Webhook URL: The platform provides a unique endpoint (URL). When this endpoint is called with an HTTP request, the workflow starts.
Use case: Useful for integrating external systems that need to call your workflow via HTTP.
Example:
A GitHub webhook hits your Logic App’s HTTP trigger whenever a push occurs.
HTTP Actions
An HTTP action sends an HTTP request to another system as part of a workflow step.
Configuration: You specify the HTTP method, URI, headers, authentication, and body.
Execution: During the workflow execution, the HTTP action sends the request and waits for a response.
Use case: Ideal for calling REST APIs, web services, or even other workflows.
Example:
After receiving data, your workflow sends it via POST to a third-party API for processing.
Management & Monitoring
Authentication: Managed via OAuth, API keys, or custom headers.
Error Handling: Built-in retry policies, timeouts, and error branches (like
Run Afterconditions).Logging: Platforms provide runtime logs showing the request/response details, making debugging easier.
Security: You can restrict IPs, require tokens, or validate request signatures to protect HTTP triggers.
Azure Functions
HTTP Triggers: These allow functions to be invoked via HTTP requests, making them suitable for building serverless APIs and responding to webhooks.
Runtime Support: HTTP triggers are supported across all active Azure Functions runtime versions, including the latest version 4.x. While support for version 1.x is scheduled to end on September 14, 2026, HTTP triggers continue to be supported in newer versions.
Azure Logic Apps
HTTP Triggers and Actions: Logic Apps support HTTP triggers to initiate workflows and HTTP actions to call external services. These are available in both Standard and Consumption plans.
IMPORTANT: Deprecated Components
While HTTP triggers and actions themselves are not deprecated, certain components have been:
Azure Functions Runtime Versions: Versions 2.x and 3.x have reached the end of extended support. It's recommended to migrate to version 4.x for full support.
Specific Connectors: In Power Automate, the "Send an HTTP request" action in the Office 365 Groups connector has been deprecated in favor of "Send an HTTP request V2".
Explanation
In the context of cloud-based automation platforms (like Microsoft Power Automate, Azure Logic Apps, or other integration services), HTTP triggers and actions are managed as part of workflows that interact with web-based APIs.
HTTP triggers and actions are managed through the existing DLP editor. This allows administrators to enforce Data Loss Prevention (DLP) policies, ensuring secure and controlled use of connectors within environments.
HTTP triggers and actions are fully supported and integral to services like Azure Functions and Azure Logic Apps.
In the context of cloud-based automation platforms (like Microsoft Power Automate, Azure Logic Apps, or other integration services), HTTP triggers and actions are managed as part of workflows that interact with web-based APIs. Here's how they generally work:
HTTP Triggers
An HTTP trigger initiates a workflow when it receives an HTTP request.
Setup: You define the HTTP trigger in your workflow with an expected method (GET, POST, etc.) and optionally, headers or a body schema.
Webhook URL: The platform provides a unique endpoint (URL). When this endpoint is called with an HTTP request, the workflow starts.
Use case: Useful for integrating external systems that need to call your workflow via HTTP.
Example:
A GitHub webhook hits your Logic App’s HTTP trigger whenever a push occurs.
HTTP Actions
An HTTP action sends an HTTP request to another system as part of a workflow step.
Configuration: You specify the HTTP method, URI, headers, authentication, and body.
Execution: During the workflow execution, the HTTP action sends the request and waits for a response.
Use case: Ideal for calling REST APIs, web services, or even other workflows.
Example:
After receiving data, your workflow sends it via POST to a third-party API for processing.
Management & Monitoring
Authentication: Managed via OAuth, API keys, or custom headers.
Error Handling: Built-in retry policies, timeouts, and error branches (like
Run Afterconditions).Logging: Platforms provide runtime logs showing the request/response details, making debugging easier.
Security: You can restrict IPs, require tokens, or validate request signatures to protect HTTP triggers.
Azure Functions
HTTP Triggers: These allow functions to be invoked via HTTP requests, making them suitable for building serverless APIs and responding to webhooks.
Runtime Support: HTTP triggers are supported across all active Azure Functions runtime versions, including the latest version 4.x. While support for version 1.x is scheduled to end on September 14, 2026, HTTP triggers continue to be supported in newer versions.
Azure Logic Apps
HTTP Triggers and Actions: Logic Apps support HTTP triggers to initiate workflows and HTTP actions to call external services. These are available in both Standard and Consumption plans.
IMPORTANT: Deprecated Components
While HTTP triggers and actions themselves are not deprecated, certain components have been:
Azure Functions Runtime Versions: Versions 2.x and 3.x have reached the end of extended support. It's recommended to migrate to version 4.x for full support.
Specific Connectors: In Power Automate, the "Send an HTTP request" action in the Office 365 Groups connector has been deprecated in favor of "Send an HTTP request V2".
Question 4 Single Choice
Scenario: You are working at OZcorp which is a multi-million dollar company run by Mayor Norman Osborn. Profits from the company are used to fund Norman’s operatives, such as a police task force.
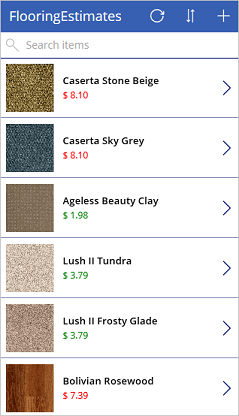
At the moment, you have been hired by OZcorp as a Microsoft Power Apps SME. Currently, the IT team is working with Power Apps and has created an application that shows pricing for various products. The prices however are not showing the currency formatting in dollars for the North American region, which is required.
How can the formatting be changed to show the price with dollar signs in the required format ($999.99)?
Explanation
Click "Show Answer" to see the explanation here
When using Microsoft Power Apps, you don't have to write complicated application code the way that a traditional developer does. However, you must express logic in an app and control its navigation, filtering, sorting, and other functionalities. This is where formulas come in. If you've used Microsoft Excel functions, you should recognize the approach that Power Apps takes.
Formulas and properties
By default, the price appears as a plain number without a currency symbol. Suppose that you want to add a dollar sign and change the text colour based on the item's cost (for example, red if it's more than $5 but green otherwise). The following graphic shows the expected result.
By default, Power Apps pulls in a price value for each item. This value is set as the Text property of the label that shows the price.
1. In BrowseScreen1, select the price of the first item.

2. In the drop-down list of properties, select Text.
3. To add the currency symbol for dollars, set the Text property to this formula:
- PowerApps Formula
- Text(ThisItem.Price, "$ ##.00")
Note: If your formula returns an error, then please note that the language setting of your Power Apps environment can affect some separators and operators. For example, the above formula is expressed in a language and region that uses dot or period as the decimal separator, such as Japan or the United Kingdom. However, this same formula in a language and region where a comma is used for the decimal separator, such as France or Spain, the formula will need to be: powerappsfl Text(ThisItem.Price; "$ ##,00")
The property selection operator. (dot or period) in ThisItem.Price is always the same, no matter what the decimal separator is, but notice that the decimal separator and the chaining operation separator changed to a comma and semicolon respectively. Internally the formula doesn't change, all that changes is how it's displayed and edited by the author. See Formula separators and chaining operator for more information.
The Text function specifies how to format the number. The formula is like an Excel function, but Power Apps formulas refer to controls and other app elements instead of cells in a workbook.
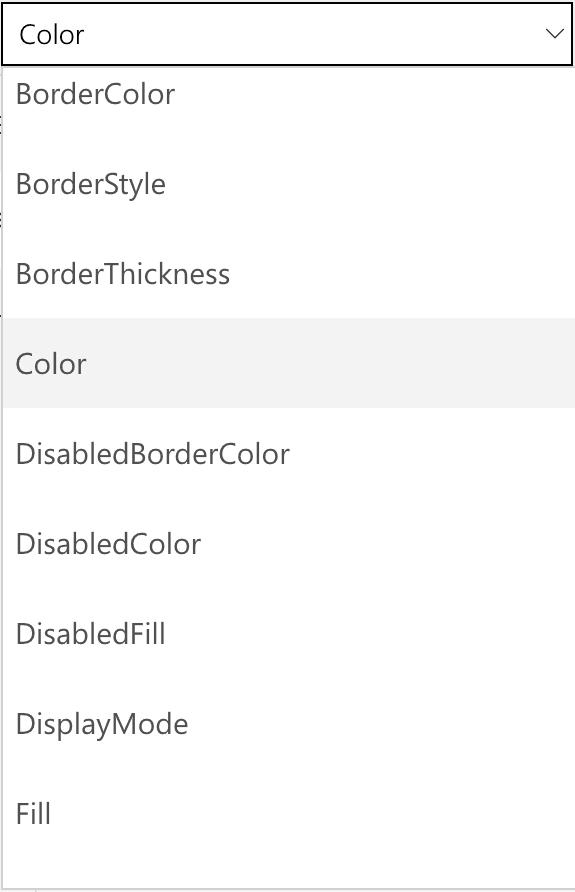
If you select a control and then open the property drop-down list, a list of properties that are relevant to the control appears. For example, the following is a partial list of the properties for a Label control. Some properties are relevant across a wide range of controls, but others are relevant only for a specific control.
To conditionally format the price's colour, select the price Label and choose the colour property and set it to this formula:
- PowerApps Formula
- If(ThisItem.Price > 5, Color.Red, Color.Green)

Formulas included in the generated app
Power Apps uses a couple of formulas in every app that it generates. Both examples are from the browse screen and work with the OnSelect property. This property defines what happens when a user selects a control.
The first formula is associated with the IconNewItem1 control. Select this control to open the edit/create screen where you can create an item. To view the formula, select the New item icon and then select it in the formula bar. The formula is as follows:
- PowerApps Formula
- NewForm(EditForm1);Navigate(EditScreen1, ScreenTransition.None)
The formula instantiates an edit page on the edit/create screen so that users can create an item. A value of
ScreenTransition.Nonemeans that there's no transition, such as a fade, between screens.The second formula is associated with the IconSortUpDown1 control Screenshot of the formula for the sort gallery icon items. Select this control to sort the items in the gallery. The formula is as follows:
- PowerApps Formula
- UpdateContext({SortDescending1: !SortDescending1})
The formula uses UpdateContext to update a variable called SortDescending1. The exclamation "!" symbol in the formula is a shortcut for the Not function. The value of the variable switches back and forth as you select the control. This variable tells the gallery on this screen how to sort the items.
The app contains many other formulas, so take some time to select controls and determine what formulas are set for various properties.
Explanation
When using Microsoft Power Apps, you don't have to write complicated application code the way that a traditional developer does. However, you must express logic in an app and control its navigation, filtering, sorting, and other functionalities. This is where formulas come in. If you've used Microsoft Excel functions, you should recognize the approach that Power Apps takes.
Formulas and properties
By default, the price appears as a plain number without a currency symbol. Suppose that you want to add a dollar sign and change the text colour based on the item's cost (for example, red if it's more than $5 but green otherwise). The following graphic shows the expected result.
By default, Power Apps pulls in a price value for each item. This value is set as the Text property of the label that shows the price.
1. In BrowseScreen1, select the price of the first item.
2. In the drop-down list of properties, select Text.
3. To add the currency symbol for dollars, set the Text property to this formula:
- PowerApps Formula
- Text(ThisItem.Price, "$ ##.00")
Note: If your formula returns an error, then please note that the language setting of your Power Apps environment can affect some separators and operators. For example, the above formula is expressed in a language and region that uses dot or period as the decimal separator, such as Japan or the United Kingdom. However, this same formula in a language and region where a comma is used for the decimal separator, such as France or Spain, the formula will need to be: powerappsfl Text(ThisItem.Price; "$ ##,00")
The property selection operator. (dot or period) in ThisItem.Price is always the same, no matter what the decimal separator is, but notice that the decimal separator and the chaining operation separator changed to a comma and semicolon respectively. Internally the formula doesn't change, all that changes is how it's displayed and edited by the author. See Formula separators and chaining operator for more information.
The Text function specifies how to format the number. The formula is like an Excel function, but Power Apps formulas refer to controls and other app elements instead of cells in a workbook.
If you select a control and then open the property drop-down list, a list of properties that are relevant to the control appears. For example, the following is a partial list of the properties for a Label control. Some properties are relevant across a wide range of controls, but others are relevant only for a specific control.
To conditionally format the price's colour, select the price Label and choose the colour property and set it to this formula:
- PowerApps Formula
- If(ThisItem.Price > 5, Color.Red, Color.Green)
Formulas included in the generated app
Power Apps uses a couple of formulas in every app that it generates. Both examples are from the browse screen and work with the OnSelect property. This property defines what happens when a user selects a control.
The first formula is associated with the IconNewItem1 control. Select this control to open the edit/create screen where you can create an item. To view the formula, select the New item icon and then select it in the formula bar. The formula is as follows:
- PowerApps Formula
- NewForm(EditForm1);Navigate(EditScreen1, ScreenTransition.None)
The formula instantiates an edit page on the edit/create screen so that users can create an item. A value of
ScreenTransition.Nonemeans that there's no transition, such as a fade, between screens.The second formula is associated with the IconSortUpDown1 control Screenshot of the formula for the sort gallery icon items. Select this control to sort the items in the gallery. The formula is as follows:
- PowerApps Formula
- UpdateContext({SortDescending1: !SortDescending1})
The formula uses UpdateContext to update a variable called SortDescending1. The exclamation "!" symbol in the formula is a shortcut for the Not function. The value of the variable switches back and forth as you select the control. This variable tells the gallery on this screen how to sort the items.
The app contains many other formulas, so take some time to select controls and determine what formulas are set for various properties.
Question 5 Single Choice
Power Apps is a suite of apps, services, and connectors, as well as a data platform, that provides a rapid development environment to build custom apps for your business needs. Using Power Apps, you can quickly build custom business apps that connect to your data stored either in the underlying data platform (Microsoft Dataverse) or in various online and on-premises data sources (such as SharePoint, Microsoft 365, Dynamics 365, SQL Server, and so on).

If you use business logic in your Power Apps app, which statement is true?
Explanation
Click "Show Answer" to see the explanation here
Choose the best tool. Both Power Apps and Power Automate can use business logic.
Power Automate is a companion to Power Apps
Power Automate is a standalone component in the Microsoft 365 ecosystem but also a great Power Apps companion. This is because Power Automate has actions and triggers for interfacing directly with Power Apps. This connection allows you to easily use Power Automate functionality in your app.
Business logic
Power Apps is great in scenarios where you have a direct action you want to take after a user does an activity. An example might be sending an email after a user submits a new expense report. If you need to notify someone the expense report was submitted, then you can do that easily directly from Power Apps.
But what if instead of just notifying someone, you also want to start an approval process? This is a great example of where connecting to Power Automate makes your app stand out. You can have Power Apps trigger a Power Automate flow when the user submits the data. Power Automate can then look up who the user's manager is, and send the manager an approval request. Power Automate will then help get a response from the manager, update the data source with the status based on their response, and send the original submitter an update.
Approvals are just one example of how you can use Power Automates native abilities to augment your app's capabilities.
Data connections
Power Apps offers many options for connecting to data through built-in connectors, premium connectors, and custom connectors. However, sometimes you need more. Some data sources, like custom APIs, can provide data back in a difficult to use format. For example, complex JSON structures aren't user-friendly in your app. This is where Power Automate can help. Power Automate has other actions and expressions natively built in that are better at handling these complex data structures. And more importantly, these actions and expressions can parse through the data and restructure it into an easier-to-use object. After the data is parsed, Power Automate can respond to Power Apps with just the friendly data.
Use Power Automate to interact with complex data sources, restructure the objects, and then return to Power Apps only the data that you need. Watch this video to get started with creating a Power Automate flow to connect to Power Apps.
https://www.microsoft.com/en-us/videoplayer/embed/RE2ORdw?postJsllMsg=true
The following video shows how to use Power Automate as a data source for your Power Apps app.
https://www.microsoft.com/en-us/videoplayer/embed/RE4wsDJ?postJsllMsg=true
Connecting Power Apps and Power Automate can bring greater functionality to your apps.
Explanation
Choose the best tool. Both Power Apps and Power Automate can use business logic.
Power Automate is a companion to Power Apps
Power Automate is a standalone component in the Microsoft 365 ecosystem but also a great Power Apps companion. This is because Power Automate has actions and triggers for interfacing directly with Power Apps. This connection allows you to easily use Power Automate functionality in your app.
Business logic
Power Apps is great in scenarios where you have a direct action you want to take after a user does an activity. An example might be sending an email after a user submits a new expense report. If you need to notify someone the expense report was submitted, then you can do that easily directly from Power Apps.
But what if instead of just notifying someone, you also want to start an approval process? This is a great example of where connecting to Power Automate makes your app stand out. You can have Power Apps trigger a Power Automate flow when the user submits the data. Power Automate can then look up who the user's manager is, and send the manager an approval request. Power Automate will then help get a response from the manager, update the data source with the status based on their response, and send the original submitter an update.
Approvals are just one example of how you can use Power Automates native abilities to augment your app's capabilities.
Data connections
Power Apps offers many options for connecting to data through built-in connectors, premium connectors, and custom connectors. However, sometimes you need more. Some data sources, like custom APIs, can provide data back in a difficult to use format. For example, complex JSON structures aren't user-friendly in your app. This is where Power Automate can help. Power Automate has other actions and expressions natively built in that are better at handling these complex data structures. And more importantly, these actions and expressions can parse through the data and restructure it into an easier-to-use object. After the data is parsed, Power Automate can respond to Power Apps with just the friendly data.
Use Power Automate to interact with complex data sources, restructure the objects, and then return to Power Apps only the data that you need. Watch this video to get started with creating a Power Automate flow to connect to Power Apps.
https://www.microsoft.com/en-us/videoplayer/embed/RE2ORdw?postJsllMsg=true
The following video shows how to use Power Automate as a data source for your Power Apps app.
https://www.microsoft.com/en-us/videoplayer/embed/RE4wsDJ?postJsllMsg=true
Connecting Power Apps and Power Automate can bring greater functionality to your apps.
Question 6 Single Choice
Scenario: Queen Consolidated was overtaken by Raymond Carson Palmer and rebranded as Palmer Technologies. Now that Ray is overseeing the operations at Palmer, Ray has decided to implement better applications.
You are working as a consultant with Palmer and in a meeting with Ray and his IT team discussing Microsoft Power Apps. The team lead decided they wanted to share an app with the Marketing team so their permission was set to Co-owner, but there are people within the group that the team lead did not want to give the rights to edit the app so he created a subgroup in the Marketing team group and gave them User rights only.
Who will have permission to edit the application?
Explanation
Click "Show Answer" to see the explanation here
You can share an app with specific users, groups, or your whole organization. When you share an app with other people, they can run it in a browser, from the Microsoft Dynamics 365 home page, or in Microsoft Power Apps Mobile for Microsoft Windows, Apple iOS, or Google Android.
You can also give someone permission to update the app.
Prepare to share an app
To complete the following steps, open the app that you want to share in Edit mode.
In Power Apps Studio, select the File menu and then select Settings. Give the app a meaningful name and a description so that your team knows what your app does and can easily find it in the apps list.
On the File menu, select Save as and then select The cloud.
You must save an app to the cloud before you can share it.
Select Save and then select Share.
On the Share tab, specify the users or groups with whom you want to share the app. To add everyone in your organization, type Everyone and select Everyone in Company Name. If you need to share with a large group of users, a best practice is to share through an Azure Active Directory Security Group.
By default, the user receives the User's permission. If you want the user to also be able to edit the app, then select the co-owner check box. The following is a description of both permissions:
Co-owner - Users can use, edit, and share the app, but can't delete or change the owner.
User - Users can view and use the app, but they can't change it.
Security-group considerations
If you share an app with a security group, existing members of that group, and anyone who joins it, will have the permission that you specify for that group. Anyone who leaves the group loses that permission unless they belong to a different group that has access or if you give them permission as an individual.
Every member of a security group has the same permission for an app as the overall group does. However, you can specify greater permissions for one or more members of that group to allow them greater access. For example, you can give Security Group A permission to run an app, but you can also give User B, who belongs to that group, Co-owner permission. Every member of the security group can run the app, but only User B can edit it. If you give Security Group A Co-owner permission and User B permission to run the app, that user can still edit the app.
To notify users by email, leave the Send an email invitation check box selected.
If you elect to notify the users by email, everyone you shared the app with will receive an email message that has a link to the app. People whom you granted Co-owner permission for the app will also receive a link to Edit App in Power Apps Studio.
Select Share.
If you make and save changes to a shared app, the people whom you shared it with will see your changes as soon as you publish them. This can be useful if you improve the app, but it can also negatively affect users if you remove or significantly change features. Remember to create a notification plan for alerting your users of major updates.
Permissions and licensing
Basic information about permissions and licensing that you should be aware of are:
Users and contributors need permissions to any data connections and gateways that a shared app uses. Some permissions come implicitly with the app, but you must explicitly grant others. If you create an app based on Microsoft Dataverse, you must also ensure that the users with whom you share the app have the appropriate permissions for the entity or entities on which the app relies. Specifically, those users must belong to a security role that can perform tasks such as creating, reading, writing, and deleting relevant records. In many cases, you'll want to create one or more custom security roles with the exact permissions that users need to run the app. You can then assign a role to each user as appropriate.
People who have Co-owner permission also need a Power Apps Per-app plan or Power Apps Per user plan to work directly with entities in Dataverse.
Sharing an app is simple, and it's a great way to make an app that you find usefully available to people across your organization.
Explanation
You can share an app with specific users, groups, or your whole organization. When you share an app with other people, they can run it in a browser, from the Microsoft Dynamics 365 home page, or in Microsoft Power Apps Mobile for Microsoft Windows, Apple iOS, or Google Android.
You can also give someone permission to update the app.
Prepare to share an app
To complete the following steps, open the app that you want to share in Edit mode.
In Power Apps Studio, select the File menu and then select Settings. Give the app a meaningful name and a description so that your team knows what your app does and can easily find it in the apps list.
On the File menu, select Save as and then select The cloud.
You must save an app to the cloud before you can share it.
Select Save and then select Share.
On the Share tab, specify the users or groups with whom you want to share the app. To add everyone in your organization, type Everyone and select Everyone in Company Name. If you need to share with a large group of users, a best practice is to share through an Azure Active Directory Security Group.
By default, the user receives the User's permission. If you want the user to also be able to edit the app, then select the co-owner check box. The following is a description of both permissions:
Co-owner - Users can use, edit, and share the app, but can't delete or change the owner.
User - Users can view and use the app, but they can't change it.
Security-group considerations
If you share an app with a security group, existing members of that group, and anyone who joins it, will have the permission that you specify for that group. Anyone who leaves the group loses that permission unless they belong to a different group that has access or if you give them permission as an individual.
Every member of a security group has the same permission for an app as the overall group does. However, you can specify greater permissions for one or more members of that group to allow them greater access. For example, you can give Security Group A permission to run an app, but you can also give User B, who belongs to that group, Co-owner permission. Every member of the security group can run the app, but only User B can edit it. If you give Security Group A Co-owner permission and User B permission to run the app, that user can still edit the app.
To notify users by email, leave the Send an email invitation check box selected.
If you elect to notify the users by email, everyone you shared the app with will receive an email message that has a link to the app. People whom you granted Co-owner permission for the app will also receive a link to Edit App in Power Apps Studio.
Select Share.
If you make and save changes to a shared app, the people whom you shared it with will see your changes as soon as you publish them. This can be useful if you improve the app, but it can also negatively affect users if you remove or significantly change features. Remember to create a notification plan for alerting your users of major updates.
Permissions and licensing
Basic information about permissions and licensing that you should be aware of are:
Users and contributors need permissions to any data connections and gateways that a shared app uses. Some permissions come implicitly with the app, but you must explicitly grant others. If you create an app based on Microsoft Dataverse, you must also ensure that the users with whom you share the app have the appropriate permissions for the entity or entities on which the app relies. Specifically, those users must belong to a security role that can perform tasks such as creating, reading, writing, and deleting relevant records. In many cases, you'll want to create one or more custom security roles with the exact permissions that users need to run the app. You can then assign a role to each user as appropriate.
People who have Co-owner permission also need a Power Apps Per-app plan or Power Apps Per user plan to work directly with entities in Dataverse.
Sharing an app is simple, and it's a great way to make an app that you find usefully available to people across your organization.
Question 7 Single Choice
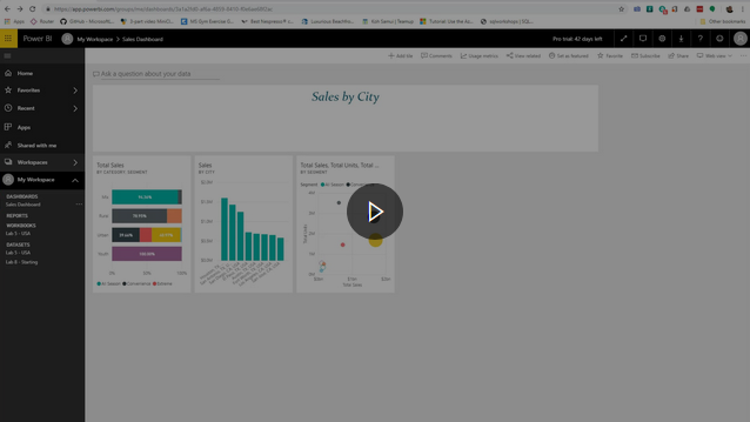
The Power BI service is the natural extension of the Power BI Desktop, and you can use its features for uploading reports, creating dashboards, and asking questions about your data by using natural language. Additionally, you can use the service to set data refresh times, share data with your organization, and create customized apps.
If you think of some interesting questions to ask in your report, how could you share them to help your Q&A users?
Explanation
Click "Show Answer" to see the explanation here
You can add your own featured questions to any dataset you own by adding them to the "Featured Q&A Questions" feature in the dashboard setting, dashboard section.
Sometimes, the fastest way to get answers about your data is by asking questions in the Q&A feature of Power BI.
Ask questions in natural language
https://www.microsoft.com/en-ca/videoplayer/embed/RE3x4jC?postJsllMsg=true&autoCaptions=en-ca
Note: Currently, Power BI Q&A only supports answering queries that are asked in English; however, a preview is available for Spanish that can be enabled by your Power BI administrator.
Explore Q&A
You can use Q&A to explore your data by using the intuitive, natural language capabilities of Power BI and receive answers in the form of charts and graphs.
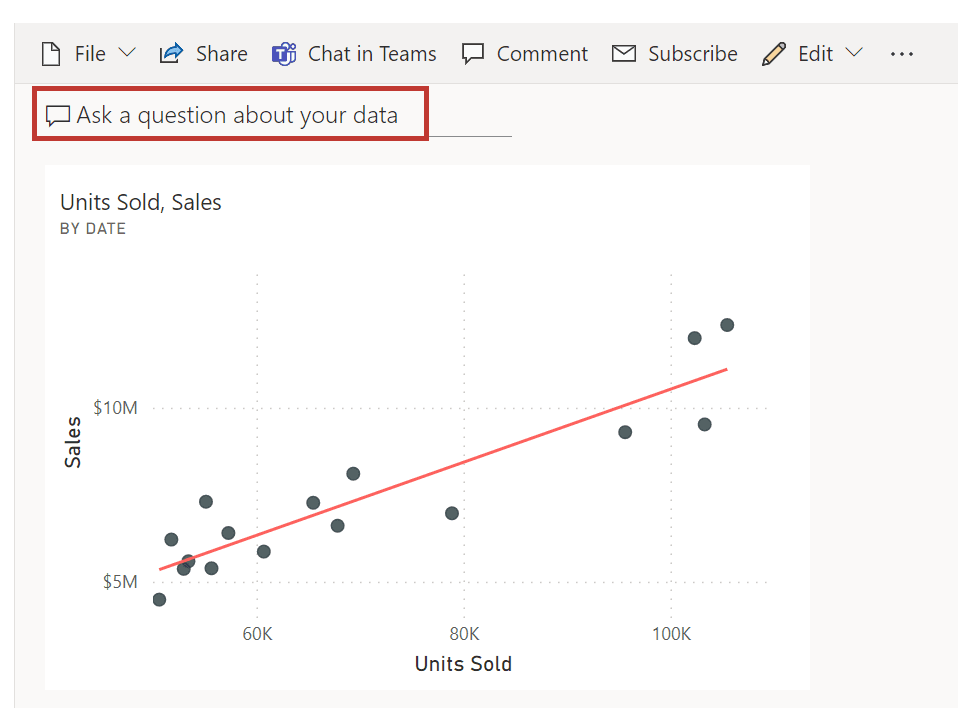
Ask a question
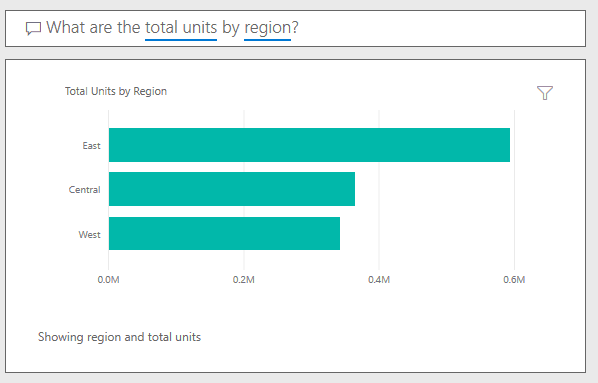
Ask a question about your data in Q&A by using natural language. Natural language refers to the ordinary language that humans use to communicate with one another every day. An example would be, “What are the total units by region?”
Q&A is available on dashboards and reports in Power BI. Go to the dashboard and place your cursor in the question box to open the Q&A screen.

If the visuals' axis labels and values include the words sales, account, month, and opportunities, then you can confidently ask questions. For example, "Which account has the highest opportunity" or "Show sales by month as a bar chart."
Other helpful items are provided on the side of the screen. For each dataset, Q&A shows you keywords and occasionally shows you some sample or suggested questions. Select any of these to add them to the question box.
Another way that Q&A helps you ask questions is with prompts, auto-complete, and visual cues.
Q&A visuals
Q&A picks the best visual based on the data that is being displayed. For example, numbers might be displayed as a line chart while cities are more likely to be displayed as a map.
You can also tell Q&A which visual to use by adding it to your question. Q&A will prompt you with a list of workable visual types. By using the previous example, you could ask, "What are the total units by region by pie chart?"

Explanation
You can add your own featured questions to any dataset you own by adding them to the "Featured Q&A Questions" feature in the dashboard setting, dashboard section.
Sometimes, the fastest way to get answers about your data is by asking questions in the Q&A feature of Power BI.
Ask questions in natural language
https://www.microsoft.com/en-ca/videoplayer/embed/RE3x4jC?postJsllMsg=true&autoCaptions=en-ca
Note: Currently, Power BI Q&A only supports answering queries that are asked in English; however, a preview is available for Spanish that can be enabled by your Power BI administrator.
Explore Q&A
You can use Q&A to explore your data by using the intuitive, natural language capabilities of Power BI and receive answers in the form of charts and graphs.
Ask a question
Ask a question about your data in Q&A by using natural language. Natural language refers to the ordinary language that humans use to communicate with one another every day. An example would be, “What are the total units by region?”
Q&A is available on dashboards and reports in Power BI. Go to the dashboard and place your cursor in the question box to open the Q&A screen.
If the visuals' axis labels and values include the words sales, account, month, and opportunities, then you can confidently ask questions. For example, "Which account has the highest opportunity" or "Show sales by month as a bar chart."
Other helpful items are provided on the side of the screen. For each dataset, Q&A shows you keywords and occasionally shows you some sample or suggested questions. Select any of these to add them to the question box.
Another way that Q&A helps you ask questions is with prompts, auto-complete, and visual cues.
Q&A visuals
Q&A picks the best visual based on the data that is being displayed. For example, numbers might be displayed as a line chart while cities are more likely to be displayed as a map.
You can also tell Q&A which visual to use by adding it to your question. Q&A will prompt you with a list of workable visual types. By using the previous example, you could ask, "What are the total units by region by pie chart?"
Question 8 Single Choice
To include HTTP triggers / actions within a DLP policy, which schema version must you use when creating that DLP policy?
Explanation
Click "Show Answer" to see the explanation here
Power Platform Management connectors are managed like any other connector in Power Platform.
HTTP triggers and actions can only be managed through the existing DLP editor, with some actions being performed by an administrator. The partial reason for this parameter is because HTTP triggers and actions are considered to be built in and technically aren't considered connectors, even though they might have similar characteristics.
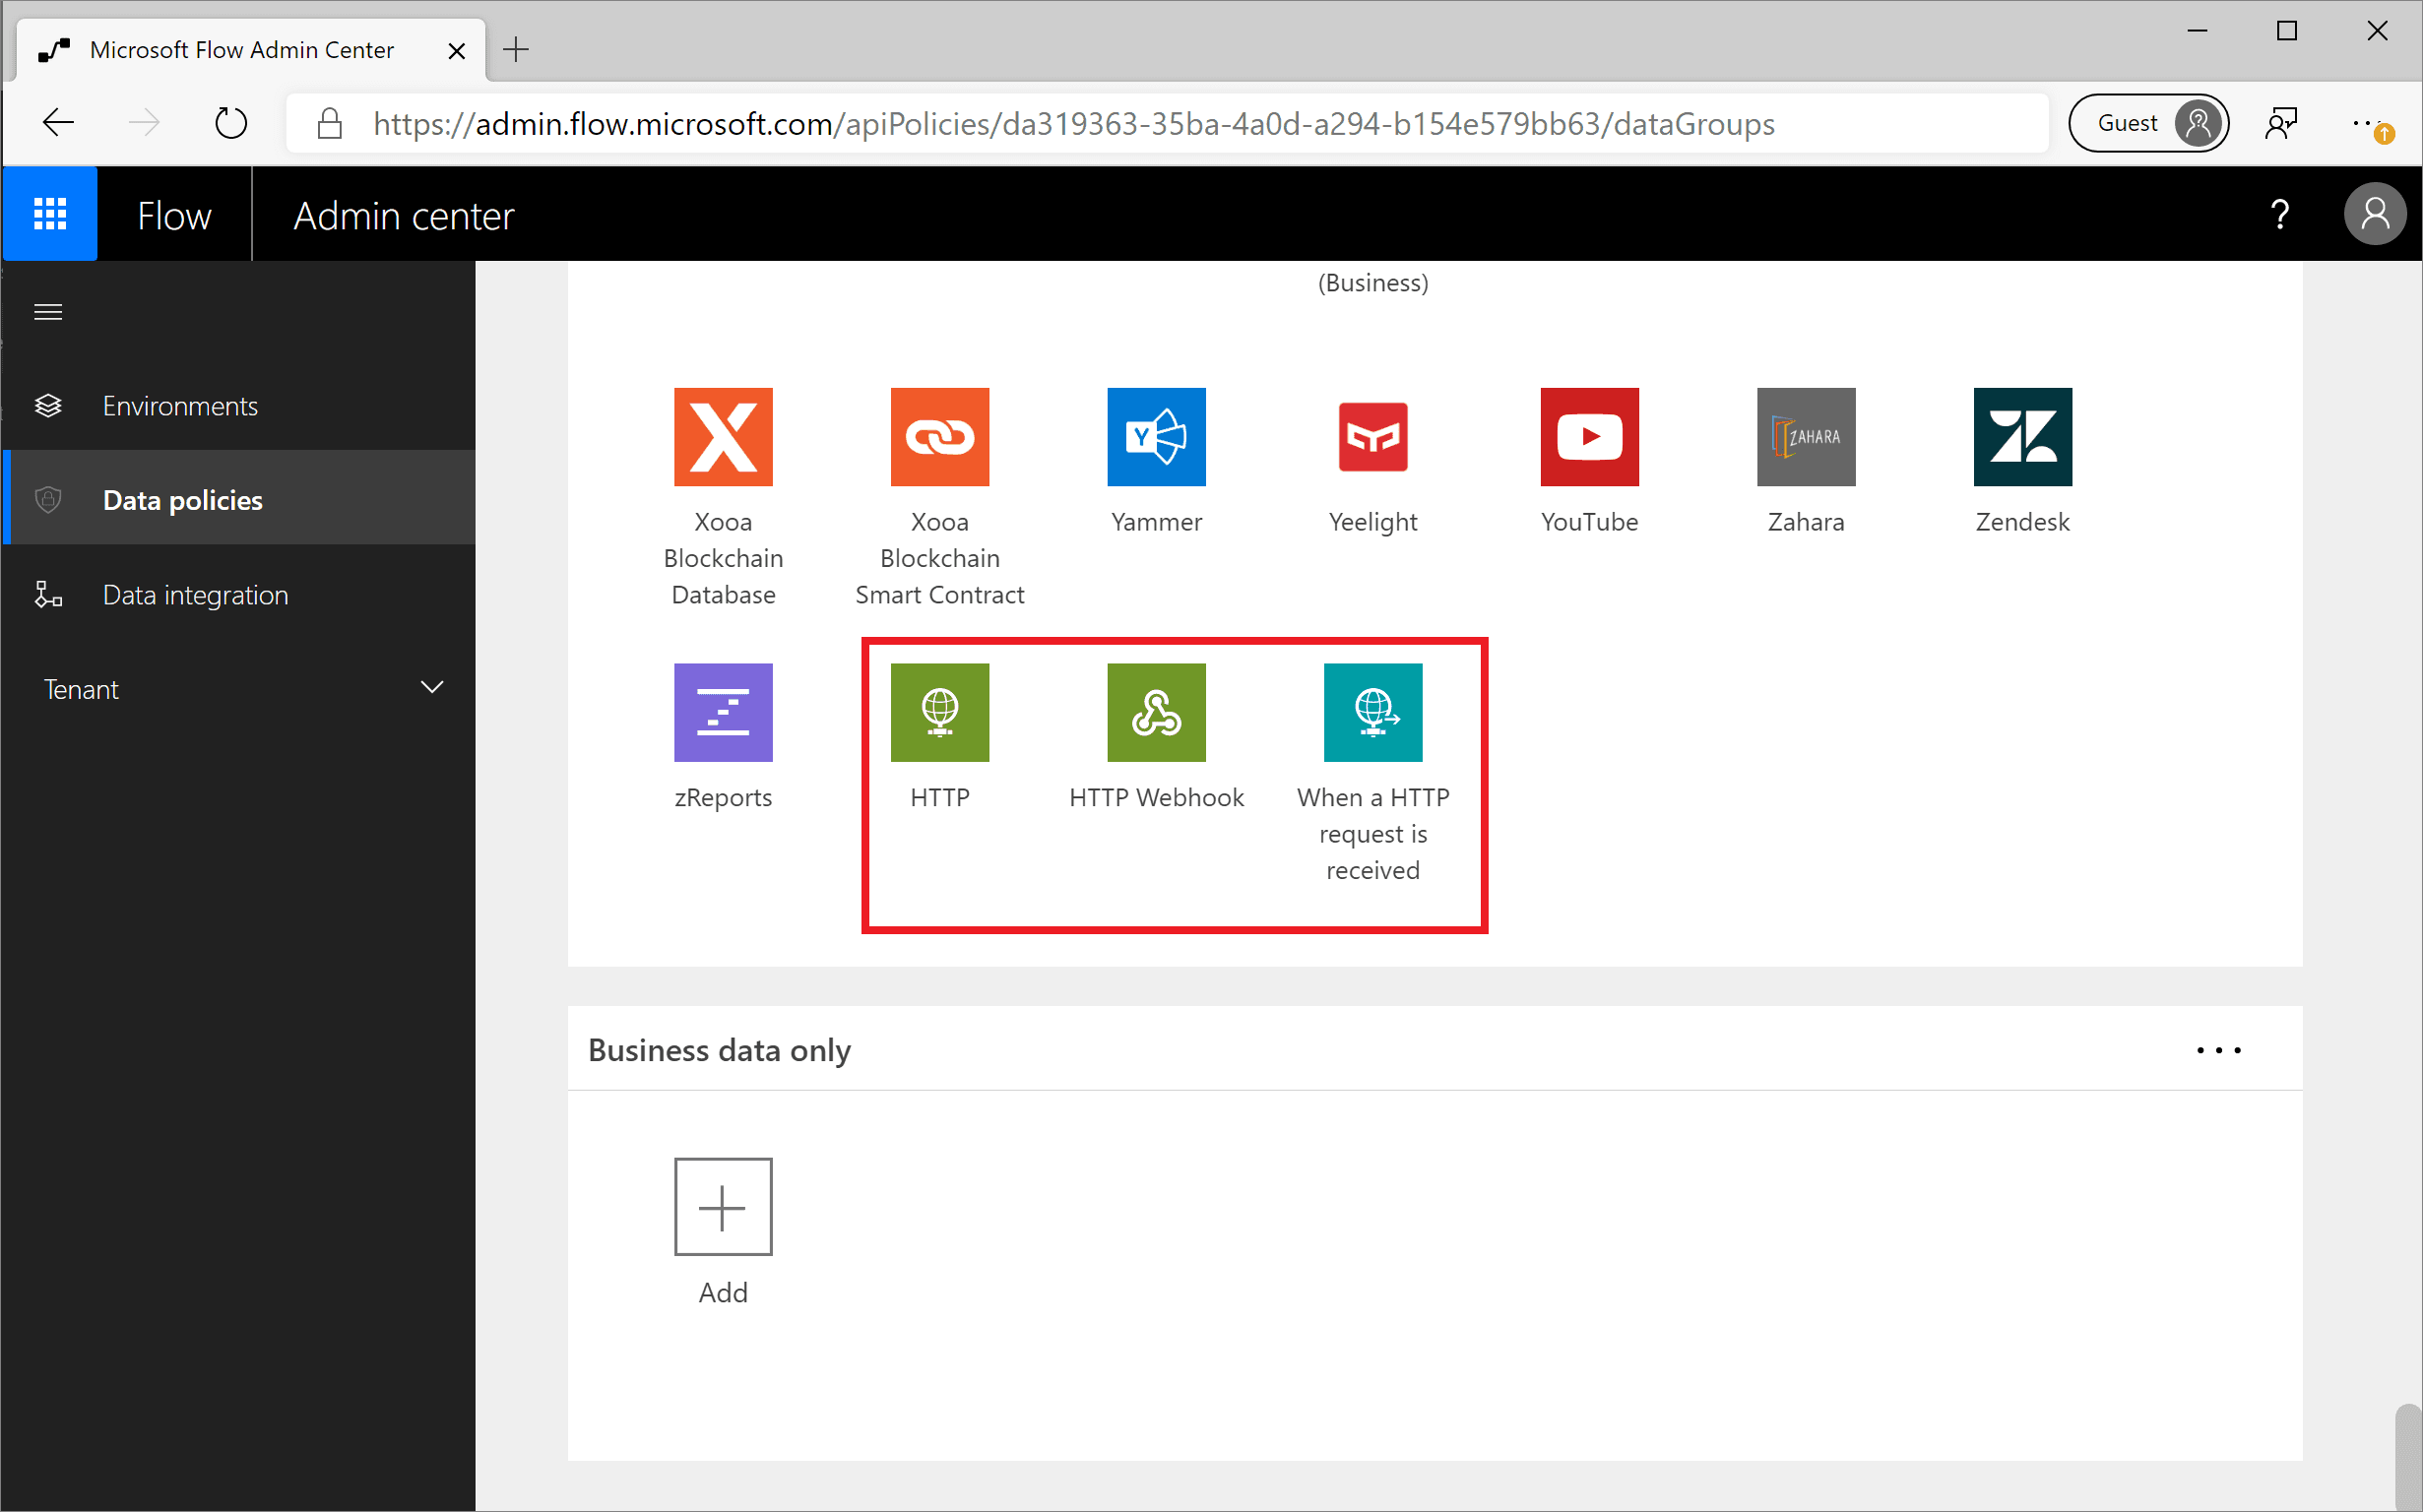
However, because of customer needs and past feedback, it is possible to manage the triggers/actions that are shown in the following image.
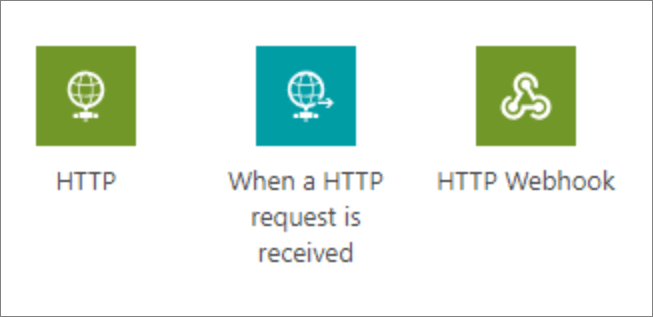
These triggers/actions can only be managed in DLP policies that have a schema version of 2018-11-01, which is discussed in the linked blog. By using a new schema version, it allows organizations to make the decision to implement these changes. Otherwise, it's highly possible that some flows will be broken, depending on how an organization wants to classify the connectors as business or non-business.
For example, if the HTTP action was previously not managed and is being used with connectors from the Business data group and is then placed in the Non-business data group, then any flows that are using this configuration will be suspended because of DLP violations.
By using this new schema version, DLP policies can be constructed by using either of the following tables:
Power Platform Management connector
Power Apps and Power Automate PowerShell cmdlets
However, using PowerShell is the simplest path forward. Additional information about PowerApps and Power Automate PowerShell cmdlets can be found at PowerShell support for Power Apps.
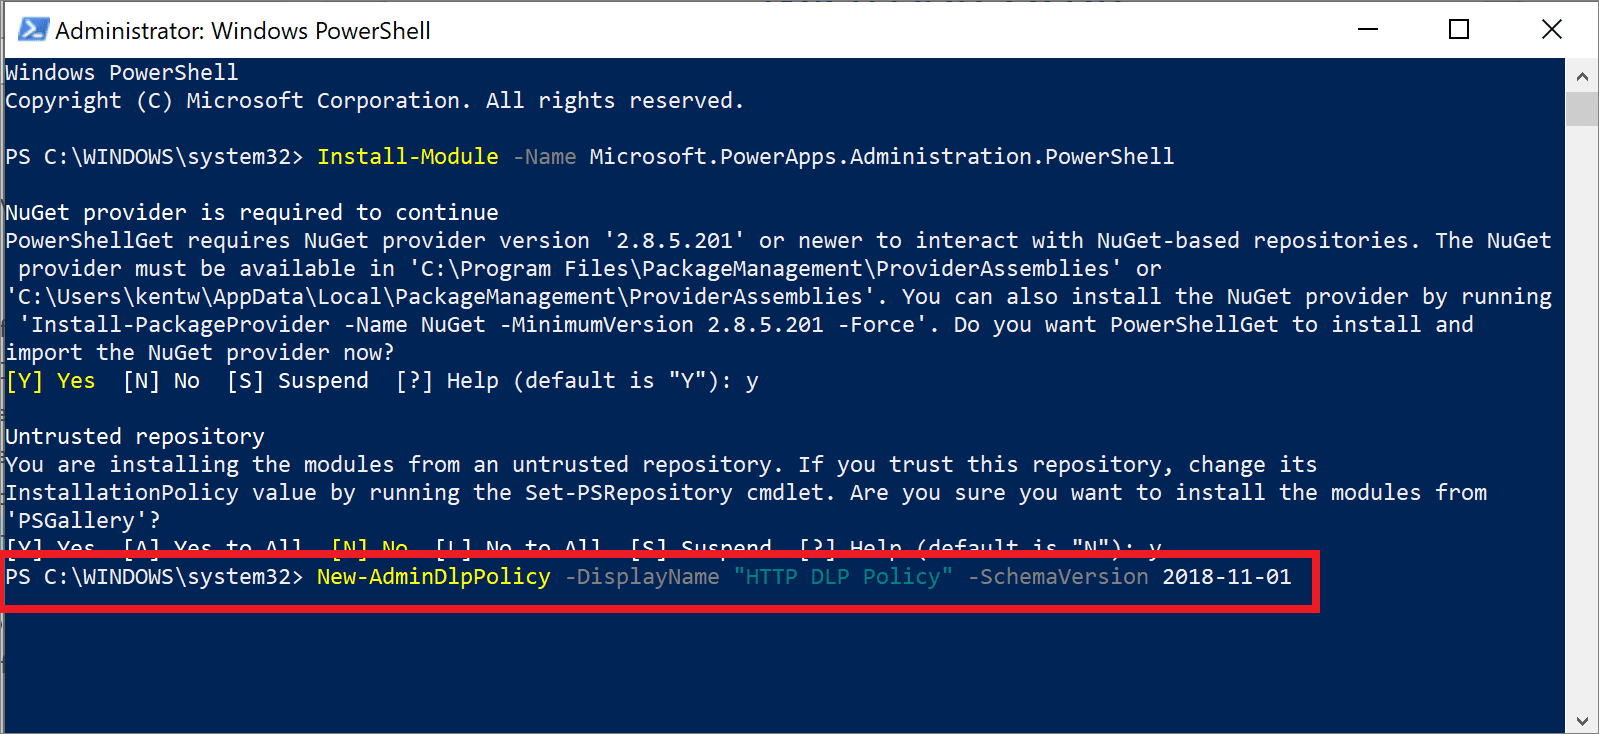
After installing the prerequisite PowerShell modules, you can run the following statement, (New-AdminDlpPolicy -DisplayName "HTTP DLP Policy" -SchemaVersion 2018-11-01), which will create a new DLP policy that includes support for HTTP when you include a -SchemaVersion parameter of 2018-11-01. After you have run the previous statement, you'll be asked to sign in by using your admin credentials.
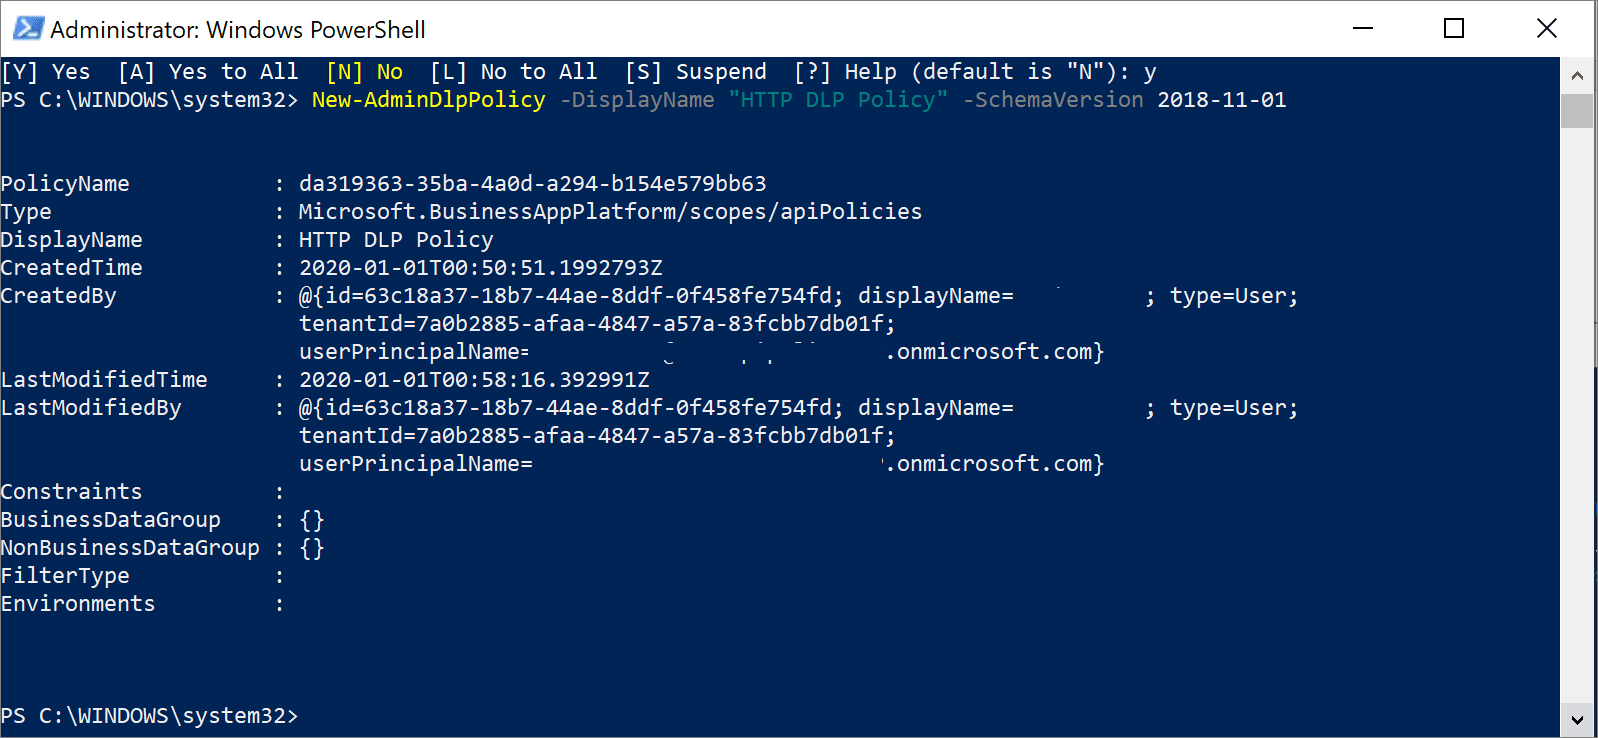
After the command has been run, you'll be provided a status output that includes the internal PolicyName and other attributes.
If you go to the Power Automate Admin Centre, you'll discover that the DLP policy has been created.
Note: Because an environment parameter was not specified when you created this DLP policy, it will be applicable to the entire tenant.
After you have explored this DLP policy, you'll find that your HTTP triggers and actions are included in your default data group, which in this case is No business data allowed. These connectors can be managed just like any other connectors and can be added to the Business data only data group.
Explanation
Power Platform Management connectors are managed like any other connector in Power Platform.
HTTP triggers and actions can only be managed through the existing DLP editor, with some actions being performed by an administrator. The partial reason for this parameter is because HTTP triggers and actions are considered to be built in and technically aren't considered connectors, even though they might have similar characteristics.
However, because of customer needs and past feedback, it is possible to manage the triggers/actions that are shown in the following image.
These triggers/actions can only be managed in DLP policies that have a schema version of 2018-11-01, which is discussed in the linked blog. By using a new schema version, it allows organizations to make the decision to implement these changes. Otherwise, it's highly possible that some flows will be broken, depending on how an organization wants to classify the connectors as business or non-business.
For example, if the HTTP action was previously not managed and is being used with connectors from the Business data group and is then placed in the Non-business data group, then any flows that are using this configuration will be suspended because of DLP violations.
By using this new schema version, DLP policies can be constructed by using either of the following tables:
Power Platform Management connector
Power Apps and Power Automate PowerShell cmdlets
However, using PowerShell is the simplest path forward. Additional information about PowerApps and Power Automate PowerShell cmdlets can be found at PowerShell support for Power Apps.
After installing the prerequisite PowerShell modules, you can run the following statement, (New-AdminDlpPolicy -DisplayName "HTTP DLP Policy" -SchemaVersion 2018-11-01), which will create a new DLP policy that includes support for HTTP when you include a -SchemaVersion parameter of 2018-11-01. After you have run the previous statement, you'll be asked to sign in by using your admin credentials.
After the command has been run, you'll be provided a status output that includes the internal PolicyName and other attributes.
If you go to the Power Automate Admin Centre, you'll discover that the DLP policy has been created.
Note: Because an environment parameter was not specified when you created this DLP policy, it will be applicable to the entire tenant.
After you have explored this DLP policy, you'll find that your HTTP triggers and actions are included in your default data group, which in this case is No business data allowed. These connectors can be managed just like any other connectors and can be added to the Business data only data group.
Question 9 Multiple Choice
Scenario: You have been contracted by Wayne Enterprises, a company owned by Bruce Wayne with a market value of over twenty-seven million dollars. Bruce founded Wayne Enterprises shortly after he created the Wayne Foundation and he became the president and chairman of the company.
Bruce has come to you because his IT team plans to use Microsoft Dataverse to apply and maintain business logic at the data layer instead of the app layer.
Which of the following business rules cases?
Explanation
Click "Show Answer" to see the explanation here
Business rules
In Microsoft Dataverse you can define business rules. Business rules allow you to apply and maintain business logic at the data layer instead of the app layer. Put more simply, if you create business rules in Microsoft Dataverse, they are in effect regardless of where you interact with the data.
For example, business rules can be used in canvas and model-driven apps to set or clear values in one or many columns in a table. They can also be used to validate stored data or show error messages. Model-driven apps can use business rules to show or hide columns, enable or disable columns, and create recommendations based on business intelligence.
Tip: Business rules are usually defined for a table and apply to all forms, but you can define a business rule for a specific model-driven form. Canvas apps cannot have a business rule applied to a specific form, but they are still enforced when interacting with the data.
Business rules give you a powerful way to enforce rules, set values, or validate data regardless of the form that is used to input data. Additionally, business rules are effective in helping to increase the accuracy of data, simplify application development, and streamline the forms presented to end-users.
The following business rule actions can be used by canvas and model-driven apps:
Set column values
Clear column values
Validate data and show error messages
Model-driven apps can also use business rules to:
Show or hide columns (model-driven apps only)
Enable or disable columns (model-driven apps only)
Create business recommendations based on business intelligence (model-driven apps only)
Below is an example of a simple, yet powerful use of business rules. The business rule is configured to change the field Credit Limit VP Approver to be a required field if the Credit Limit is set to greater than $1,000,000. If the credit limit is less than $1,000,000 then the field is optional.

By applying this business rule at the data level instead of the app level, you have better control of your data. This can ensure your business logic is followed whether it is being accessed directly from Power Apps, Power Automate, or even via an API. The rule is tied to the data, not the app.
Explanation
Business rules
In Microsoft Dataverse you can define business rules. Business rules allow you to apply and maintain business logic at the data layer instead of the app layer. Put more simply, if you create business rules in Microsoft Dataverse, they are in effect regardless of where you interact with the data.
For example, business rules can be used in canvas and model-driven apps to set or clear values in one or many columns in a table. They can also be used to validate stored data or show error messages. Model-driven apps can use business rules to show or hide columns, enable or disable columns, and create recommendations based on business intelligence.
Tip: Business rules are usually defined for a table and apply to all forms, but you can define a business rule for a specific model-driven form. Canvas apps cannot have a business rule applied to a specific form, but they are still enforced when interacting with the data.
Business rules give you a powerful way to enforce rules, set values, or validate data regardless of the form that is used to input data. Additionally, business rules are effective in helping to increase the accuracy of data, simplify application development, and streamline the forms presented to end-users.
The following business rule actions can be used by canvas and model-driven apps:
Set column values
Clear column values
Validate data and show error messages
Model-driven apps can also use business rules to:
Show or hide columns (model-driven apps only)
Enable or disable columns (model-driven apps only)
Create business recommendations based on business intelligence (model-driven apps only)
Below is an example of a simple, yet powerful use of business rules. The business rule is configured to change the field Credit Limit VP Approver to be a required field if the Credit Limit is set to greater than $1,000,000. If the credit limit is less than $1,000,000 then the field is optional.
By applying this business rule at the data level instead of the app level, you have better control of your data. This can ensure your business logic is followed whether it is being accessed directly from Power Apps, Power Automate, or even via an API. The rule is tied to the data, not the app.
Question 10 Multiple Choice
It is important to understand the impacts of an upcoming change before sending out communications. The Power Platform Admin Analytics feature can help administrators understand how Power Automate is being used in your organization to help you avoid undesirable impacts.
The Power Platform Admin Centre will store analytics for up to 28 days, but administrators can filter based on the last 14 and 7 days.
Which of the following statements are true? (Select two)
Explanation
Click "Show Answer" to see the explanation here
It is important to understand the impacts of an upcoming change before sending out communications. The Power Platform Admin Analytics feature can help administrators understand how Power Automate is being used in your organization to help you avoid undesirable impacts.
Six Power Automate reports are available in the Power Platform Admin Centre:
Runs
Usage
Created
Errors
Shared
Connectors
Administrators can use these reports to gain insight into how people are using Power Automate.
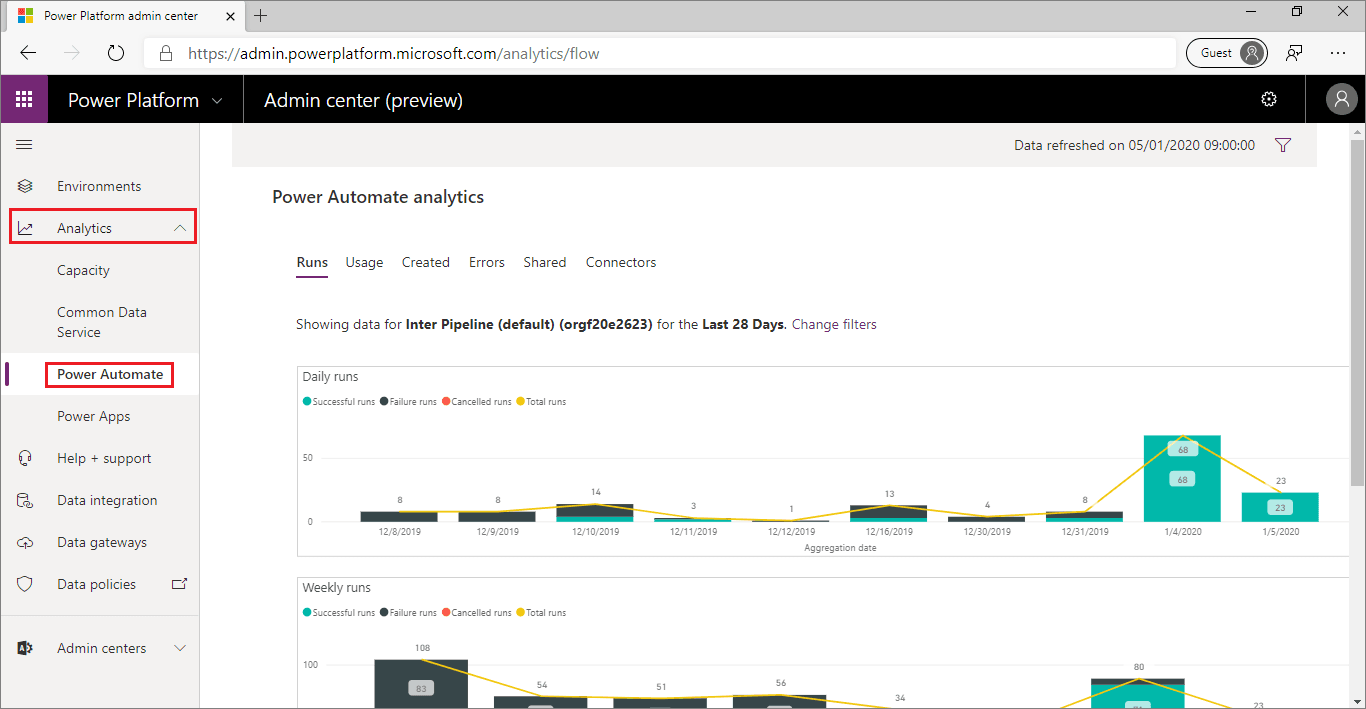
To access the Admin Analytics feature, go to the Power Platform Admin Centre by using an account that has environment or tenant admin privileges. After you have signed in, expand the Analytics drop-down menu from the left navigation pane and select Power Automate.
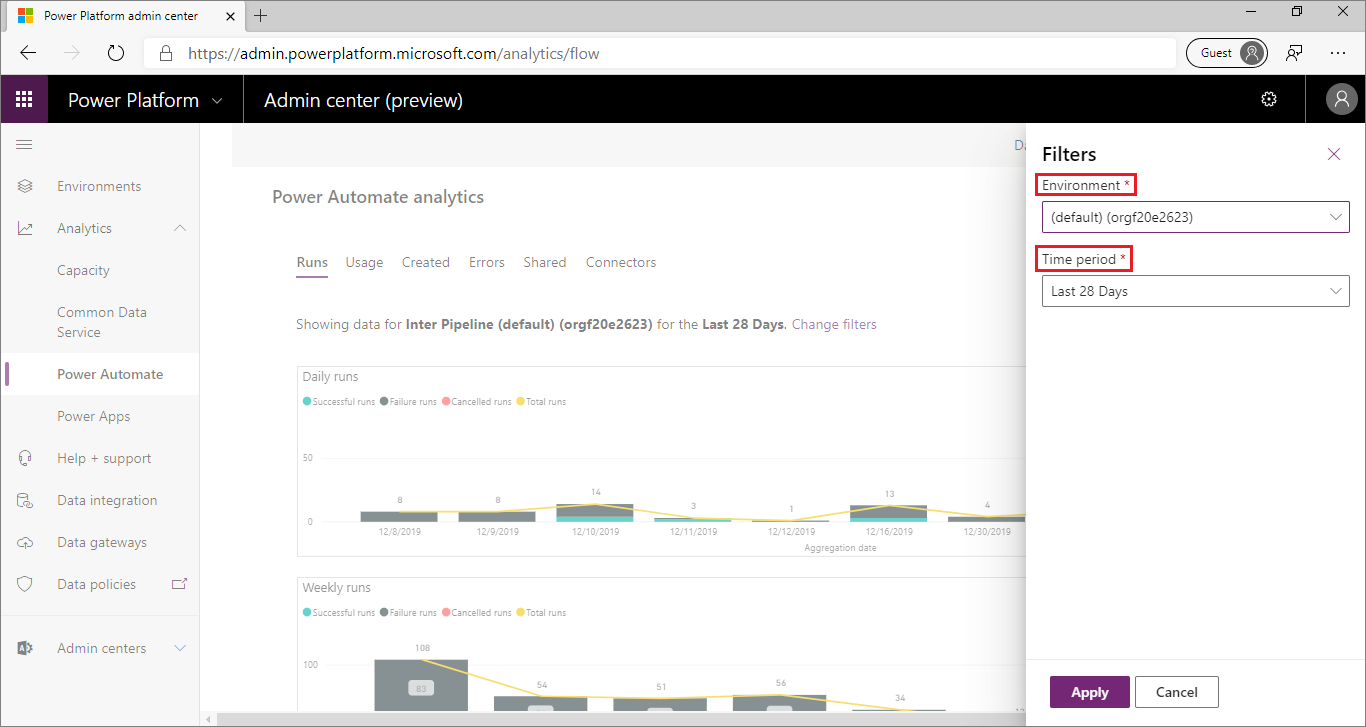
In regard to environment and tenant scopes, when it comes to Admin Analytics, everything is in the context of an environment. Currently, no method exists for you to see aggregated analytics, across a tenant, in this experience. A tenant administrator will be able to see analytics on an environment-by-environment basis. Environment administrators will only see analytics for the environments that they are admins in. To change the environment, an administrator can select the filter icon in the upper-right corner of the Admin Centre page, where they can select their desired Environment and the Time period that they want to see analytics for.
The Power Platform Admin Centre will store analytics for up to 28 days, but administrators can filter based on the last 14 and 7 days. In addition, the analytics are not aggregated in real-time. Administrators can expect up to a three-hour delay before the latest analytics are published.
Within the Runs report in the Power Automate Analytics feature, administrators will be able to determine the number of flow runs within that environment for each day, week, and month. In addition, Power BI embedded slicers allow an administrator to filter data based on whether the run was successful, failed, or cancelled.
For organizations that are adopting Power Automate, this report can provide insights that help determine the level of adoption within the organization. People who are responsible for change management can use this data to help support training and adoption campaigns by being able to show measurable progress.

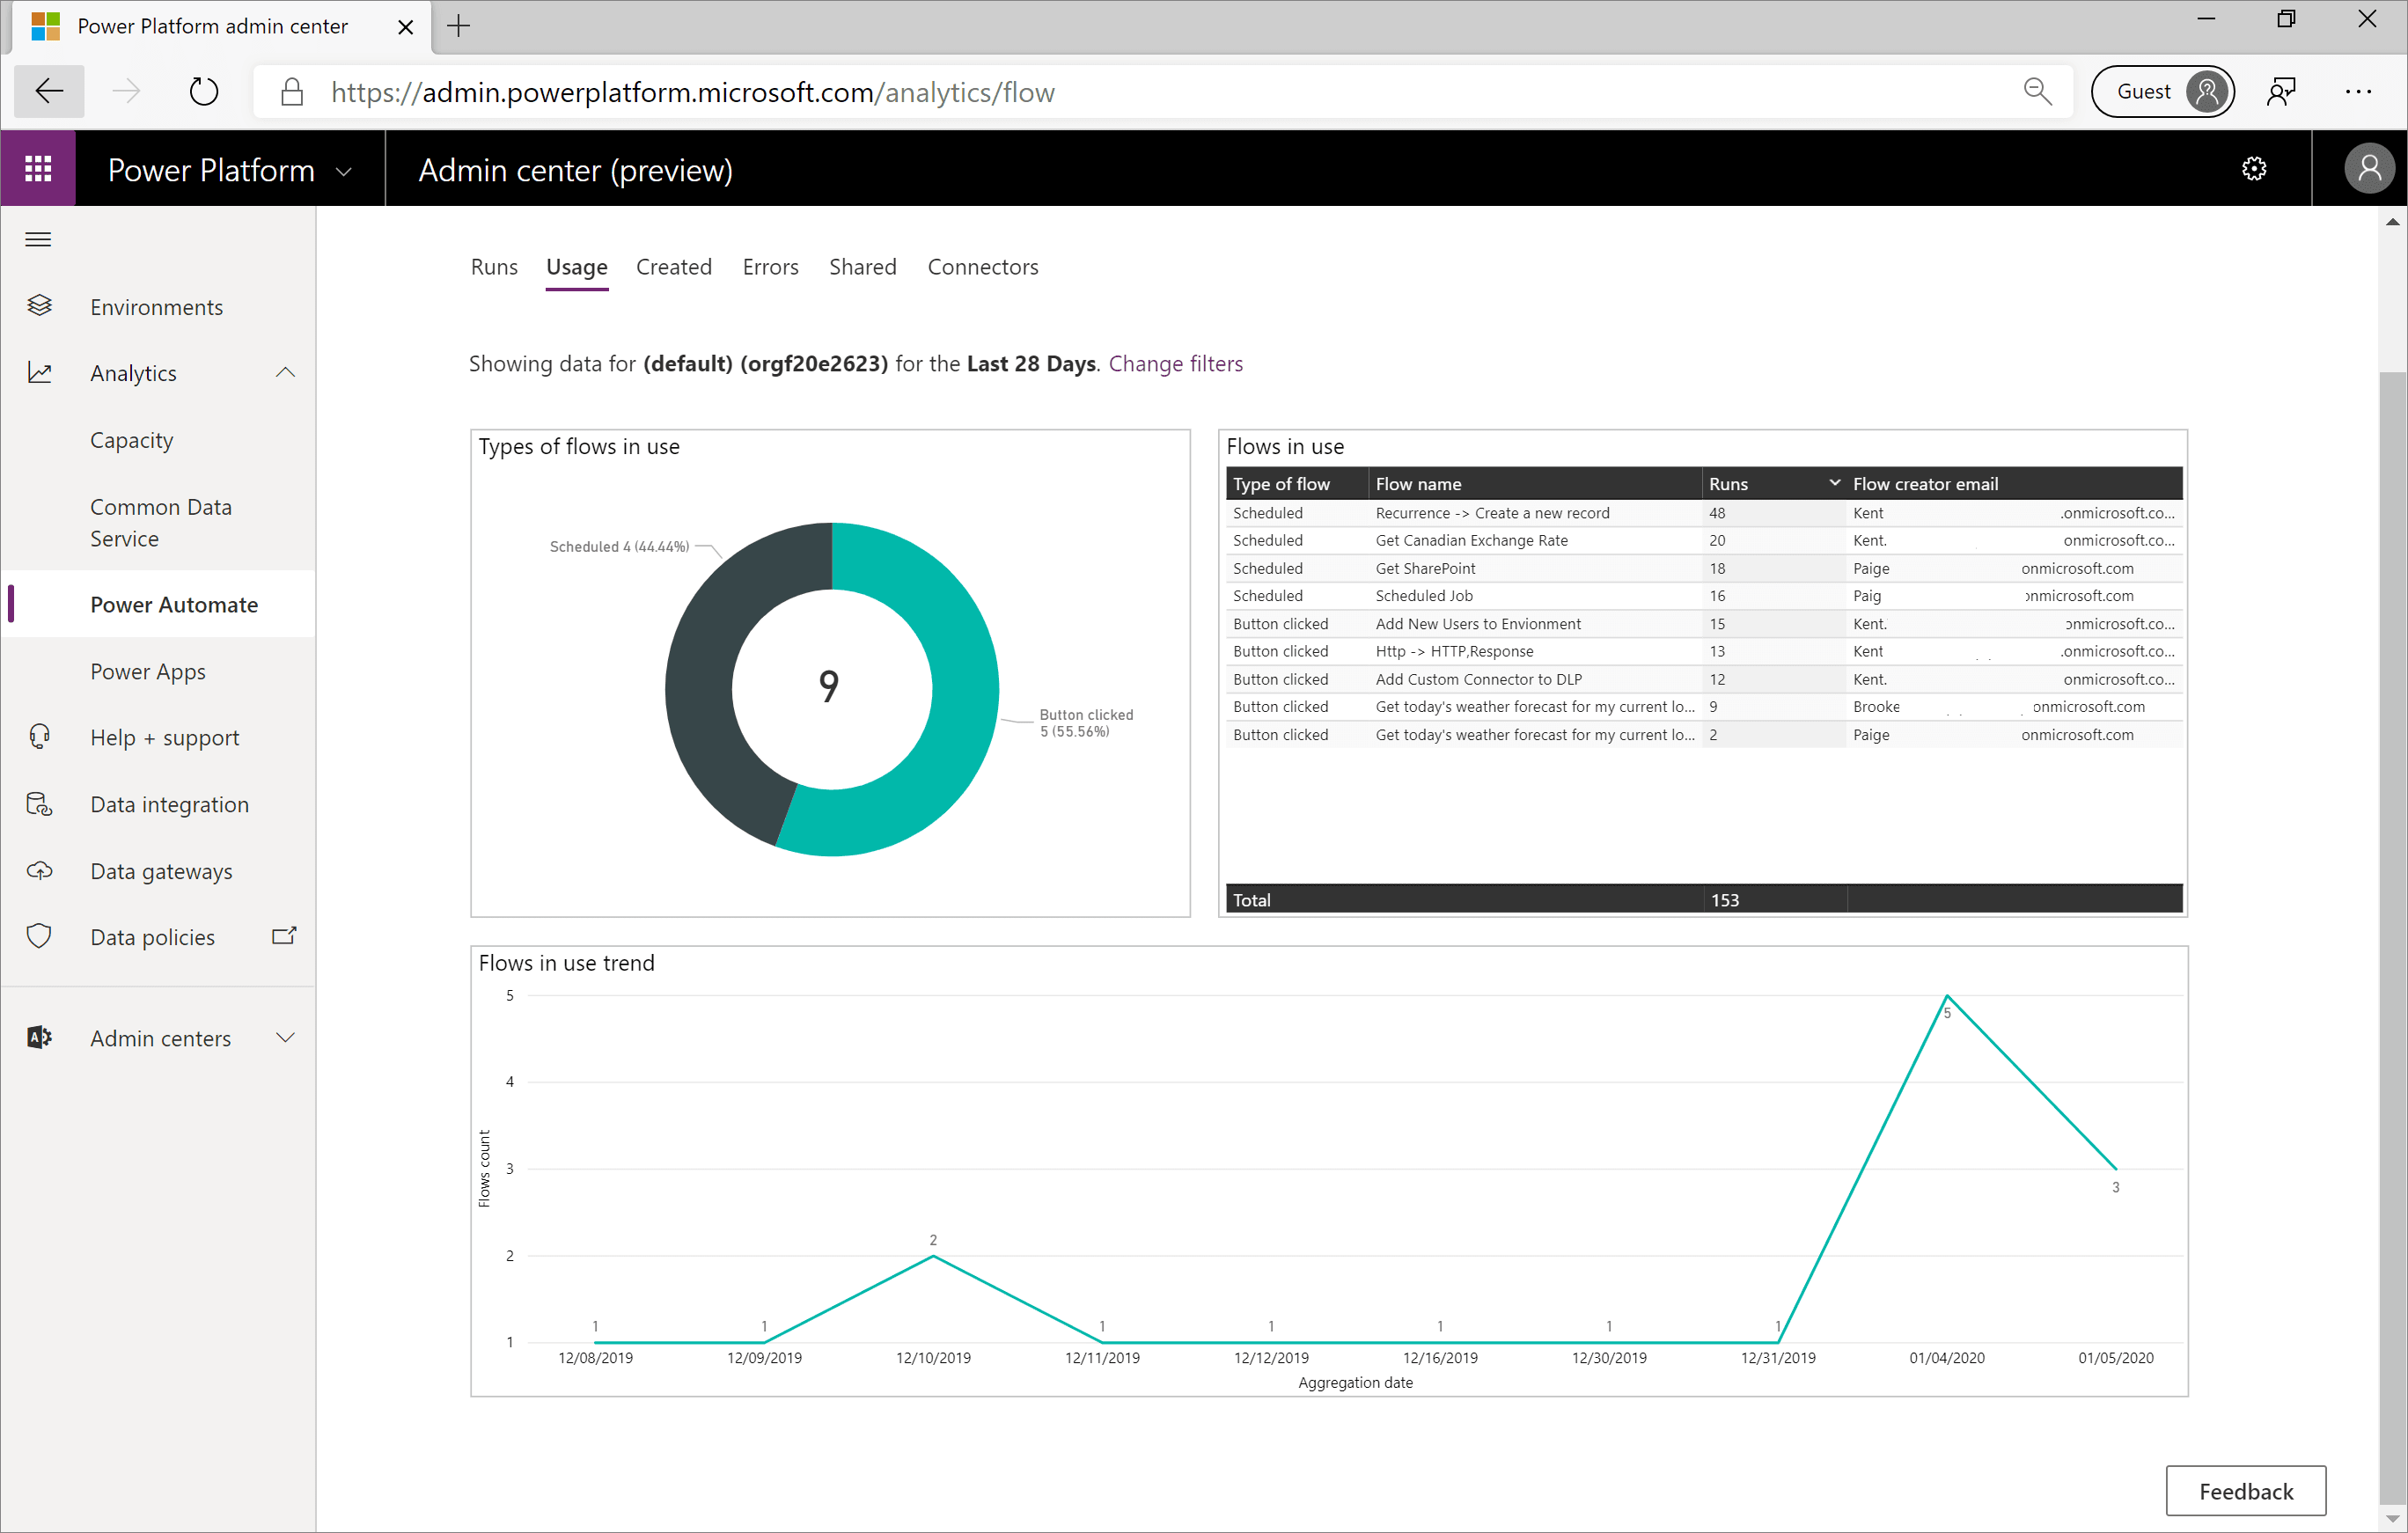
The Usage report outlines the types of flows in use, including whether the flow is Scheduled, Button clicked, or System Events are driven or not. In addition, for each flow in use, the number of runs is aggregated so an administrator can see how frequently the flows run and what is the most frequently run flow. The Flow creator email is also captured so that if an administrator needs to contact this person, they have the correct email address. The Usage report also includes a trend that highlights the number of unique flows in use each day based on the Time period filter.
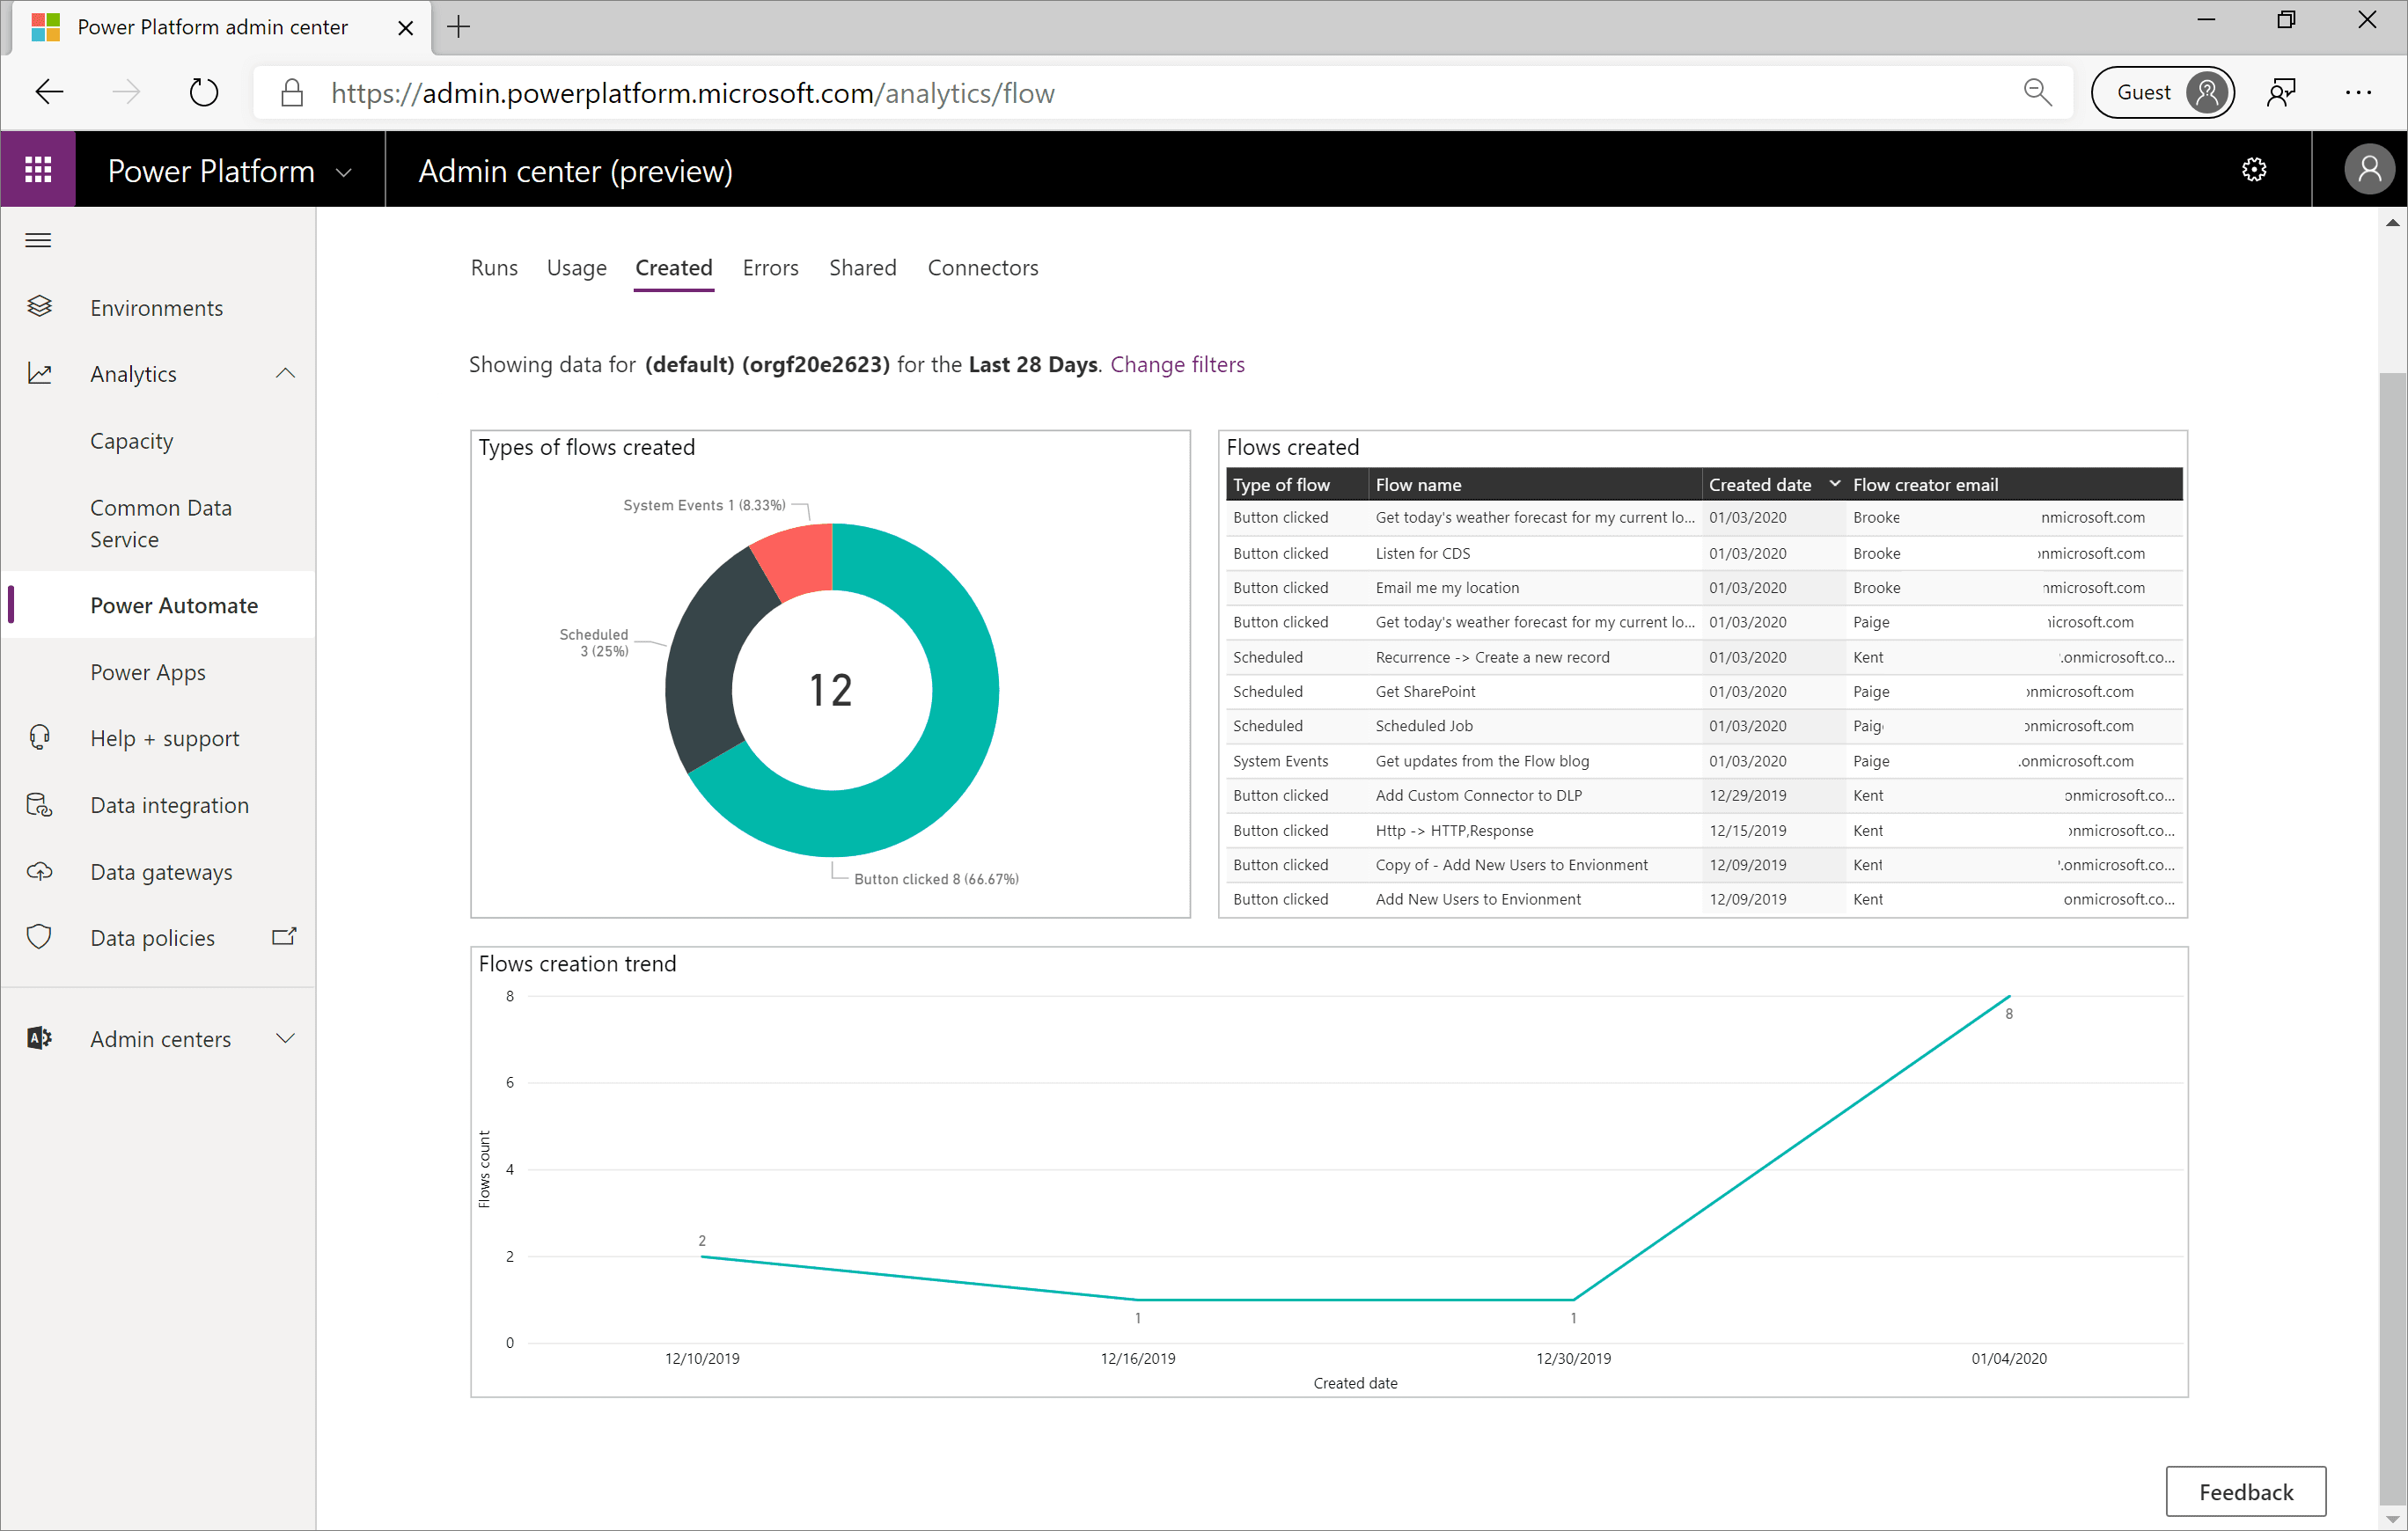
When you are looking to identify new flows, the Created flow report will identify these new assets. These flows will be broken down by their type: Scheduled, Button clicked, or System Events. The flows that have been recently created will also be listed in a table that includes the Created date and the Flow creator email address information. Additionally, this report displays a trend of when these flows were created.
The Created report is useful for people who are responsible for change management. Perhaps the organization has recently provided Power Automate training and wants to see if people are putting these new skills to use.
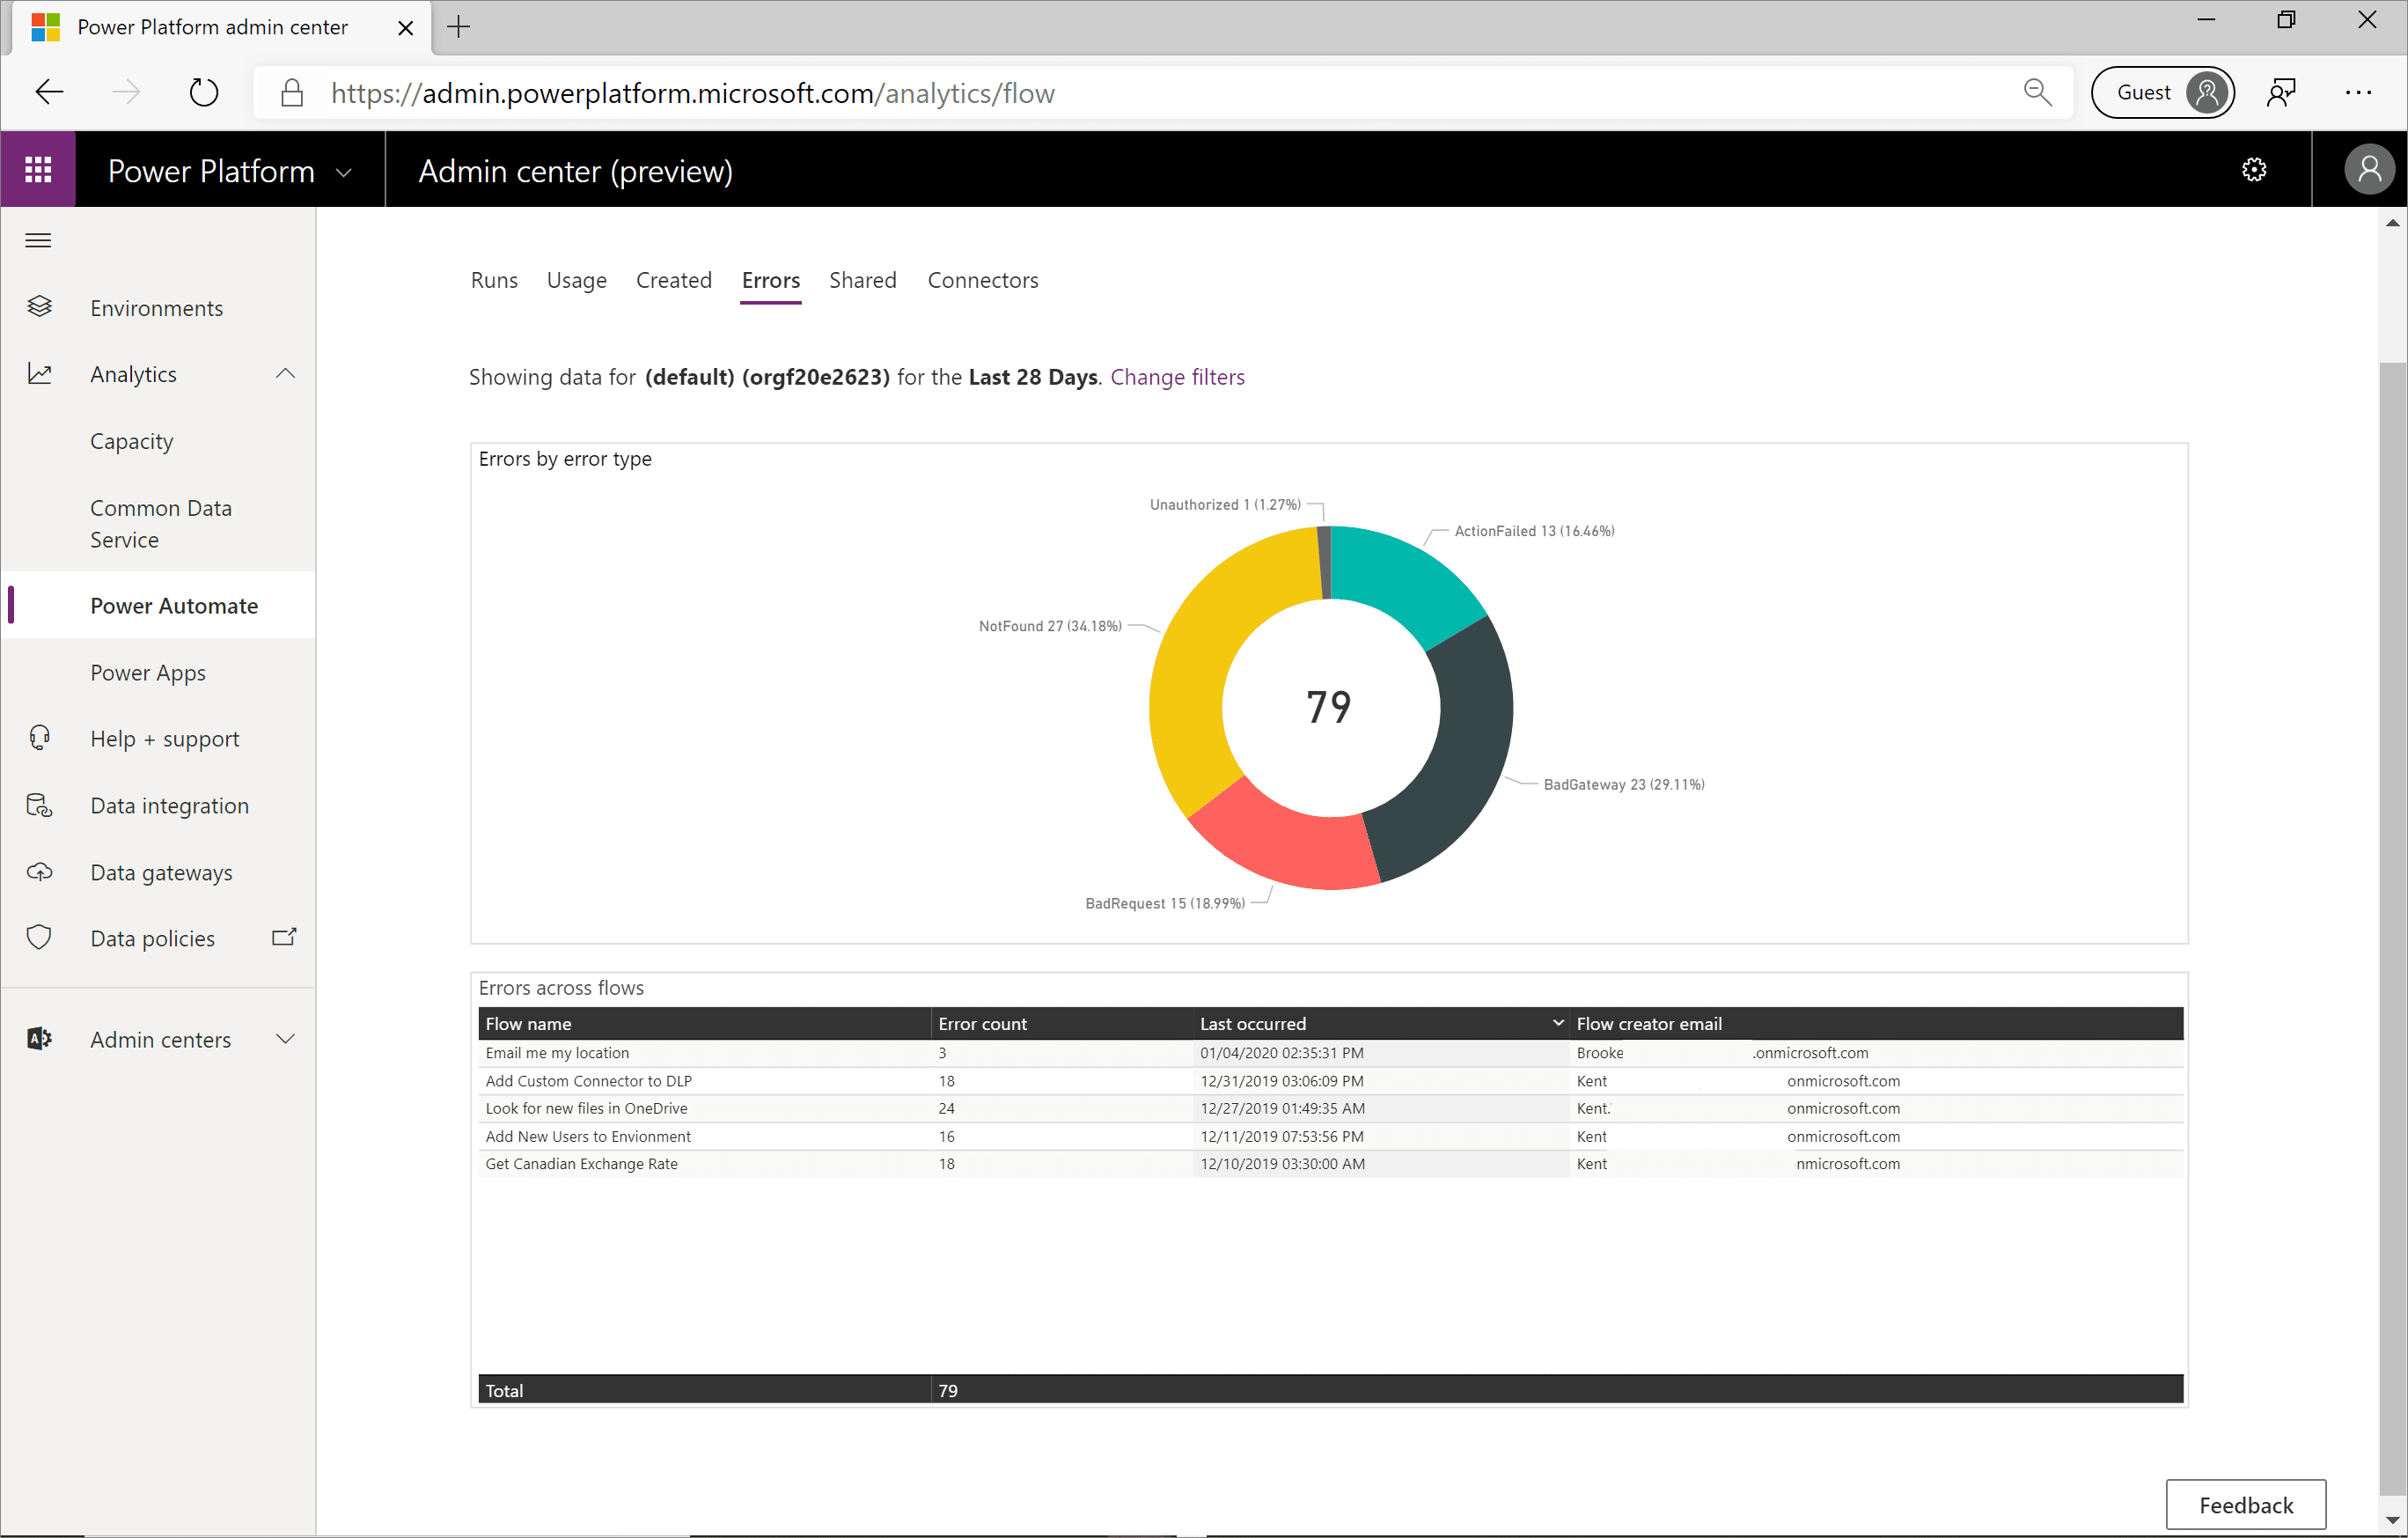
For administrators, detecting when makers are experiencing errors with their flows can become a great concern if a flow continues to fail and supports an important business process. The Errors report will help administrators identify flows that are failing and will display the Error count, the Last occurred timestamp, and the Flow creator email information. In addition, a pie chart will break down the error types that will highlight the different types of errors that makers have been experiencing.
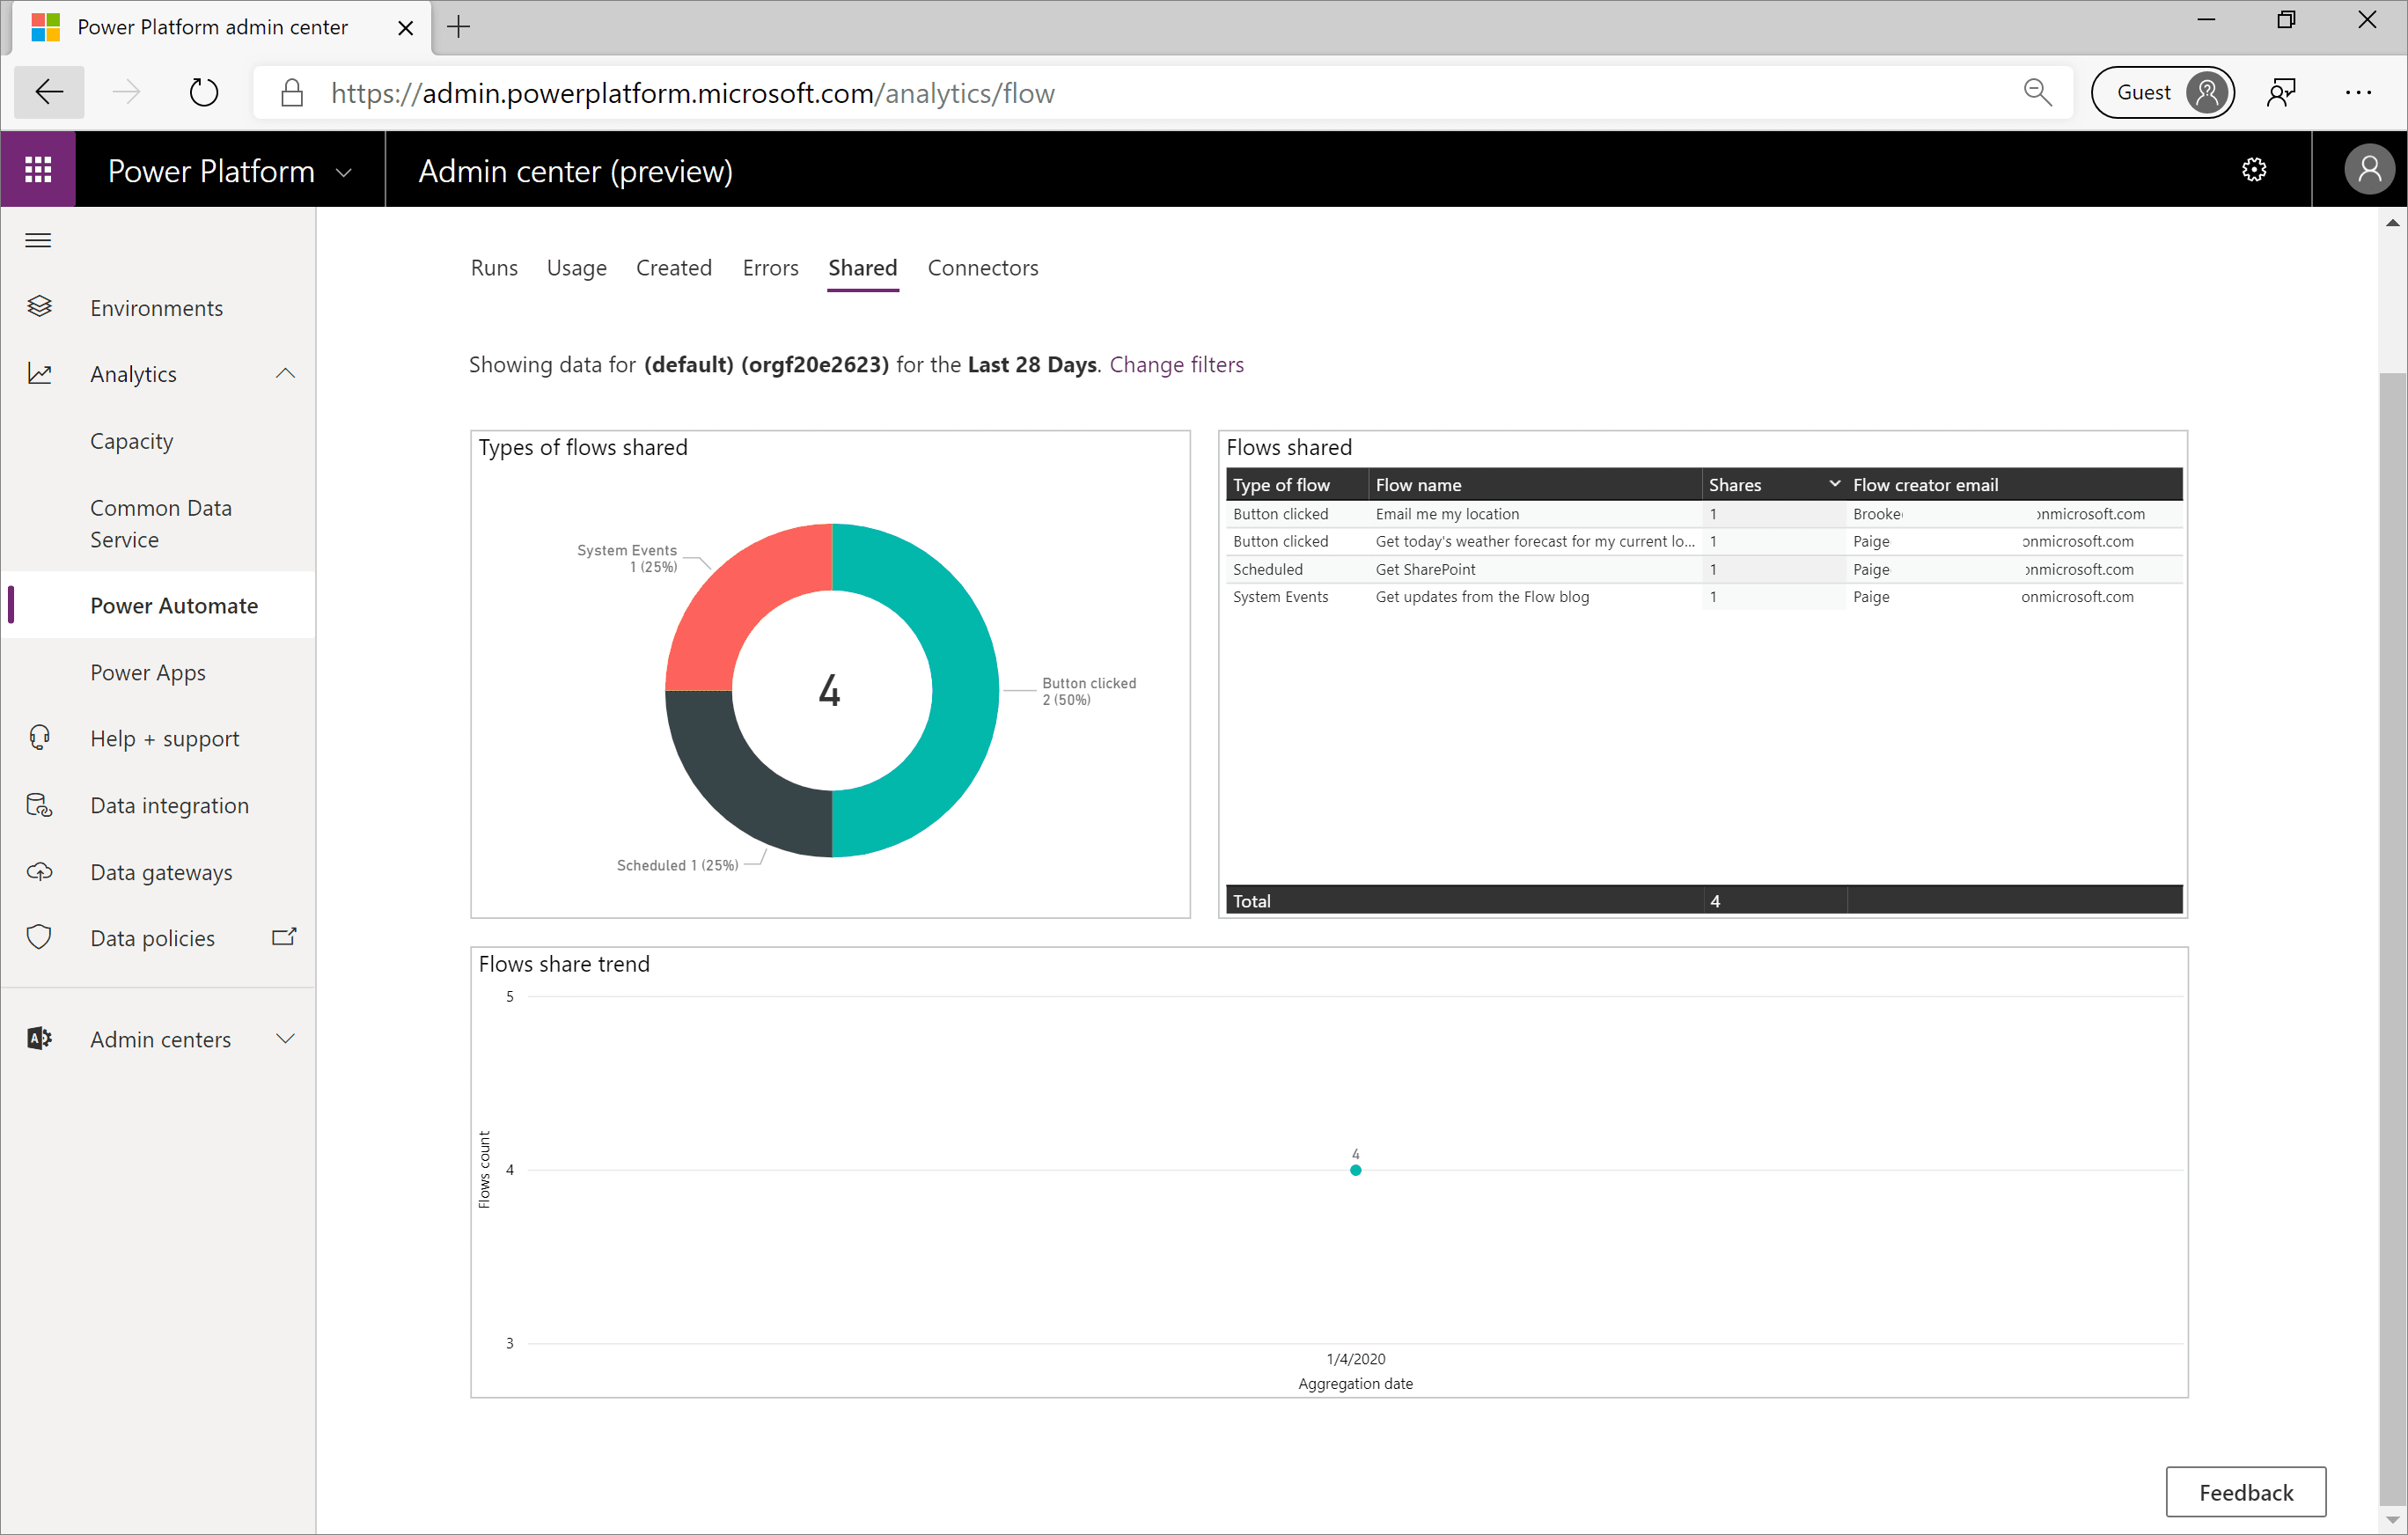
The Shared report will identify the types of flows shared, including System Events, Button clicked and Scheduled. In addition, a table will be displayed that includes the Flow name that was shared, the number of Shares, and the Flow creator email information. This report also displays a trend of what day the flow was shared within the configured time period.
The Shared report is useful for identifying makers who are sharing their work with others within the organization. These makers are often referred to as champions who should be empowered so they can drive further business results.
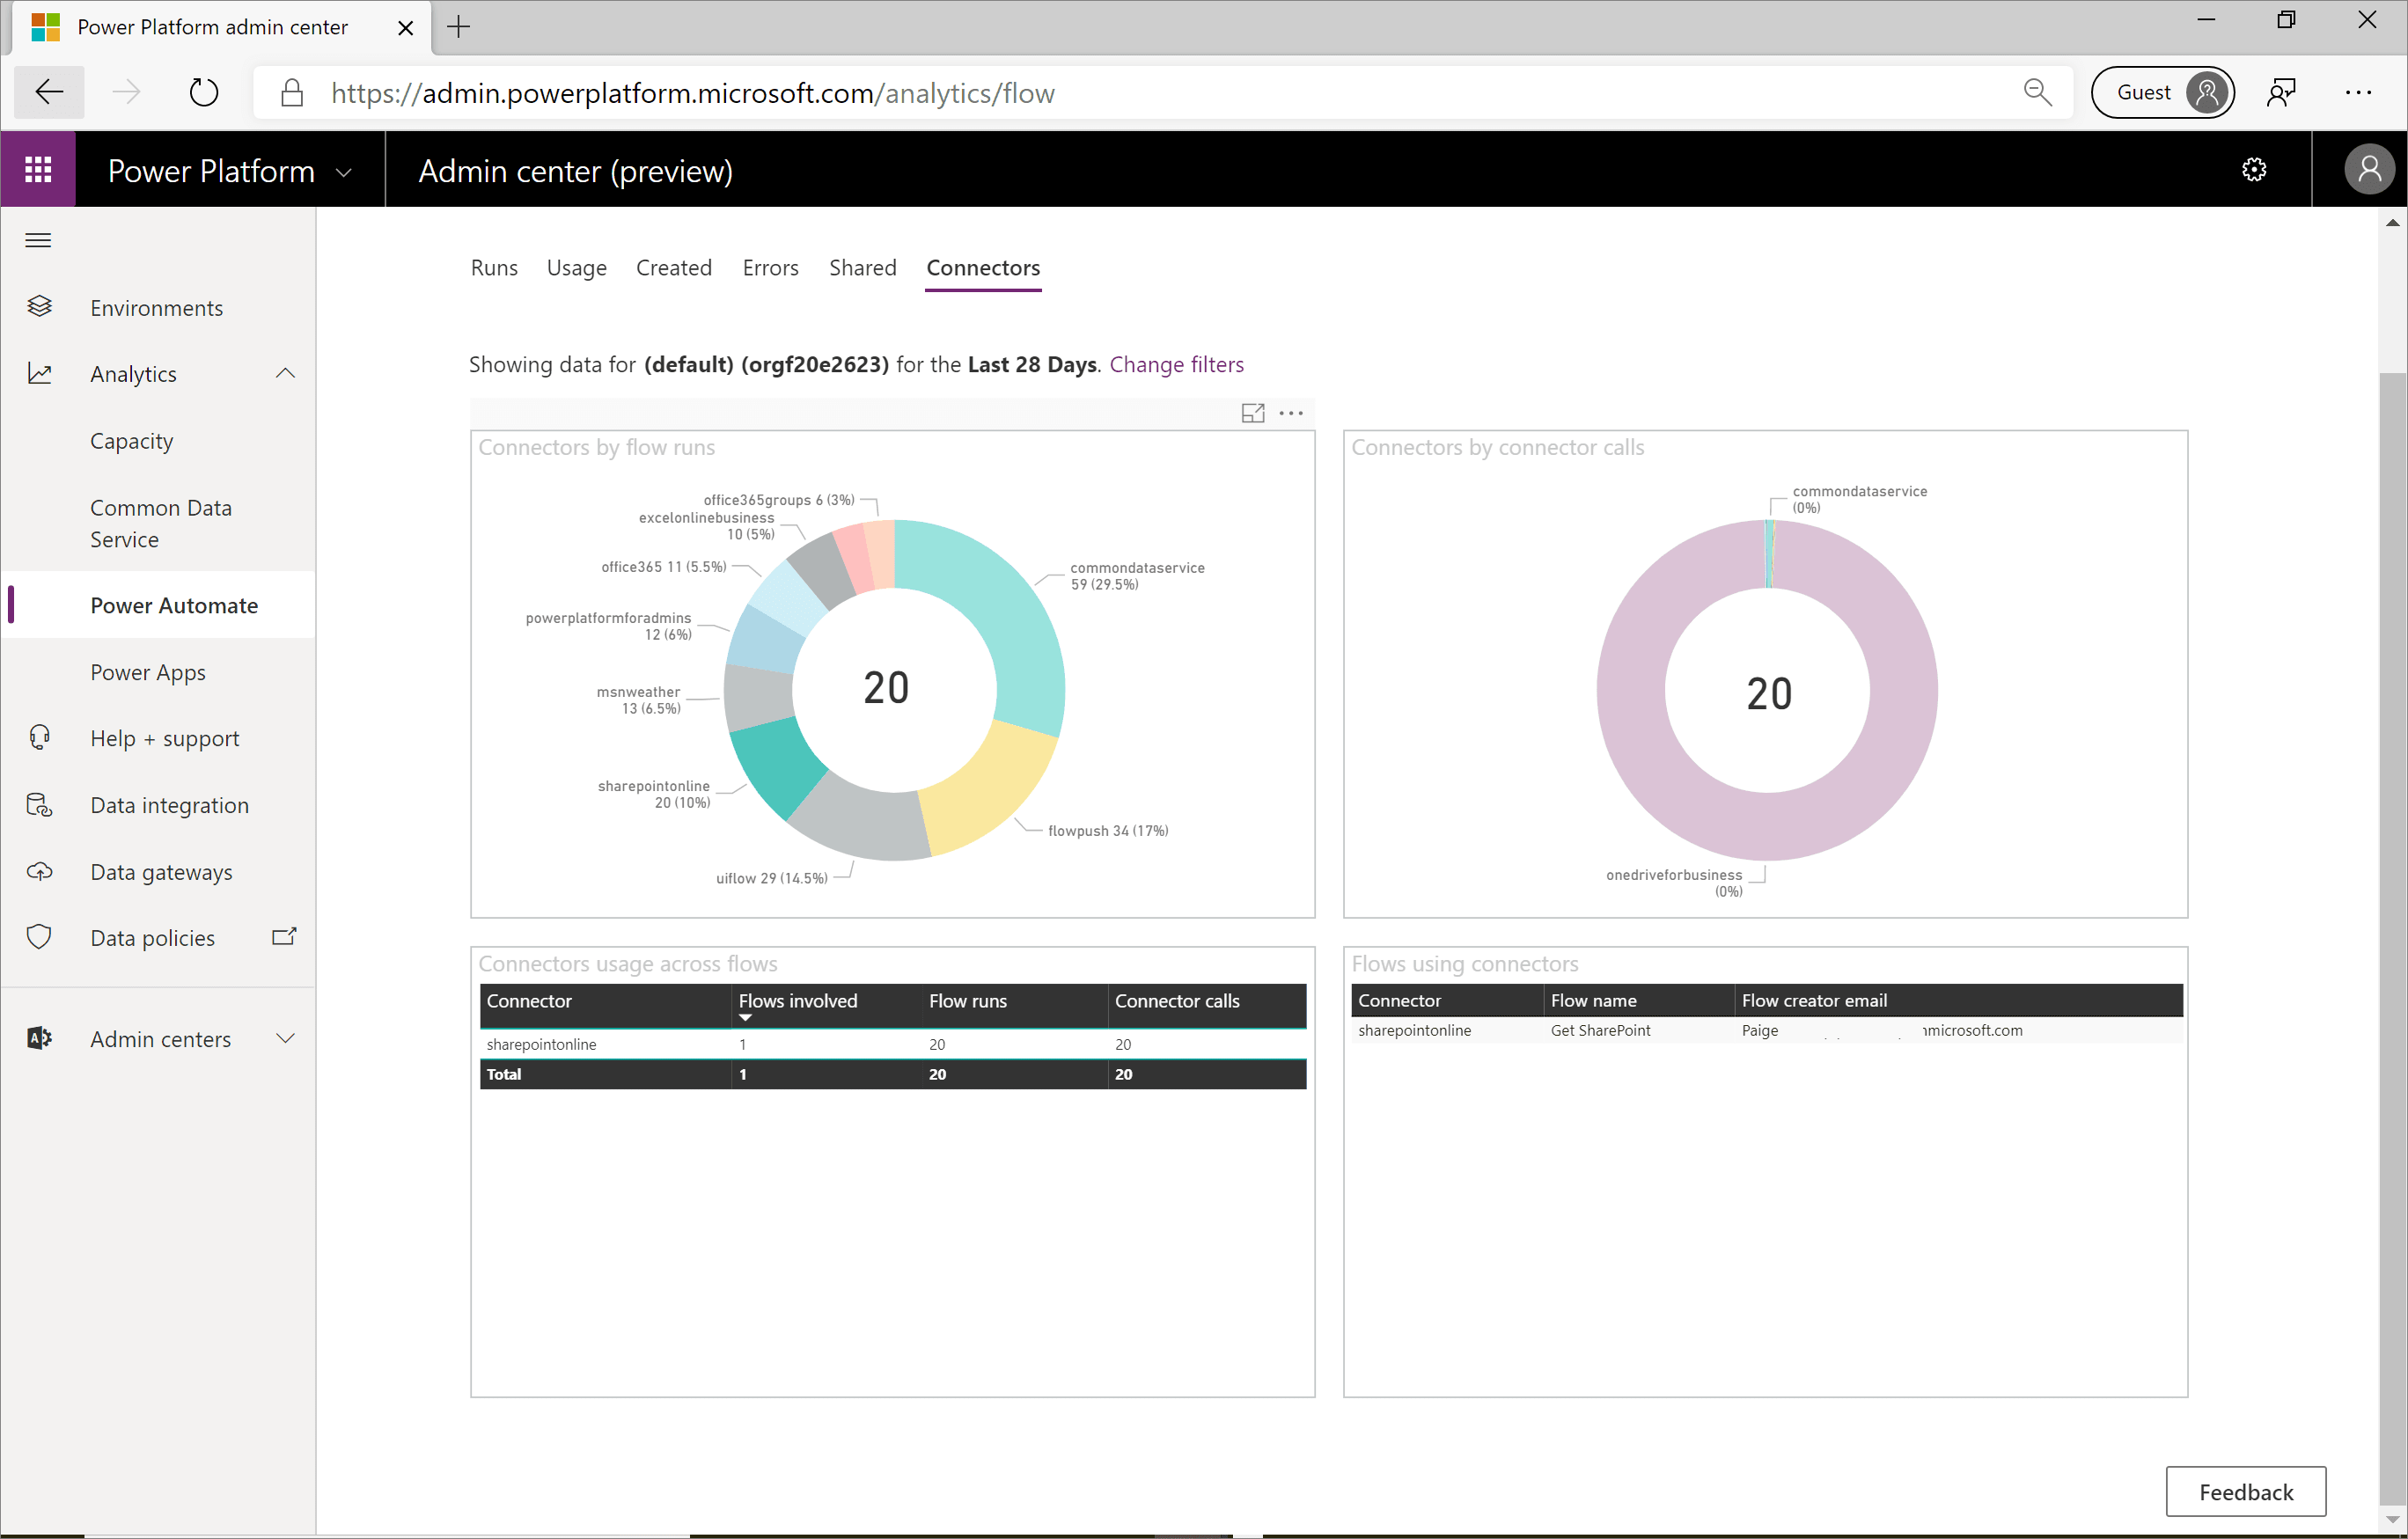
Often, Connectors is the most important report to consider when evaluating DLP changes. The Connectors report identifies all the connectors that have been involved in flow runs and how many connector calls have been made. Much like you would expect with a Power BI embedded experience, an administrator can filter out connectors as required.
For example, consider a situation where an administrator wants to make a DLP connector change that involves the SharePoint connector. The administrator can select the SharePointOnline connector from the Connectors by flow runs visualization. As a result, the Connectors by connector calls visualization will be updated. In addition, you will see an updated table called Flows using connectors. In this visualization, you will see all flows that use the SharePoint connector and the Flow creator email address. This information will help you identify all makers that you should proactively reach out to before making any DLP changes.
The Connectors report is useful in governance and change management situations. It allows administrators to identify if connectors are being used that are not in the best interest of the organization and allows administrators to work with those people to better understand why they are using those connectors and potentially implement actions that prevent further usage.
On the other hand, if an administrator discovers a lot of use around a particular connector, like Microsoft Forms, perhaps they want to evangelize its usefulness with other business units in an attempt to scale the organization and acquire more benefits for the organization.
Explanation
It is important to understand the impacts of an upcoming change before sending out communications. The Power Platform Admin Analytics feature can help administrators understand how Power Automate is being used in your organization to help you avoid undesirable impacts.
Six Power Automate reports are available in the Power Platform Admin Centre:
Runs
Usage
Created
Errors
Shared
Connectors
Administrators can use these reports to gain insight into how people are using Power Automate.
To access the Admin Analytics feature, go to the Power Platform Admin Centre by using an account that has environment or tenant admin privileges. After you have signed in, expand the Analytics drop-down menu from the left navigation pane and select Power Automate.
In regard to environment and tenant scopes, when it comes to Admin Analytics, everything is in the context of an environment. Currently, no method exists for you to see aggregated analytics, across a tenant, in this experience. A tenant administrator will be able to see analytics on an environment-by-environment basis. Environment administrators will only see analytics for the environments that they are admins in. To change the environment, an administrator can select the filter icon in the upper-right corner of the Admin Centre page, where they can select their desired Environment and the Time period that they want to see analytics for.
The Power Platform Admin Centre will store analytics for up to 28 days, but administrators can filter based on the last 14 and 7 days. In addition, the analytics are not aggregated in real-time. Administrators can expect up to a three-hour delay before the latest analytics are published.
Within the Runs report in the Power Automate Analytics feature, administrators will be able to determine the number of flow runs within that environment for each day, week, and month. In addition, Power BI embedded slicers allow an administrator to filter data based on whether the run was successful, failed, or cancelled.
For organizations that are adopting Power Automate, this report can provide insights that help determine the level of adoption within the organization. People who are responsible for change management can use this data to help support training and adoption campaigns by being able to show measurable progress.
The Usage report outlines the types of flows in use, including whether the flow is Scheduled, Button clicked, or System Events are driven or not. In addition, for each flow in use, the number of runs is aggregated so an administrator can see how frequently the flows run and what is the most frequently run flow. The Flow creator email is also captured so that if an administrator needs to contact this person, they have the correct email address. The Usage report also includes a trend that highlights the number of unique flows in use each day based on the Time period filter.
When you are looking to identify new flows, the Created flow report will identify these new assets. These flows will be broken down by their type: Scheduled, Button clicked, or System Events. The flows that have been recently created will also be listed in a table that includes the Created date and the Flow creator email address information. Additionally, this report displays a trend of when these flows were created.
The Created report is useful for people who are responsible for change management. Perhaps the organization has recently provided Power Automate training and wants to see if people are putting these new skills to use.
For administrators, detecting when makers are experiencing errors with their flows can become a great concern if a flow continues to fail and supports an important business process. The Errors report will help administrators identify flows that are failing and will display the Error count, the Last occurred timestamp, and the Flow creator email information. In addition, a pie chart will break down the error types that will highlight the different types of errors that makers have been experiencing.
The Shared report will identify the types of flows shared, including System Events, Button clicked and Scheduled. In addition, a table will be displayed that includes the Flow name that was shared, the number of Shares, and the Flow creator email information. This report also displays a trend of what day the flow was shared within the configured time period.
The Shared report is useful for identifying makers who are sharing their work with others within the organization. These makers are often referred to as champions who should be empowered so they can drive further business results.
Often, Connectors is the most important report to consider when evaluating DLP changes. The Connectors report identifies all the connectors that have been involved in flow runs and how many connector calls have been made. Much like you would expect with a Power BI embedded experience, an administrator can filter out connectors as required.
For example, consider a situation where an administrator wants to make a DLP connector change that involves the SharePoint connector. The administrator can select the SharePointOnline connector from the Connectors by flow runs visualization. As a result, the Connectors by connector calls visualization will be updated. In addition, you will see an updated table called Flows using connectors. In this visualization, you will see all flows that use the SharePoint connector and the Flow creator email address. This information will help you identify all makers that you should proactively reach out to before making any DLP changes.
The Connectors report is useful in governance and change management situations. It allows administrators to identify if connectors are being used that are not in the best interest of the organization and allows administrators to work with those people to better understand why they are using those connectors and potentially implement actions that prevent further usage.
On the other hand, if an administrator discovers a lot of use around a particular connector, like Microsoft Forms, perhaps they want to evangelize its usefulness with other business units in an attempt to scale the organization and acquire more benefits for the organization.