
Microsoft Certified: Power Platform Fundamentals - (PL-900) Exam Questions
Total Questions
Last Updated
1st Try Guaranteed

Experts Verified
Question 11 Single Choice
Scenario: The Brand Corporation is the science and research branch of the Roxxon Corporation which is managed by Melinda May and Phil Coulson. Melinda and Phil have decided to use Microsoft Power Platform for the company to increase its efficiencies. Melinda hired you as an advisor to guide many projects to ensure their success.
In the current project, Phil plans to have the team use Power Platform to create tools that help travel agents book field agent’s travel.
As the Power Platform expert, Phil asks you to recommend the appropriate tool to use for the case where Brand needs to be sure that all travel agents use the same process with all field agent’s.
Which of the following tools should you recommend?
Explanation

Click "Show Answer" to see the explanation here
The best tool option to use for the case where Brand needs to be sure that all travel agents use the same process with all field agent’s is Business process flow.
You can help ensure that people enter data consistently and follow the same steps every time they work with a customer by creating a business process flow. For example, you might want to create a business process flow to have everyone handle customer service requests the same way, or to require that people get approval for an invoice before submitting an order. Business process flows use the same underlying technology as other processes, but the capabilities that they provide are very different from other features that use processes.

https://www.youtube.com/watch?v=JB-bGasVcDo
Why use business process flows?
Business process flows provide a guide for people to get work done. They provide a streamlined user experience that leads people through the processes their organization has defined for interactions that need to be advanced to a conclusion of some kind. This user experience can be tailored so that people with different security roles can have an experience that best suits the work they do.
Use business process flows to define a set of steps for people to follow to take them to a desired outcome. These steps provide a visual indicator that tells people where they are in the business process. Business process flows reduce the need for training because new users don’t have to focus on which table they should be using. They can let the process guide them. You can configure business process flows to support common sales methodologies that can help your sales groups achieve better results. For service groups, business process flows can help new staff get up-to-speed more quickly and avoid mistakes that could result in unsatisfied customers.
What can business process flows do?
With business process flows, you define a set of stages and steps that are then displayed in a control at the top of the form.

Each stage contains a group of steps. Each step represents a column where data can be entered. You can advance to the next stage by using the Next Stage button. In the unified interface, you can work with a business process flow stage inside the stage flyout or you can pin it to the side pane. Business process flows doesn't support expanding the stage flyout to the side pane on mobile devices.
You can make a step required so that people must enter data for a corresponding column before they can proceed to the next stage. This is commonly called ”stage-gating”. If you are adding a business-required or system-required column to a business process flow stage, we recommend that you add this column to your form as well.
Business process flows appear relatively simple compared to other types of processes because they do not provide any conditional business logic or automation beyond providing the streamlined experience for data entry and controlling entry into stages. However, when you combine them with other processes and customizations, they can play an important role in saving people time, reducing training costs, and increasing user adoption.
Explanation
The best tool option to use for the case where Brand needs to be sure that all travel agents use the same process with all field agent’s is Business process flow.
You can help ensure that people enter data consistently and follow the same steps every time they work with a customer by creating a business process flow. For example, you might want to create a business process flow to have everyone handle customer service requests the same way, or to require that people get approval for an invoice before submitting an order. Business process flows use the same underlying technology as other processes, but the capabilities that they provide are very different from other features that use processes.
https://www.youtube.com/watch?v=JB-bGasVcDo
Why use business process flows?
Business process flows provide a guide for people to get work done. They provide a streamlined user experience that leads people through the processes their organization has defined for interactions that need to be advanced to a conclusion of some kind. This user experience can be tailored so that people with different security roles can have an experience that best suits the work they do.
Use business process flows to define a set of steps for people to follow to take them to a desired outcome. These steps provide a visual indicator that tells people where they are in the business process. Business process flows reduce the need for training because new users don’t have to focus on which table they should be using. They can let the process guide them. You can configure business process flows to support common sales methodologies that can help your sales groups achieve better results. For service groups, business process flows can help new staff get up-to-speed more quickly and avoid mistakes that could result in unsatisfied customers.
What can business process flows do?
With business process flows, you define a set of stages and steps that are then displayed in a control at the top of the form.
Each stage contains a group of steps. Each step represents a column where data can be entered. You can advance to the next stage by using the Next Stage button. In the unified interface, you can work with a business process flow stage inside the stage flyout or you can pin it to the side pane. Business process flows doesn't support expanding the stage flyout to the side pane on mobile devices.
You can make a step required so that people must enter data for a corresponding column before they can proceed to the next stage. This is commonly called ”stage-gating”. If you are adding a business-required or system-required column to a business process flow stage, we recommend that you add this column to your form as well.
Business process flows appear relatively simple compared to other types of processes because they do not provide any conditional business logic or automation beyond providing the streamlined experience for data entry and controlling entry into stages. However, when you combine them with other processes and customizations, they can play an important role in saving people time, reducing training costs, and increasing user adoption.
Question 12 Single Choice
Scenario: You have been contracted by Wayne Enterprises, a company owned by Bruce Wayne with a market value of over twenty-seven million dollars. Bruce founded Wayne Enterprises shortly after he created the Wayne Foundation and he became the president and chairman of the company.
Bruce has come to you because his IT team plans to create Power Platform apps that consume industry-standard and proprietary data sources.
Jack Napier is the team lead and he raised a point during the current workgroup meeting. Jack said “Custom connectors are supported in instant flows only”.
Is Jack correct?
Explanation
Click "Show Answer" to see the explanation here
No, Jack is not correct. We can use custom connectors in power apps as well as flow.
Data is at the core of most apps, including those you build in Power Apps. Data is stored in a data source, and you bring that data into your app by creating a connection. The connection uses a specific connector to talk to the data source. Power Apps has connectors for many popular services and on-premises data sources, including SharePoint, SQL Server, Office 365, Salesforce, and Twitter.
A connector may provide tables of data or actions. Some connectors provide only tables, some provide only actions, and some provide both. Also your connector may be either a standard or custom connector.
While Azure Logic Apps, Microsoft Power Automate, and Microsoft Power Apps offer over 325+ connectors to connect to Microsoft and non-Microsoft services, you may want to communicate with services that aren't available as prebuilt connectors. Custom connectors address this scenario by allowing you to create (and even share) a connector with its own triggers and actions.

Explanation
No, Jack is not correct. We can use custom connectors in power apps as well as flow.
Data is at the core of most apps, including those you build in Power Apps. Data is stored in a data source, and you bring that data into your app by creating a connection. The connection uses a specific connector to talk to the data source. Power Apps has connectors for many popular services and on-premises data sources, including SharePoint, SQL Server, Office 365, Salesforce, and Twitter.
A connector may provide tables of data or actions. Some connectors provide only tables, some provide only actions, and some provide both. Also your connector may be either a standard or custom connector.
While Azure Logic Apps, Microsoft Power Automate, and Microsoft Power Apps offer over 325+ connectors to connect to Microsoft and non-Microsoft services, you may want to communicate with services that aren't available as prebuilt connectors. Custom connectors address this scenario by allowing you to create (and even share) a connector with its own triggers and actions.
Question 13 Multiple Choice
Scenario: Honest Eddie's Car Dealership is an establishment in South Carolina USA, which is dedicated to the purchase and sale of cars and light trucks.
Eddie has lent his company resources to a local charity to organize fundraising events. Below is the App Designer example of a Model-driven app called “Fundraiser.”

Which of the items listed are the table assets? (Select all that apply)
Explanation
Click "Show Answer" to see the explanation here
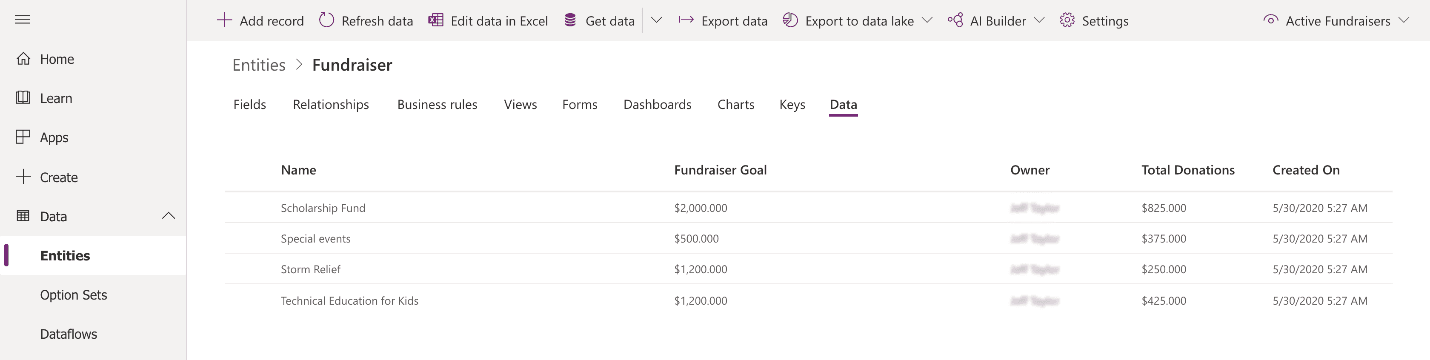
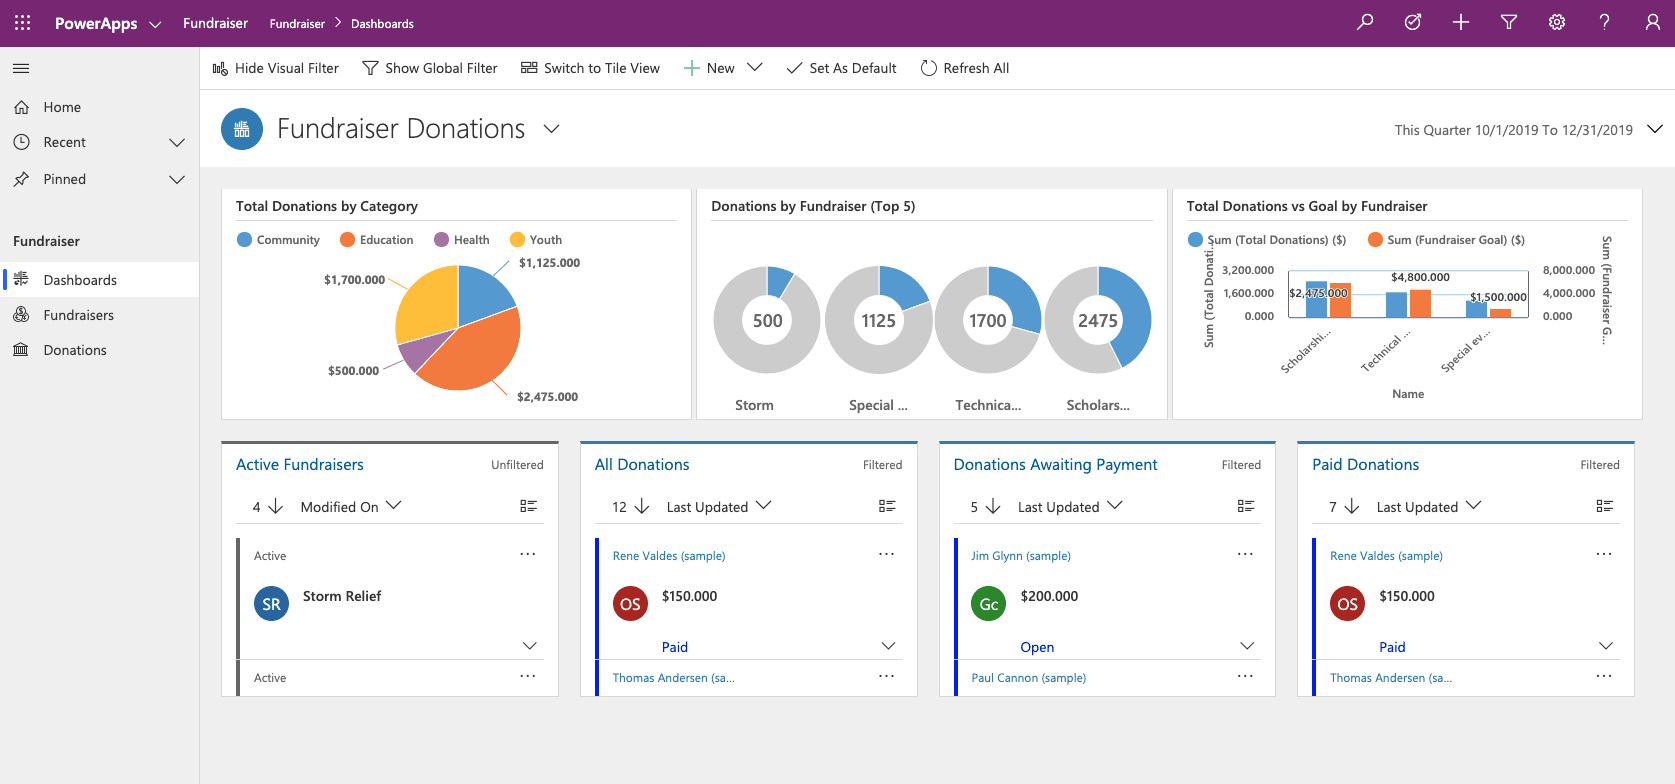
Below is the App Designer example of a Model-driven app called “Fundraiser.”
As you can see, there are two tables: Donation and Fundraiser. Each table also contains four assets:
Forms – Defining how users will see and interact with the data
Views – A list view of the rows for each table
Charts - Showing the data in a meaningful, visual representation
Dashboards – Providing an insightful, graphical overview of the data

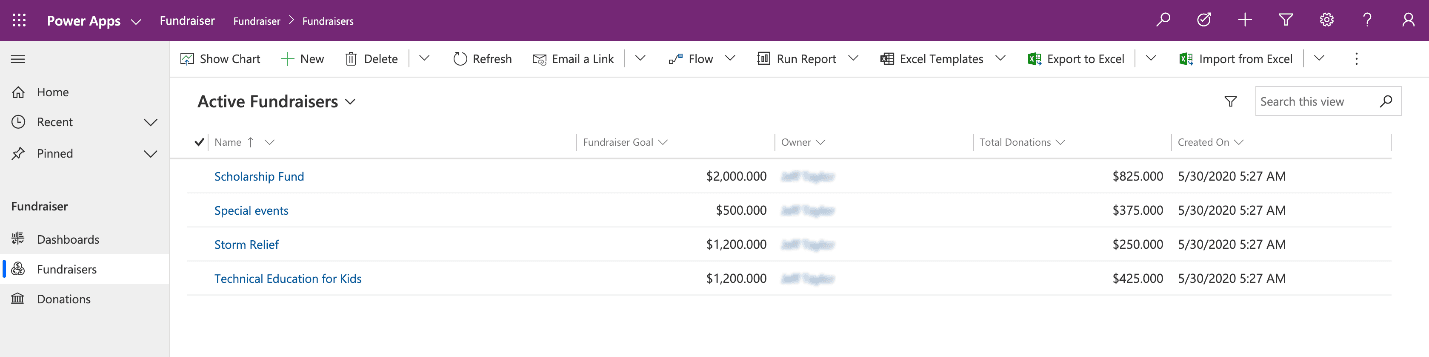
By selecting the Play button in the top right, the app is put into Play mode. You can see it then looks completely different and shows the data based on the choices made in the design process.

Understand the needs of the user
With model-driven apps, the name says it all. Your primary design goal is to get your Microsoft Dataverse data model in order. With that in place, you can connect Power Apps, and a model-driven app will be created for you from that model.
Model-driven apps are created using the App Designer. You will choose the entities, dashboards, business process flows, forms, and other components that you want to make available in your app, and then the app will be created for you. This means you will need to spend more time understanding what your user needs than how it is going to look.
Data model
As you begin the data modelling process, there are a couple of important questions to ask yourself:
What type of data will your solution be storing and or collecting?
How will this data relate or coincide with the other data you are working with?
These questions are important when designing a model-driven application because of how model-driven applications function. Remember, model-driven applications use a metadata-driven architecture. This means a large portion of the model-driven app is based on how your data is modeled, and there is no need to write custom code to alter the app design.
You can view the app metadata by reviewing the Table in Microsoft Dataverse.
You can also view the app Play mode to see a preview of what the app will look like.
In the example above, for the Fundraiser table, there are several pieces of data being collected, such as:
Name
Fundraiser Goal
Owner
Total Donations
Created On
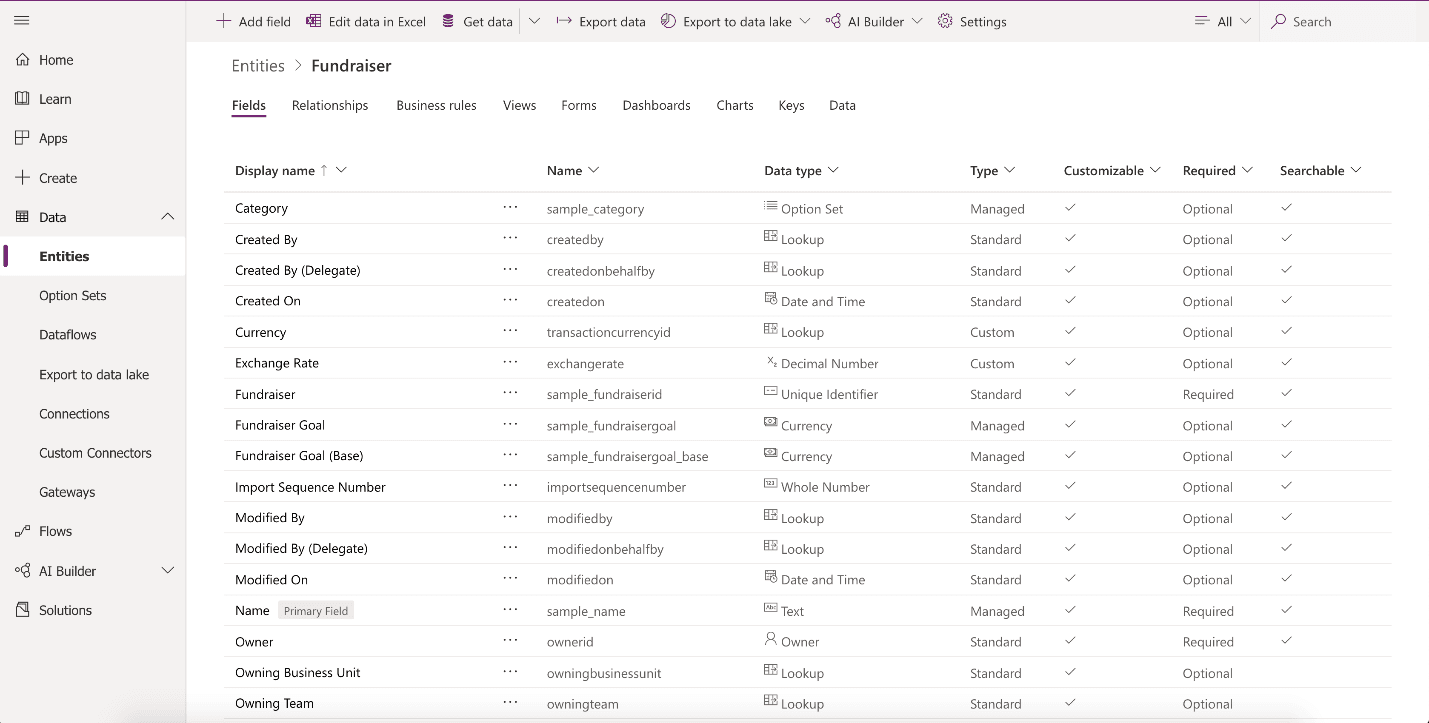
As you think about your data model, also think about data types. When adding columns to your table in Microsoft Dataverse, the data type you choose will determine how users enter and view that in your model-driven app. Choices show as dropdowns, currency shows with currency symbols, while decimal numbers don’t. These little changes in the table can have a profound effect on how your user experiences your app.
The screenshot below shows examples of columns and the different data types they could have using the Fundraiser example again.
Important
If a column needs to be changed to a different data type, (i.e. text column to a choice column), then you will need to delete that column and recreate with the correct data type. This will cause you to lose any data associated with that column.
Business Logic
When incorporating business logic in your app, there are two primary options available. You can set Business Rules on your Microsoft Dataverse tables or you can build Business Process Flows.
With Business Rules, you will define behaviours at the data layer. This is great for setting conditions for when a field is required, setting a default value, or even showing or hiding a field based on criteria. An example could be a table for tracking expenses. You could have a column for type of travel and then build a business rule that dictates that if a user chooses automobile then the mileage field is required, else it is optional. This gives you the power to make sure you maintain data consistency in all scenarios.
Business process flows are used to guide users through using your app. These workflows can provide visuals on next steps based on the status of the data and facilitate other actions that you want to occur as the user uses the app. Business Process Flows let you bring automation to your app and make it more of a guided experience than just a place to enter data.
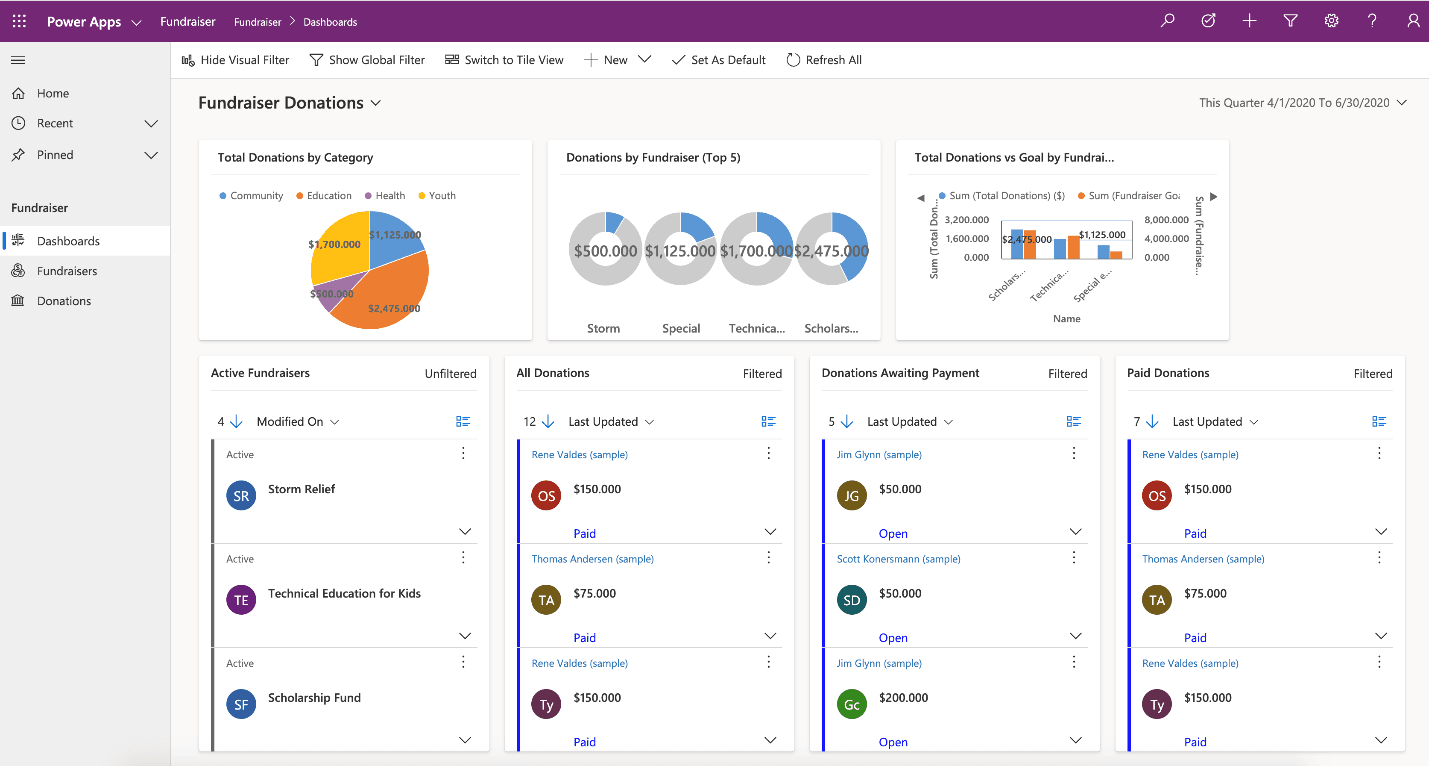
Dashboards
A common output need for apps is to visualize the data. For this requirement, you can implement dashboards with custom filters and visual graphics to tie all this data together right in your app. When creating your dashboards, make sure they are simple for your users to consume without overwhelming them with all the data. Provide high-level snapshots of your data and allow them to use filters to dive deeper into the data if needed.
Additional third-party solutions and app accelerators
It is also important to know about the different App accelerators and third-party solutions available to you. Depending on the industry you are in, Health, Financial, Banking, Education, Non- Profit, Automotive, or Media, Microsoft has released a number of accelerators or foundational components to assist you with quickly standing up your solution.
Explanation
Below is the App Designer example of a Model-driven app called “Fundraiser.”
As you can see, there are two tables: Donation and Fundraiser. Each table also contains four assets:
Forms – Defining how users will see and interact with the data
Views – A list view of the rows for each table
Charts - Showing the data in a meaningful, visual representation
Dashboards – Providing an insightful, graphical overview of the data
By selecting the Play button in the top right, the app is put into Play mode. You can see it then looks completely different and shows the data based on the choices made in the design process.
Understand the needs of the user
With model-driven apps, the name says it all. Your primary design goal is to get your Microsoft Dataverse data model in order. With that in place, you can connect Power Apps, and a model-driven app will be created for you from that model.
Model-driven apps are created using the App Designer. You will choose the entities, dashboards, business process flows, forms, and other components that you want to make available in your app, and then the app will be created for you. This means you will need to spend more time understanding what your user needs than how it is going to look.
Data model
As you begin the data modelling process, there are a couple of important questions to ask yourself:
What type of data will your solution be storing and or collecting?
How will this data relate or coincide with the other data you are working with?
These questions are important when designing a model-driven application because of how model-driven applications function. Remember, model-driven applications use a metadata-driven architecture. This means a large portion of the model-driven app is based on how your data is modeled, and there is no need to write custom code to alter the app design.
You can view the app metadata by reviewing the Table in Microsoft Dataverse.
You can also view the app Play mode to see a preview of what the app will look like.
In the example above, for the Fundraiser table, there are several pieces of data being collected, such as:
Name
Fundraiser Goal
Owner
Total Donations
Created On
As you think about your data model, also think about data types. When adding columns to your table in Microsoft Dataverse, the data type you choose will determine how users enter and view that in your model-driven app. Choices show as dropdowns, currency shows with currency symbols, while decimal numbers don’t. These little changes in the table can have a profound effect on how your user experiences your app.
The screenshot below shows examples of columns and the different data types they could have using the Fundraiser example again.
Important
If a column needs to be changed to a different data type, (i.e. text column to a choice column), then you will need to delete that column and recreate with the correct data type. This will cause you to lose any data associated with that column.
Business Logic
When incorporating business logic in your app, there are two primary options available. You can set Business Rules on your Microsoft Dataverse tables or you can build Business Process Flows.
With Business Rules, you will define behaviours at the data layer. This is great for setting conditions for when a field is required, setting a default value, or even showing or hiding a field based on criteria. An example could be a table for tracking expenses. You could have a column for type of travel and then build a business rule that dictates that if a user chooses automobile then the mileage field is required, else it is optional. This gives you the power to make sure you maintain data consistency in all scenarios.
Business process flows are used to guide users through using your app. These workflows can provide visuals on next steps based on the status of the data and facilitate other actions that you want to occur as the user uses the app. Business Process Flows let you bring automation to your app and make it more of a guided experience than just a place to enter data.
Dashboards
A common output need for apps is to visualize the data. For this requirement, you can implement dashboards with custom filters and visual graphics to tie all this data together right in your app. When creating your dashboards, make sure they are simple for your users to consume without overwhelming them with all the data. Provide high-level snapshots of your data and allow them to use filters to dive deeper into the data if needed.
Additional third-party solutions and app accelerators
It is also important to know about the different App accelerators and third-party solutions available to you. Depending on the industry you are in, Health, Financial, Banking, Education, Non- Profit, Automotive, or Media, Microsoft has released a number of accelerators or foundational components to assist you with quickly standing up your solution.
Question 14 Single Choice
Business process flows are used to guide a user through the steps of your business process when working with Model-driven apps and Microsoft Dataverse.
True or False: You can edit the business process flow after it has been created.
Explanation
Click "Show Answer" to see the explanation here
Yes, you can edit the business process flow after it has been created.
Business process flows are used to guide a user through the steps of your business process when working with Model-driven apps and Microsoft Dataverse. The example below will guide you through the process and decisions you need to make when building or editing a business process flow.
Create a business process flow
Launch Power Automate and sign in using your organizational account.
In the left pane, select My flows.
On the top bar, select Business process flows.
Select + New at the top.
In the Build a business process flow pane, fill in the required fields:
Flow Name: The display name of the process doesn't have to be unique, but it should be meaningful for people who must choose a process. You can change this name later.
Name: A unique name that's based on the display name. You can change the name when you create the process, but you can't change it after the process has been created.
Choose a table: Select the table to base the process on. You can choose Account for this example.
The table that you select affects the columns that are available for steps in the business process flow. You can't change the table after creating the business process flow.
Select Create.
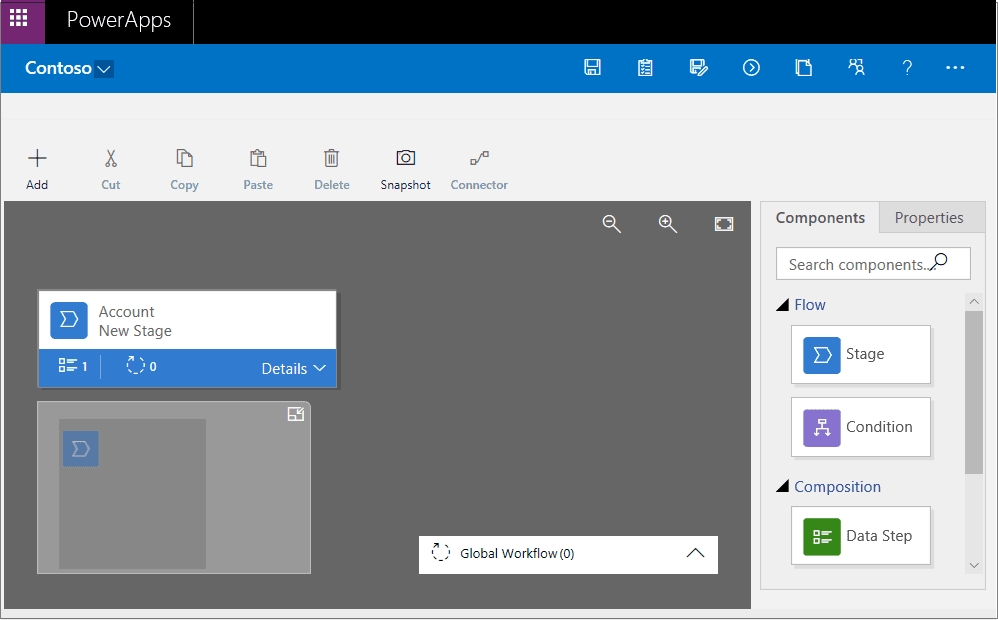
The new process is created, and the business process flow designer is started. The designer page has three sections:
On the left, a single stage named Account New Stage has already been created for you.
Beneath this stage is the mini map, which lets you see the whole process or quickly go to a part of the process.
On the right are components that you can drag to the designer. You can also set properties to create a business process flow.
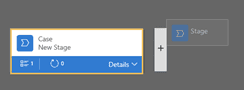
7. Add stages, so that users can proceed from one business stage to another in the process:
a. Drag the Stage component from the Components tab to the plus sign (+) in the designer.
b. Select the stage, and then, on the Properties tab on the right, set the properties:
Enter a display name.
Optional: Select a category for the stage (for example, Identify or Research). This category will display on the business process flow stage.
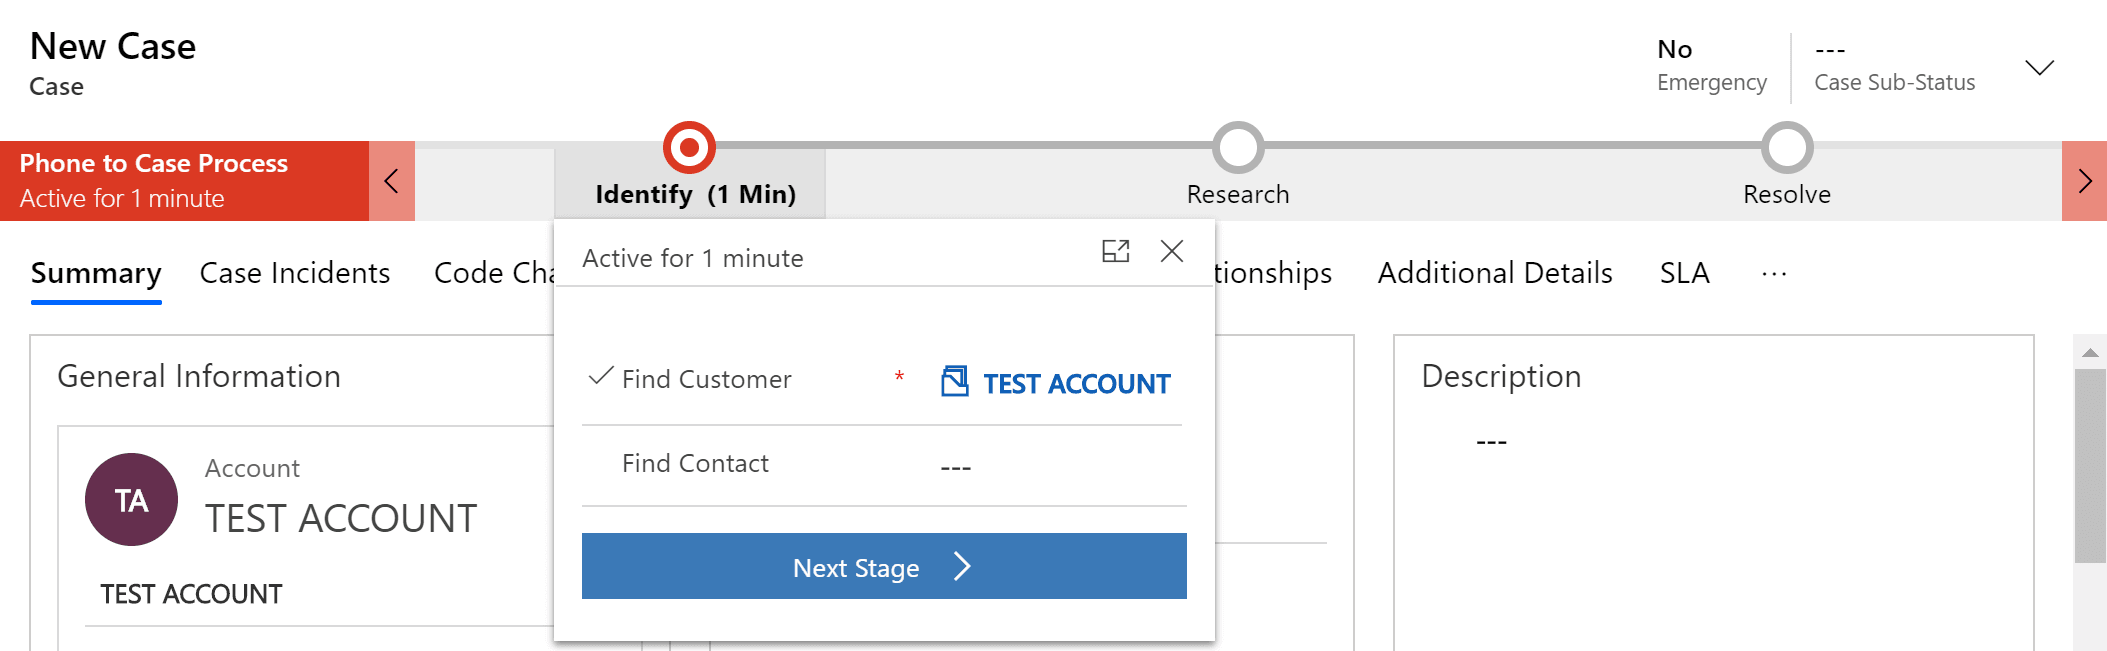
When you've finished setting the properties, select Apply.
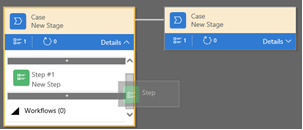
8. Add steps to each stage:
a. Select Details on a stage to view the steps and processes in that stage.
b. Select Data Step #1 to edit the Properties of that step.
c. Populate Identify Primary Contact for the Step Name and select Primary Contact for the Data Field.
d. Select the Component tab and drag the Data Step component to the stage, under the previous step.
e. Repeat the previous steps to populate the Data Steps as desired.
9. Add a branch (condition) to the process:
a. Drag the Condition component from the Components tab to the plus sign (+) between two stages.

b. Select the condition, and then, on the Properties tab, set the properties. When you've finished, select Apply.
10. Add a workflow to the process:
a. Drag the Workflow component from the Components tab to either a specific stage or the Global Workflow item:
Drag the Workflow component to a specific stage if the workflow should be triggered when the process enters or exits that stage. The Workflow component must be based on the same primary entity as the stage.
Drag the Workflow component to the Global Workflow item if the workflow should be triggered when the process is activated or archived (that is, when the status changes to Completed or Abandoned). The Workflow component must be based on the same primary entity as the process.
b. Select the condition, and then, on the Properties tab, set the properties:
Enter a display name.
Select when the workflow should be triggered.
Search for an existing on-demand active workflow that matches the stage entity, or create a workflow by selecting New.
When you've finished, select Apply.
11. To validate the business process flow, select Validate on the action bar.
12. To save the process as a draft while you continue to work on it, select Save on the action bar.
13. To activate the process and make it available to your team, select Activate on the action bar.
14. To define who has privileges to create, read, update, or delete the business process flow instance, select Edit Security Roles on the action bar. For example, for service-related processes, you might give customer service reps full access to change the business process flow instance. But you might give sales reps just read-only access to the instance, so that they can monitor post-sales activities for their customers.
a. In the Security Roles pane, select the name of a role to open the details page for that role.
b. On the Business Process Flows tab, select options to assign the role appropriate privileges for the business process flow.
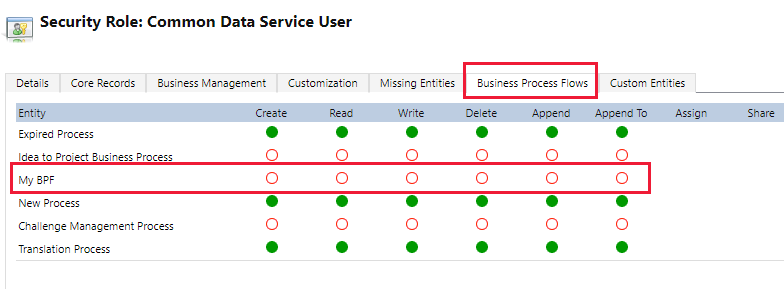
c. Select Save.
Edit a business process flow
You can edit the business process flow after it has been created.
In the Power Apps portal, select Flows in the left pane.
In the list of processes, select the business process flow that you created, and then select the Edit button.
Keep the following points in mind when you edit the stages of a business process flow:
Business process flows can have up to 30 stages.
You can add or change the following properties of a stage:
Stage Name: You can change the stage name after you create the stage.
Table: You can change the table for any stage except the first one.
Stage Category: A category lets you group stages by the type of action. It's useful for reports that will group rows by the stage that they're in. The options for the stage category come from the Stage Category global choice. You can add more options to this global choice and change the labels of existing options. You can also delete options, but we recommend that you keep the existing options. If you delete an option, you won't be able to add it back later. If you don't want an option to be used, change the label to Do not use.
Relationship: Enter a relationship when the preceding stage in the process is based on a different table than the current stage. For the current stage, select Select relationships, and then specify the relationship that should be used when the flow moves between the two stages. We recommend that you specify relationships, because they provide the following benefits:
Attribute maps are often defined for relationships. These attribute maps automatically carry over data between rows. Therefore, they help minimize the amount data entry that's required.
When you select Next Stage on the process bar for a row, any rows that use the relationship are listed in the process flow. Therefore, the reuse of rows in the process is promoted. In addition, you can use workflows to automate the creation of rows. Users then just have to select the workflow instead of creating a row. Therefore, the process is streamlined.
Set Process Flow Order: If you have more than one business process flow for a table, you must specify which process is automatically assigned to new rows. On the action bar, select Order Process Flow. For new rows or rows that don't already have a process flow associated with them, the first business process flow that a user has access to will be used.
Enable Security Roles: A user's access to a business process flow depends on the privileges that are defined for the business process flow in the security role that's assigned to the user. By default, only the System Administrator and System Customizer security roles can view a new business process flow.
Explanation
Yes, you can edit the business process flow after it has been created.
Business process flows are used to guide a user through the steps of your business process when working with Model-driven apps and Microsoft Dataverse. The example below will guide you through the process and decisions you need to make when building or editing a business process flow.
Create a business process flow
Launch Power Automate and sign in using your organizational account.
In the left pane, select My flows.
On the top bar, select Business process flows.
Select + New at the top.
In the Build a business process flow pane, fill in the required fields:
Flow Name: The display name of the process doesn't have to be unique, but it should be meaningful for people who must choose a process. You can change this name later.
Name: A unique name that's based on the display name. You can change the name when you create the process, but you can't change it after the process has been created.
Choose a table: Select the table to base the process on. You can choose Account for this example.
The table that you select affects the columns that are available for steps in the business process flow. You can't change the table after creating the business process flow.
Select Create.
The new process is created, and the business process flow designer is started. The designer page has three sections:
On the left, a single stage named Account New Stage has already been created for you.
Beneath this stage is the mini map, which lets you see the whole process or quickly go to a part of the process.
On the right are components that you can drag to the designer. You can also set properties to create a business process flow.
7. Add stages, so that users can proceed from one business stage to another in the process:
a. Drag the Stage component from the Components tab to the plus sign (+) in the designer.
b. Select the stage, and then, on the Properties tab on the right, set the properties:
Enter a display name.
Optional: Select a category for the stage (for example, Identify or Research). This category will display on the business process flow stage.
When you've finished setting the properties, select Apply.
8. Add steps to each stage:
a. Select Details on a stage to view the steps and processes in that stage.
b. Select Data Step #1 to edit the Properties of that step.
c. Populate Identify Primary Contact for the Step Name and select Primary Contact for the Data Field.
d. Select the Component tab and drag the Data Step component to the stage, under the previous step.
e. Repeat the previous steps to populate the Data Steps as desired.
9. Add a branch (condition) to the process:
a. Drag the Condition component from the Components tab to the plus sign (+) between two stages.
b. Select the condition, and then, on the Properties tab, set the properties. When you've finished, select Apply.
10. Add a workflow to the process:
a. Drag the Workflow component from the Components tab to either a specific stage or the Global Workflow item:
Drag the Workflow component to a specific stage if the workflow should be triggered when the process enters or exits that stage. The Workflow component must be based on the same primary entity as the stage.
Drag the Workflow component to the Global Workflow item if the workflow should be triggered when the process is activated or archived (that is, when the status changes to Completed or Abandoned). The Workflow component must be based on the same primary entity as the process.
b. Select the condition, and then, on the Properties tab, set the properties:
Enter a display name.
Select when the workflow should be triggered.
Search for an existing on-demand active workflow that matches the stage entity, or create a workflow by selecting New.
When you've finished, select Apply.
11. To validate the business process flow, select Validate on the action bar.
12. To save the process as a draft while you continue to work on it, select Save on the action bar.
13. To activate the process and make it available to your team, select Activate on the action bar.
14. To define who has privileges to create, read, update, or delete the business process flow instance, select Edit Security Roles on the action bar. For example, for service-related processes, you might give customer service reps full access to change the business process flow instance. But you might give sales reps just read-only access to the instance, so that they can monitor post-sales activities for their customers.
a. In the Security Roles pane, select the name of a role to open the details page for that role.
b. On the Business Process Flows tab, select options to assign the role appropriate privileges for the business process flow.
c. Select Save.
Edit a business process flow
You can edit the business process flow after it has been created.
In the Power Apps portal, select Flows in the left pane.
In the list of processes, select the business process flow that you created, and then select the Edit button.
Keep the following points in mind when you edit the stages of a business process flow:
Business process flows can have up to 30 stages.
You can add or change the following properties of a stage:
Stage Name: You can change the stage name after you create the stage.
Table: You can change the table for any stage except the first one.
Stage Category: A category lets you group stages by the type of action. It's useful for reports that will group rows by the stage that they're in. The options for the stage category come from the Stage Category global choice. You can add more options to this global choice and change the labels of existing options. You can also delete options, but we recommend that you keep the existing options. If you delete an option, you won't be able to add it back later. If you don't want an option to be used, change the label to Do not use.
Relationship: Enter a relationship when the preceding stage in the process is based on a different table than the current stage. For the current stage, select Select relationships, and then specify the relationship that should be used when the flow moves between the two stages. We recommend that you specify relationships, because they provide the following benefits:
Attribute maps are often defined for relationships. These attribute maps automatically carry over data between rows. Therefore, they help minimize the amount data entry that's required.
When you select Next Stage on the process bar for a row, any rows that use the relationship are listed in the process flow. Therefore, the reuse of rows in the process is promoted. In addition, you can use workflows to automate the creation of rows. Users then just have to select the workflow instead of creating a row. Therefore, the process is streamlined.
Set Process Flow Order: If you have more than one business process flow for a table, you must specify which process is automatically assigned to new rows. On the action bar, select Order Process Flow. For new rows or rows that don't already have a process flow associated with them, the first business process flow that a user has access to will be used.
Enable Security Roles: A user's access to a business process flow depends on the privileges that are defined for the business process flow in the security role that's assigned to the user. By default, only the System Administrator and System Customizer security roles can view a new business process flow.
Question 15 Multiple Choice
Scenario: Iceberg Lounge is Gotham's coolest nightclub and Penguin's pad for Gotham operations. Oswald Cobblepot runs the show there.
You have been hired as a contractor for Iceberg Lounge, and you are consulting on various IT functions.
In the current project, the team has created a canvas app and Oswald has added a label control to the screen where the the text colour is to be set to "red".
Oswald looks to you for direction on how to do this.
Which of the following are possible ways to achieve this?
Explanation
Click "Show Answer" to see the explanation here
Oswald can change the colour of a label’s text by choosing a colour from the colour picker in the toolbar.
He can also use the colour enumeration to set the Colour property of a label control, which can be done in the formula bar or in the Properties pane.
Fill will set the background colour of the control, not the text colour.
Colour and border properties in Power Apps
You can specify colours in many ways:
Color enumeration: Specify colour names from cascading style sheets, as in these examples:
Color.Red
Color.Indigo
ColorValue function: Specify text strings such as colour names from cascading style sheets and hex-code notation (#), as in these examples:
ColorValue( "AliceBlue" )
ColorValue( "#ff00ff" )
ColorFade function: Specify how faded a colour is, from fully black (-100%) to fully white (100%), as in this example:
ColorFade( Color.Red, 50% )
RGBA function: Specify the red, green, and blue components of a colour from 0 to 255, and specify an alpha channel from 0% (fully transparent) to 100% (fully opaque), as in this example:
RGBA( 255, 0, 255, 25% )
Colour properties can also reference other colour properties. For example, Label.PressedColor may be set to the formula Label1.Color, automatically cascading a change from one property to another.
Explanation
Oswald can change the colour of a label’s text by choosing a colour from the colour picker in the toolbar.
He can also use the colour enumeration to set the Colour property of a label control, which can be done in the formula bar or in the Properties pane.
Fill will set the background colour of the control, not the text colour.
Colour and border properties in Power Apps
You can specify colours in many ways:
Color enumeration: Specify colour names from cascading style sheets, as in these examples:
Color.Red
Color.Indigo
ColorValue function: Specify text strings such as colour names from cascading style sheets and hex-code notation (#), as in these examples:
ColorValue( "AliceBlue" )
ColorValue( "#ff00ff" )
ColorFade function: Specify how faded a colour is, from fully black (-100%) to fully white (100%), as in this example:
ColorFade( Color.Red, 50% )
RGBA function: Specify the red, green, and blue components of a colour from 0 to 255, and specify an alpha channel from 0% (fully transparent) to 100% (fully opaque), as in this example:
RGBA( 255, 0, 255, 25% )
Colour properties can also reference other colour properties. For example, Label.PressedColor may be set to the formula Label1.Color, automatically cascading a change from one property to another.
Question 16 Single Choice
Scenario: Donahue Development (DD) is an Australian Research & Development company owned and directed by businessman Trevor Donahue.
Trevor is creating a Power Apps app where he plans to create a web-based knowledge base. He needs to allow suppliers to register themselves to gain access to information stored in the knowledge base.
Which of the following should Trevor create?
Explanation
Click "Show Answer" to see the explanation here
Trevor should create a portal app, using the Partner portal template. This allows users to register themselves for your portal app web site. The knowledge management feature in the app can be used to allow suppliers to read documentation from the company.
Canvas apps in general are built from scratch and would take much more time to build than a portal app that uses the partner portal template with the knowledge base feature. Additionally, canvas app requires the app to be shared explicitly with each external user and cannot be published in a way that allows users to sign themselves up for access.
Model-driven apps do not allow for self-service registration to gain access to the app.
A cloud flow can be used within a larger solution, but a flow does not have any user interface that users can interact with, so it does not meet the requirements of allowing users to log in and view information in a web-based solution.
Power Apps is a no-code/low-code platform for building apps that builds off concepts like formulas in an Excel workbook such as SUM and TEXT. You can use Power Apps to build simple solutions like vehicle inspection forms and status reports, or complex business solutions for purchasing processes and inventory management. If you can envision an app to solve a business problem, then you can use your existing skills to build it. Although Power Apps can be used by virtually anyone, it also offers advanced functionality for seasoned developers to design complex applications with ease.
Portal Management app
To use the Portal Management app, you will need to be assigned the system administrator role in the same Microsoft Dataverse environment as your site. Users in the system customizer role also have access to use the Portal Management app however they may have limited privileges on certain tables (for example, Notes / Attachments related to Web Files) that do not allow them to view or update records created by other users.
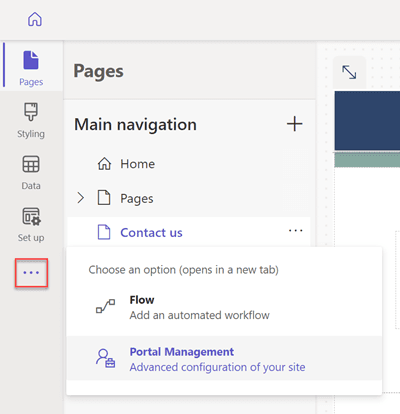
Open the Portal Management app from the Power Pages home page
On the Power Pages home page, select the ellipsis (...) from the site section, and select Portal management.
Open the Portal Management app from the Power Pages design studio
In the design studio, select the ellipsis (...) from the tool belt, and then select Portal Management.
Open the Portal Management app from Power Apps
To open Portal Management app:
Go to Power Apps.
Select Apps from the left pane.
Select Portal Management app to open.
Portal Management app opens in a new browser tab.
To get started with configuring your site, select the relevant option from the left pane.
Explanation
Trevor should create a portal app, using the Partner portal template. This allows users to register themselves for your portal app web site. The knowledge management feature in the app can be used to allow suppliers to read documentation from the company.
Canvas apps in general are built from scratch and would take much more time to build than a portal app that uses the partner portal template with the knowledge base feature. Additionally, canvas app requires the app to be shared explicitly with each external user and cannot be published in a way that allows users to sign themselves up for access.
Model-driven apps do not allow for self-service registration to gain access to the app.
A cloud flow can be used within a larger solution, but a flow does not have any user interface that users can interact with, so it does not meet the requirements of allowing users to log in and view information in a web-based solution.
Power Apps is a no-code/low-code platform for building apps that builds off concepts like formulas in an Excel workbook such as SUM and TEXT. You can use Power Apps to build simple solutions like vehicle inspection forms and status reports, or complex business solutions for purchasing processes and inventory management. If you can envision an app to solve a business problem, then you can use your existing skills to build it. Although Power Apps can be used by virtually anyone, it also offers advanced functionality for seasoned developers to design complex applications with ease.
Portal Management app
To use the Portal Management app, you will need to be assigned the system administrator role in the same Microsoft Dataverse environment as your site. Users in the system customizer role also have access to use the Portal Management app however they may have limited privileges on certain tables (for example, Notes / Attachments related to Web Files) that do not allow them to view or update records created by other users.
Open the Portal Management app from the Power Pages home page
On the Power Pages home page, select the ellipsis (...) from the site section, and select Portal management.
Open the Portal Management app from the Power Pages design studio
In the design studio, select the ellipsis (...) from the tool belt, and then select Portal Management.
Open the Portal Management app from Power Apps
To open Portal Management app:
Go to Power Apps.
Select Apps from the left pane.
Select Portal Management app to open.
Portal Management app opens in a new browser tab.
To get started with configuring your site, select the relevant option from the left pane.
Question 17 Single Choice
Scenario: Duncan + Dotter Design is an architectural business based in New York City which was founded by John Raymond. The company is embarking on a Microsoft journey by switching things over from various other systems they have used over the years.
Each week John uses the corporate YouTube channel to create a video that highlights new initiatives, and goals for service operations.
John has asked his IT team leader, Jean-Luc Picard, to design a Power Apps app that streams the videos to internal users.
Which of the following should Jean-Luc use to implement the Power Apps app?
Explanation
Click "Show Answer" to see the explanation here
Jean-Luc should use Model-driven to implement the Power Apps app. Only model driven app supports Youtube videos.
Multimedia
You can embed videos to provide a richer customer experience for sales and column people on the go. Use this control to map to a URL column that contains the audio or video link to play in the control.
Note: This control is supported on Android versions 4.4 and later.
YouTube videos aren’t currently supported on Windows 8 and Windows 8.1 tablets and phones. On Windows 10, only HTTPS videos (including YouTube) are supported.
Supported media types include:
Streaming MP4 files
YouTube videos
Azure media
Audio streams
Explanation
Jean-Luc should use Model-driven to implement the Power Apps app. Only model driven app supports Youtube videos.
Multimedia
You can embed videos to provide a richer customer experience for sales and column people on the go. Use this control to map to a URL column that contains the audio or video link to play in the control.
Note: This control is supported on Android versions 4.4 and later.
YouTube videos aren’t currently supported on Windows 8 and Windows 8.1 tablets and phones. On Windows 10, only HTTPS videos (including YouTube) are supported.
Supported media types include:
Streaming MP4 files
YouTube videos
Azure media
Audio streams
Question 18 Single Choice
Scenario: You are working as a consultant at Avengers Security. At the moment, you are consulting with Tony, the lead of the IT team and the topic of discussion is Power Automate workflows.
The one of the team members has added an item in SharePoint which prompts a workflow to run in Power Automate.
What type of operation has the teammate used to start the workflow?
Explanation
Click "Show Answer" to see the explanation here
A trigger is an operation that tells a workflow to begin or prompts some type of action.
Microsoft Power Platform is made powerful by its ability to leverage data across many platforms. To do this, components of Microsoft Power Platform use connectors. You can think of connectors as a bridge from your data source to your app or workflow which allows information to be conveyed back and forth. Connectors allow you to extend your business solutions across platforms and add functionality for your users.
Data Sources
In order to understand the types of connectors and what you can do with them, you must first understand the types of data sources to which they connect. The two types of data sources are tabular and function-based.
Tabular data - A tabular data source is one that returns data in a structured table format. Power Apps can directly read and display these tables through galleries, forms, and other controls. Additionally, if the data source supports it, Power Apps can create, edit, and delete data from these data sources. Examples include Microsoft Dataverse, SharePoint, and SQL Server.
Function-based data - A function-based data source is one that uses functions to interact with the data source. These functions can be used to return a table of data but offer more extensive action such as the ability to send an email, update permissions, or create a calendar event. Examples include Office 365 Users, Project Online, and Azure Blob Storage.
Both of these data source types are commonly used to bring data and additional functionality to your solutions.
As you can see, connecting to data sources allows you to integrate disparate parts of your business solutions to build them out cohesively.
Connectors
Now that you understand more about data sources, you are ready to learn about connectors.
Connectors are the bridges from your data source to your app, workflow, or dashboard. Microsoft Power Platform has more than 275 connectors available to common data sources. Connectors are divided into standard and premium. Some popular standard connectors are SharePoint, Outlook, and YouTube. Premium connectors require additional licensing for your app and/or users. A few premium connectors are SQL Server, Survey Monkey, and Mail Chimp. The connector reference in the summary and resources unit lists all connectors and whether they are considered standard or premium. You can also use AppSource to source and install apps and use the connectors to non-Microsoft services.
Connectors can provide input and output between the data source and Power Platform, which can accelerate the delivery of Microsoft Power Platform business solutions. For instance, using Dynamics 365 apps such as Customer Service, you can set up Power Automate to notify users when specific customer types are added. Or you can use a SharePoint document library to store files that are fed into Power Apps to manage and distribute. Microsoft also provides connectors to their Azure services, providing advanced AI techniques to do tasks such as reading text off images or cognitive services like recognizing faces in images.
All Microsoft Power Platform business solutions can be used and implemented into Microsoft 365 apps such as Teams. This allows users to play Power Apps within Teams or run Power Automate from actions and events within Teams.
Triggers and Actions
Once you have established a data source and configured your connector, there are two types of operations you can use, triggers or actions.
Triggers are only used in Power Automate and prompt a flow to begin. Triggers can be time based, such as a flow which begins every day at 8:00 am, or they could be based off of an action like creating a new row in a table or receiving an email. You will always need a trigger to tell your workflow when to run.
Actions are used in Power Automate and Power Apps. Actions are prompted by the user or a trigger and allow interaction with your data source by some function. For example, an action would be sending an email in your workflow or app or writing a new line to a data source.
Now that you understand what connectors are and how to use them, let's look at what to do when there isn't a connector already built for your data source.
Custom Connectors
While Microsoft Power Platform offers more than 200 connectors, you also have the option to build a custom connector. This will allow you to extend your app by calling a publicly available API, or a custom API you are hosting in a cloud provider, such as Azure. API stands for Application Programming Interface and holds a series of functions available for developers. Connectors work by sending information back and forth across these APIs and gathering available functions into Power Apps or Power Automate. Because these connectors are function-based, they will call specific functions in the underlying service of the API to return the corresponding data.
An advantage of building custom connectors is that they can be used in different platforms, such as Power Apps, Power Automate, and Azure Logic Apps.
Creating Custom Connectors
You can create custom connectors using 3 different approaches:
Using a blank custom connector
While the requirements for each approach will vary, they all require a Power Apps per app or per user plan. Each link above points to the instructions for each approach.
Explanation
A trigger is an operation that tells a workflow to begin or prompts some type of action.
Microsoft Power Platform is made powerful by its ability to leverage data across many platforms. To do this, components of Microsoft Power Platform use connectors. You can think of connectors as a bridge from your data source to your app or workflow which allows information to be conveyed back and forth. Connectors allow you to extend your business solutions across platforms and add functionality for your users.
Data Sources
In order to understand the types of connectors and what you can do with them, you must first understand the types of data sources to which they connect. The two types of data sources are tabular and function-based.
Tabular data - A tabular data source is one that returns data in a structured table format. Power Apps can directly read and display these tables through galleries, forms, and other controls. Additionally, if the data source supports it, Power Apps can create, edit, and delete data from these data sources. Examples include Microsoft Dataverse, SharePoint, and SQL Server.
Function-based data - A function-based data source is one that uses functions to interact with the data source. These functions can be used to return a table of data but offer more extensive action such as the ability to send an email, update permissions, or create a calendar event. Examples include Office 365 Users, Project Online, and Azure Blob Storage.
Both of these data source types are commonly used to bring data and additional functionality to your solutions.
As you can see, connecting to data sources allows you to integrate disparate parts of your business solutions to build them out cohesively.
Connectors
Now that you understand more about data sources, you are ready to learn about connectors.
Connectors are the bridges from your data source to your app, workflow, or dashboard. Microsoft Power Platform has more than 275 connectors available to common data sources. Connectors are divided into standard and premium. Some popular standard connectors are SharePoint, Outlook, and YouTube. Premium connectors require additional licensing for your app and/or users. A few premium connectors are SQL Server, Survey Monkey, and Mail Chimp. The connector reference in the summary and resources unit lists all connectors and whether they are considered standard or premium. You can also use AppSource to source and install apps and use the connectors to non-Microsoft services.
Connectors can provide input and output between the data source and Power Platform, which can accelerate the delivery of Microsoft Power Platform business solutions. For instance, using Dynamics 365 apps such as Customer Service, you can set up Power Automate to notify users when specific customer types are added. Or you can use a SharePoint document library to store files that are fed into Power Apps to manage and distribute. Microsoft also provides connectors to their Azure services, providing advanced AI techniques to do tasks such as reading text off images or cognitive services like recognizing faces in images.
All Microsoft Power Platform business solutions can be used and implemented into Microsoft 365 apps such as Teams. This allows users to play Power Apps within Teams or run Power Automate from actions and events within Teams.
Triggers and Actions
Once you have established a data source and configured your connector, there are two types of operations you can use, triggers or actions.
Triggers are only used in Power Automate and prompt a flow to begin. Triggers can be time based, such as a flow which begins every day at 8:00 am, or they could be based off of an action like creating a new row in a table or receiving an email. You will always need a trigger to tell your workflow when to run.
Actions are used in Power Automate and Power Apps. Actions are prompted by the user or a trigger and allow interaction with your data source by some function. For example, an action would be sending an email in your workflow or app or writing a new line to a data source.
Now that you understand what connectors are and how to use them, let's look at what to do when there isn't a connector already built for your data source.
Custom Connectors
While Microsoft Power Platform offers more than 200 connectors, you also have the option to build a custom connector. This will allow you to extend your app by calling a publicly available API, or a custom API you are hosting in a cloud provider, such as Azure. API stands for Application Programming Interface and holds a series of functions available for developers. Connectors work by sending information back and forth across these APIs and gathering available functions into Power Apps or Power Automate. Because these connectors are function-based, they will call specific functions in the underlying service of the API to return the corresponding data.
An advantage of building custom connectors is that they can be used in different platforms, such as Power Apps, Power Automate, and Azure Logic Apps.
Creating Custom Connectors
You can create custom connectors using 3 different approaches:
Using a blank custom connector
While the requirements for each approach will vary, they all require a Power Apps per app or per user plan. Each link above points to the instructions for each approach.
Question 19 Single Choice
Scenario: Mys-Tech is a British multinational chemical corporation with worldwide interests. It is headquartered in London, UK. Mys-Tech employs thousands of people and has numerous facilities all over the world. Mys-Tech hosts conferences in its major centres every year where customers are invited to see new product lineups.
As a developer in the company, you need to enable attendees to view upcoming conferences hosted by Mys-Tech.
Which Power Apps component should you use?
Explanation
Click "Show Answer" to see the explanation here
Power Apps portals allow you to create a website for external users.
Canvas apps, model-driven apps, and business process flows are not suitable for external users.
What is Power Apps and what it can do for you
Power Apps is a no-code/low-code platform for building apps that builds off of concepts similar to formulas in an Excel workbook such as SUM and TEXT. You can use Power Apps to build simple solutions like vehicle inspection forms and status reports or complex business solutions for purchasing processes and inventory management. If you can envision an app to solve a business problem, then you can use your existing skills to build it. Although this module is geared towards business users with little background in computer science and coding, Power Apps offers advanced functionality and the ability for seasoned developers to design complex applications with ease.
Work with your data where it lives
When modernizing a paper-based process, there are likely systems in your organization with data you can leverage. With Power Apps, you have choices. With hundreds of connectors you can easily connect to data, using the underlying data service and app platform, Microsoft Dataverse, or a multitude of online and on-premises data sources. Some common data sources include:
Dataverse
SharePoint
Dynamics 365
SQL Server and Azure SQL
Office 365
You don't have to choose just one data source. Power Apps easily supports multiple data connections allowing you to bring data together from many platforms into a single app.
Different types of Power Apps for different scenarios
Power Apps can create three types of apps: canvas, model-driven, and portals. Each is suited to different scenarios and end users.
Canvas apps
Canvas apps are a great option when you want to build an app from a blank canvas. You start by choosing the screen size: tablet or mobile, then you have a blank screen from which to build. You can interact with data in your app by adding data sources. Drag and drop various controls and add the desired functionality by writing Excel style formulas. Canvas apps provide you complete flexibility when building your apps.
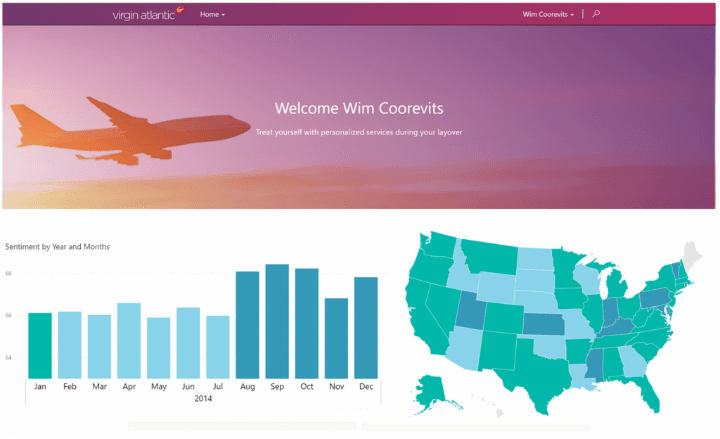
Below are a couple of examples of a mobile canvas app built by Heathrow Airport.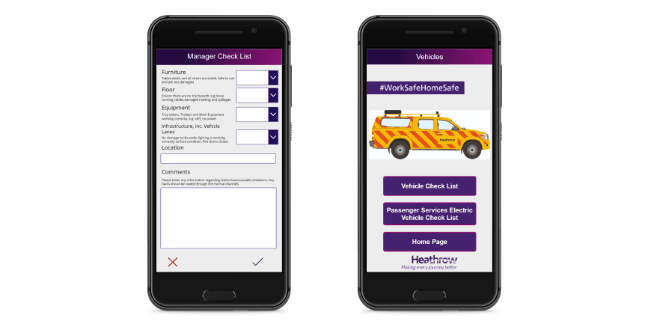
Model-driven apps
Model-driven apps build from data in Microsoft Dataverse. Power Apps will build you a great looking, fully functional app to act upon and interact with this data. With model-driven apps, there is no need to worry about choosing the app size; it is responsive, meaning it works on mobile or tablet with no extra work by you. You define the relationships, forms, views, business rules, and more at the data layer, inside of the Dataverse, giving you enough control to get your business result without writing all of the formulas yourself.
Below is an example of a fundraiser donations tracking model-driven app.
Portals
Portals bring the power of no-code solutions to building externally facing websites. Through the Power Apps interface, you can build an anonymous or authenticated website that allows users to interact with data held in Dataverse. The same drag and drop experience you enjoy when building apps is available to build these rich, interactive websites.
Add artificial intelligence to your app with no code
Prior to Power Apps, adding functionality such as image recognition or prediction models required advanced computer knowledge. There was code to write, data models to design and train, and a whole lot of complicated logic. Power Apps has "democratized" artificial intelligence by providing a wizard-based interface for building and training your model. This unlocks the power of Azure Machine Learning and Cognitive services without writing a single line of code or creating complex machine learning models.
A ready to use AI component is the Business card reader. This component reviews an uploaded photo or picture taken to determine if it is a business card and subsequently extracts the relevant information. No configuration required.
The business card reader is simply one ready-made example which builds off of the underlying AI components which you can deploy in other ways by first building a model. From https://make.PowerApps.com, a wizard guides you through building and training the model. Currently, there are four available AI models in Power Apps:
Prediction - This model predicts whether something will happen or not based on previous data history. More details in the following section.
Form processor - This model extracts text from an image like the business card reader.
Object detector - This model identifies objects from an uploaded image or taken photo and then provides a count of the number of objects present.
Text classification - This model categorizes text by its meaning, making it is easier to analyze.
Security and Administration
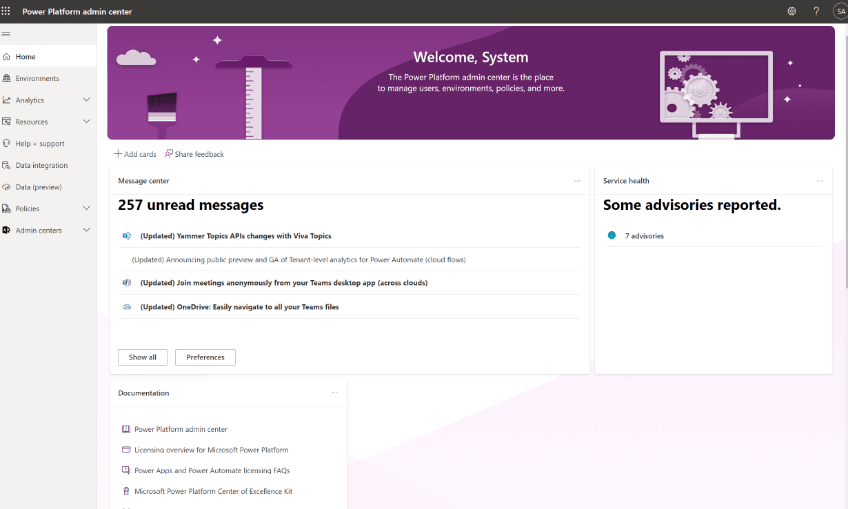
There are many tools for those in IT or otherwise responsible for governance. Power Apps has a multitude of security, governance, and reporting capabilities to let you manage Power Apps. Also, Power Apps doesn't circumvent security in any way. Users cannot build apps to bypass current access permissions. To manage security for Power Apps, you can access https://admin.powerplatform.microsoft.com/. Here you will find options for creating and managing environments, monitoring licenses, working with Data Loss Prevention policies and managing Dataverse Data Integration projects. This allows you to manage the Power Apps throughout your tenant from one single place.
Power Apps also has its own set of PowerShell cmdlets for app creators, administrators, and developers that allow you to automate many of your administrative duties. A common use case of the PowerShell cmdlets is to automate the discovery and permission management of all apps in your tenant, allowing you to better understand and manage apps as they are created and spread throughout your company.
In addition, in the Power Automate learn module, you will see that Power Automate has the ability to automate these tasks. You can download the Center of Excellence starter kit, a collection of components or tools that are designed to help get started with developing a strategy for adopting and supporting Microsoft Power Platform, with a focus on Power Apps and Power Automate.
Driving business value
By now you understand that Power Apps does not require traditional "code" like C#, making a low technology barrier to entry. If you know your business process, you can get started writing your first app. For many businesses, this means apps are not coming from IT but instead directly from frontline business users. The same way Finance builds their own Excel workbooks today, they can build their own Power Apps.
Power Apps allows even the most entry level users to reduce paperwork, increase process efficiency, and ensure a single source of truth by combining multiple data sources into one app. Users can build apps with ease, while staying within the guardrails set by IT. This allows for an unprecedented amount of innovation and digitization, eliminating the app backlog, cumbersome paper-based processes and more.
Explanation
Power Apps portals allow you to create a website for external users.
Canvas apps, model-driven apps, and business process flows are not suitable for external users.
What is Power Apps and what it can do for you
Power Apps is a no-code/low-code platform for building apps that builds off of concepts similar to formulas in an Excel workbook such as SUM and TEXT. You can use Power Apps to build simple solutions like vehicle inspection forms and status reports or complex business solutions for purchasing processes and inventory management. If you can envision an app to solve a business problem, then you can use your existing skills to build it. Although this module is geared towards business users with little background in computer science and coding, Power Apps offers advanced functionality and the ability for seasoned developers to design complex applications with ease.
Work with your data where it lives
When modernizing a paper-based process, there are likely systems in your organization with data you can leverage. With Power Apps, you have choices. With hundreds of connectors you can easily connect to data, using the underlying data service and app platform, Microsoft Dataverse, or a multitude of online and on-premises data sources. Some common data sources include:
Dataverse
SharePoint
Dynamics 365
SQL Server and Azure SQL
Office 365
You don't have to choose just one data source. Power Apps easily supports multiple data connections allowing you to bring data together from many platforms into a single app.
Different types of Power Apps for different scenarios
Power Apps can create three types of apps: canvas, model-driven, and portals. Each is suited to different scenarios and end users.
Canvas apps
Canvas apps are a great option when you want to build an app from a blank canvas. You start by choosing the screen size: tablet or mobile, then you have a blank screen from which to build. You can interact with data in your app by adding data sources. Drag and drop various controls and add the desired functionality by writing Excel style formulas. Canvas apps provide you complete flexibility when building your apps.
Below are a couple of examples of a mobile canvas app built by Heathrow Airport.
Model-driven apps
Model-driven apps build from data in Microsoft Dataverse. Power Apps will build you a great looking, fully functional app to act upon and interact with this data. With model-driven apps, there is no need to worry about choosing the app size; it is responsive, meaning it works on mobile or tablet with no extra work by you. You define the relationships, forms, views, business rules, and more at the data layer, inside of the Dataverse, giving you enough control to get your business result without writing all of the formulas yourself.
Below is an example of a fundraiser donations tracking model-driven app.
Portals
Portals bring the power of no-code solutions to building externally facing websites. Through the Power Apps interface, you can build an anonymous or authenticated website that allows users to interact with data held in Dataverse. The same drag and drop experience you enjoy when building apps is available to build these rich, interactive websites.
Add artificial intelligence to your app with no code
Prior to Power Apps, adding functionality such as image recognition or prediction models required advanced computer knowledge. There was code to write, data models to design and train, and a whole lot of complicated logic. Power Apps has "democratized" artificial intelligence by providing a wizard-based interface for building and training your model. This unlocks the power of Azure Machine Learning and Cognitive services without writing a single line of code or creating complex machine learning models.
A ready to use AI component is the Business card reader. This component reviews an uploaded photo or picture taken to determine if it is a business card and subsequently extracts the relevant information. No configuration required.
The business card reader is simply one ready-made example which builds off of the underlying AI components which you can deploy in other ways by first building a model. From https://make.PowerApps.com, a wizard guides you through building and training the model. Currently, there are four available AI models in Power Apps:
Prediction - This model predicts whether something will happen or not based on previous data history. More details in the following section.
Form processor - This model extracts text from an image like the business card reader.
Object detector - This model identifies objects from an uploaded image or taken photo and then provides a count of the number of objects present.
Text classification - This model categorizes text by its meaning, making it is easier to analyze.
Security and Administration
There are many tools for those in IT or otherwise responsible for governance. Power Apps has a multitude of security, governance, and reporting capabilities to let you manage Power Apps. Also, Power Apps doesn't circumvent security in any way. Users cannot build apps to bypass current access permissions. To manage security for Power Apps, you can access https://admin.powerplatform.microsoft.com/. Here you will find options for creating and managing environments, monitoring licenses, working with Data Loss Prevention policies and managing Dataverse Data Integration projects. This allows you to manage the Power Apps throughout your tenant from one single place.
Power Apps also has its own set of PowerShell cmdlets for app creators, administrators, and developers that allow you to automate many of your administrative duties. A common use case of the PowerShell cmdlets is to automate the discovery and permission management of all apps in your tenant, allowing you to better understand and manage apps as they are created and spread throughout your company.
In addition, in the Power Automate learn module, you will see that Power Automate has the ability to automate these tasks. You can download the Center of Excellence starter kit, a collection of components or tools that are designed to help get started with developing a strategy for adopting and supporting Microsoft Power Platform, with a focus on Power Apps and Power Automate.
Driving business value
By now you understand that Power Apps does not require traditional "code" like C#, making a low technology barrier to entry. If you know your business process, you can get started writing your first app. For many businesses, this means apps are not coming from IT but instead directly from frontline business users. The same way Finance builds their own Excel workbooks today, they can build their own Power Apps.
Power Apps allows even the most entry level users to reduce paperwork, increase process efficiency, and ensure a single source of truth by combining multiple data sources into one app. Users can build apps with ease, while staying within the guardrails set by IT. This allows for an unprecedented amount of innovation and digitization, eliminating the app backlog, cumbersome paper-based processes and more.
Question 20 Single Choice
Scenario: Roxxon Energy Corporation (NYSE: ROX) is an American multinational oil and gas corporation headquartered at the One Roxxon Plaza in Manhattan, New York City. It is one of the largest fuel conglomerates around the world. The Corporation generated billions of dollars in profits each year by refining and manufacturing products related to oil through its many holdings. The founder of the company, J.T. Jones, has hired you as a Microsoft Power Platform SME to assist with their IT projects.
At the moment, the team is exploring Power BI dashboards.
What is a dashboard?
Explanation
Click "Show Answer" to see the explanation here
A dashboard is a great way to display information and visualizations.
Power BI Desktop connects to many types of data sources, including local databases, worksheets, and data on cloud services. Sometimes when you gather data, it's not quite as structured, or clean, as you want it to be. To structure data, you can transform it, meaning that you can split and rename columns, change data types, and create relationships between columns.
You can connect Power BI Desktop to many types of data sources, including on-premises databases, Microsoft Excel workbooks, and cloud services. Currently, there are over 110 Power BI-specific connectors to cloud services such as GitHub and Marketo. You can also connect to generic sources through XML, CSV, text, and ODBC. Power BI will even extract tabular data directly from a website URL.
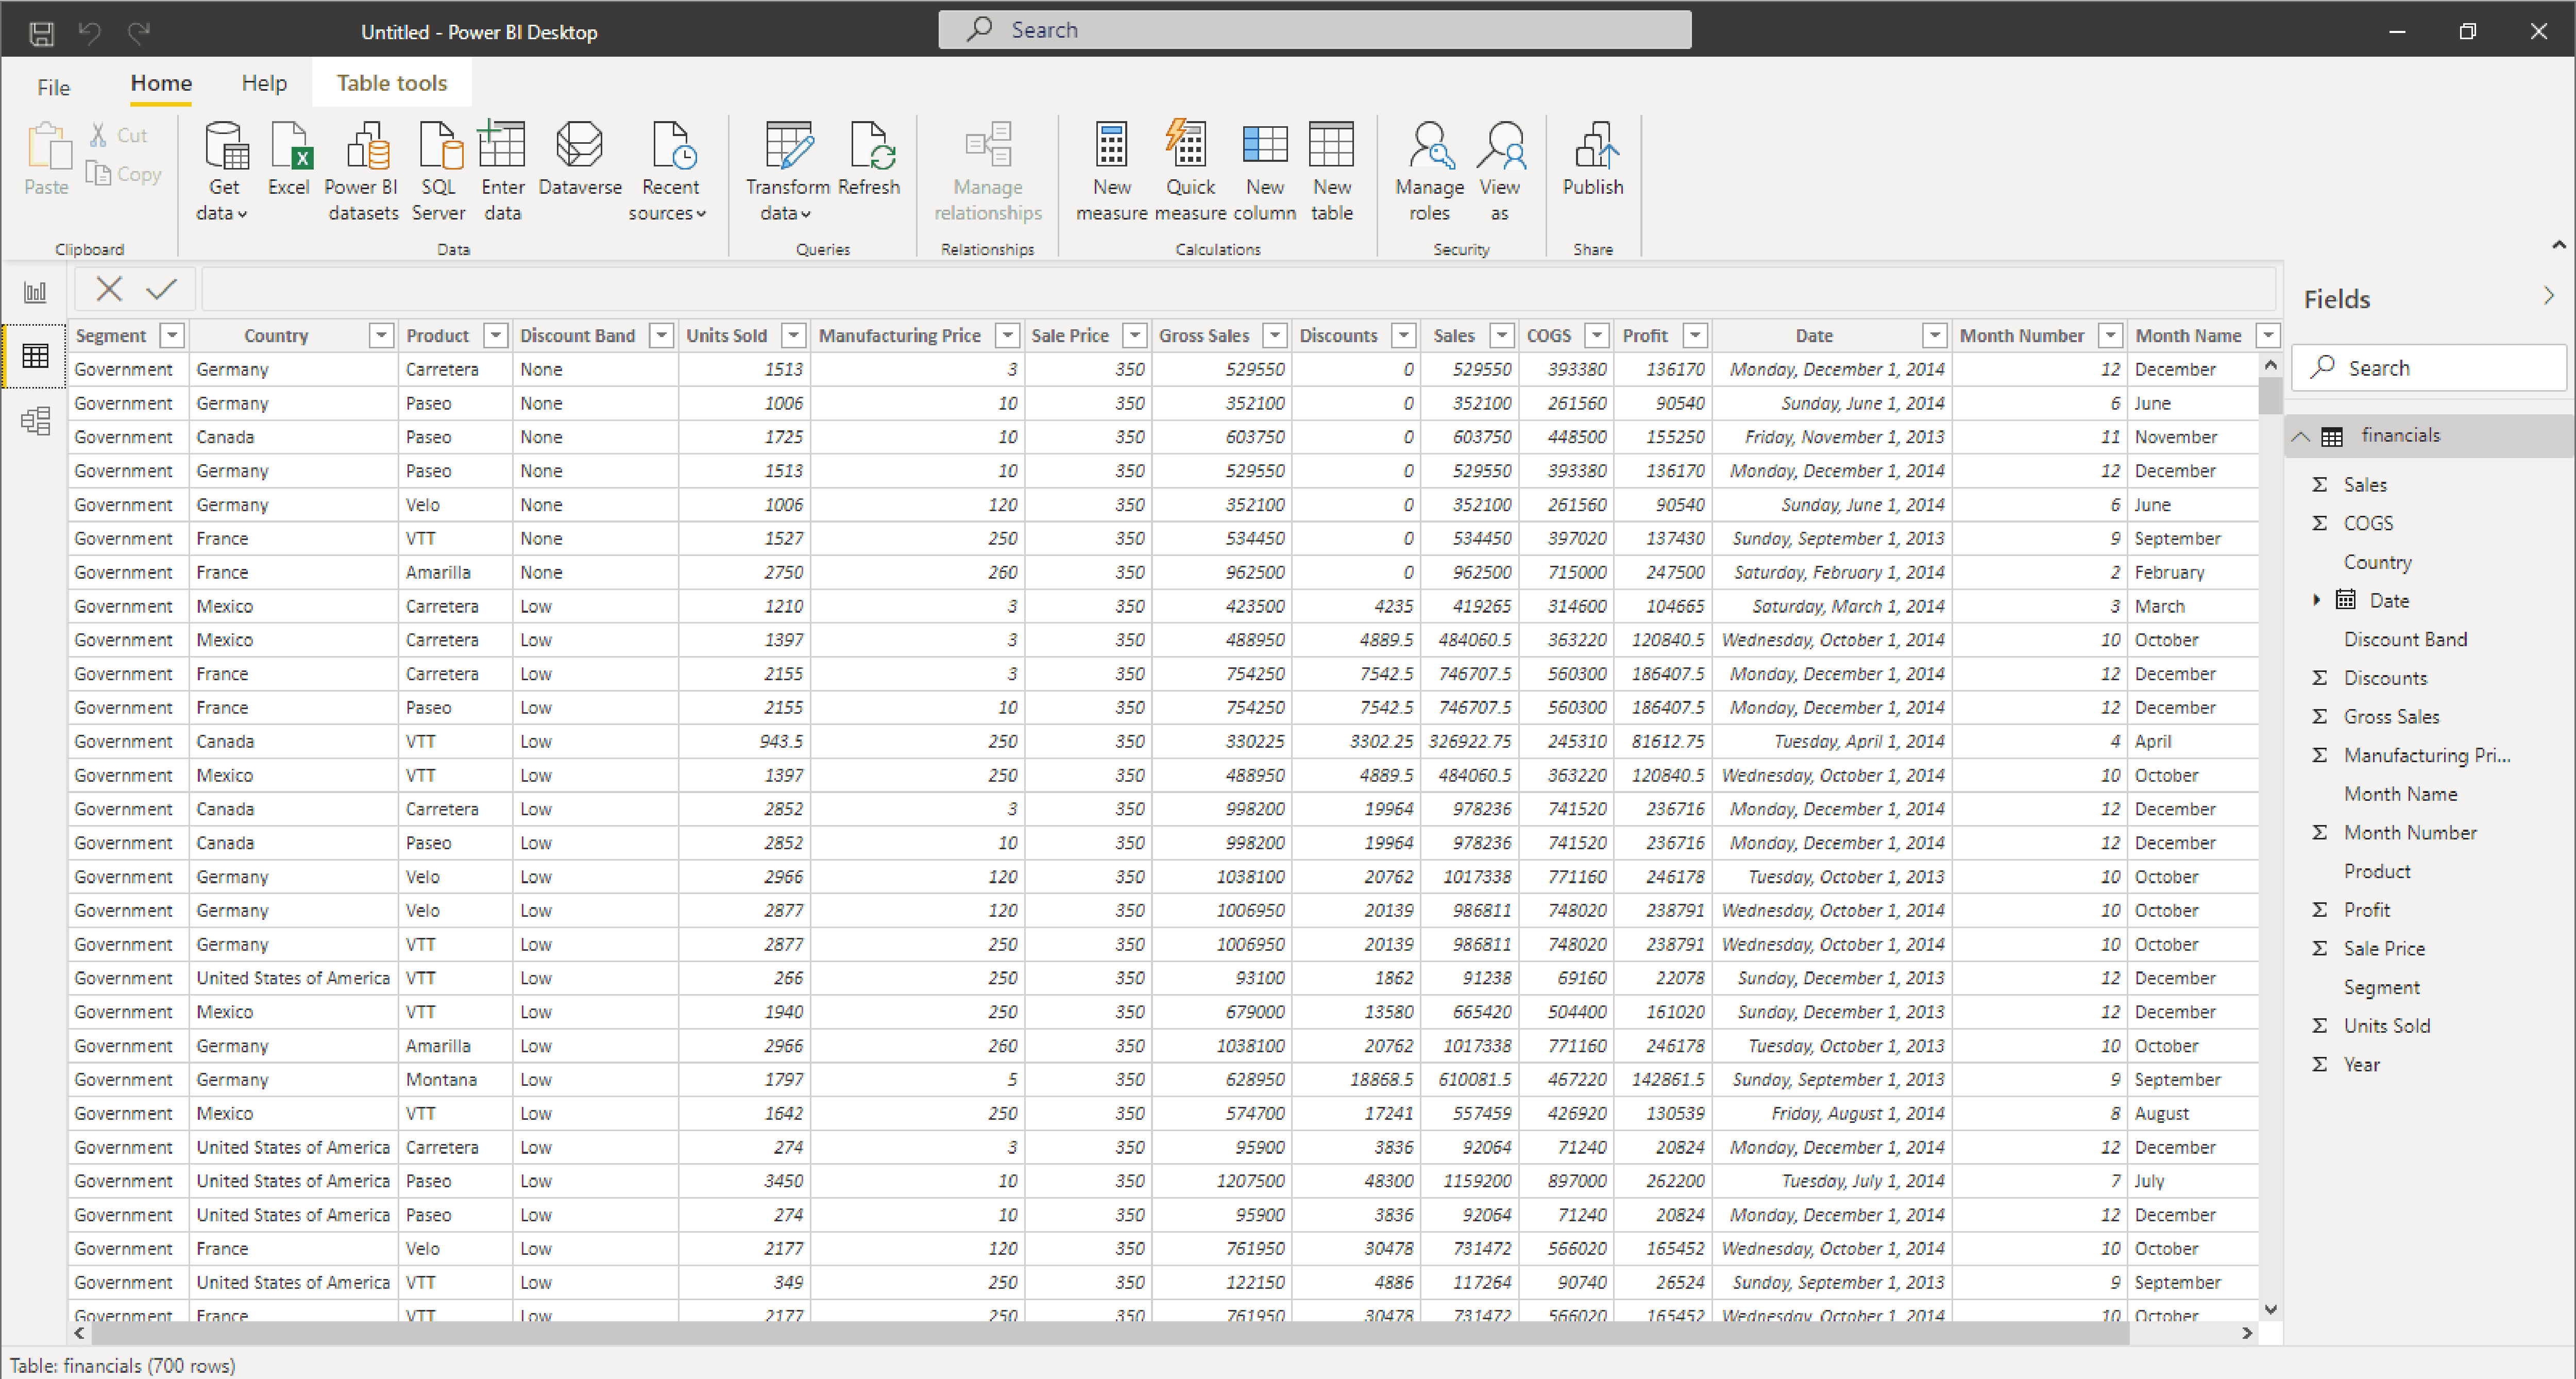
In this module, we will build out a dashboard for Contoso Manufacturing displaying their sales data for various products. To follow along with the next steps, visit /power-bi/create-reports/sample-financial-download and download the financial sample workbook to your local files or One Drive. If this is your first time using Power BI Desktop, please visit /power-bi/fundamentals/desktop-get-the-desktop for download instructions.
Start Power BI Desktop, and choose Get Data from the ribbon on the Home tab.
Choose Excel and press Connect.
Find the financial sample workbook which you downloaded and saved locally or to your OneDrive. Select the file and click Open.
A dialogue box with the tables in your data should open. Click the box next to the financials table. You will see a preview of the data displayed. Select Load.
You can now see that the fields have populated on the farthest right pane. You are currently in the report building tab. Select the data tab to see a preview of your data.
Now you have loaded your data and will shortly be ready to build visuals, but first, let's transform our data into exactly what we want.
Data doesn't always come into your report clean, or ready to use. You may need additional columns or to rename or hide existing columns. You may have multiple data sources and need to define a relationship between them. All of these tasks are known as data transformation.
Explanation
A dashboard is a great way to display information and visualizations.
Power BI Desktop connects to many types of data sources, including local databases, worksheets, and data on cloud services. Sometimes when you gather data, it's not quite as structured, or clean, as you want it to be. To structure data, you can transform it, meaning that you can split and rename columns, change data types, and create relationships between columns.
You can connect Power BI Desktop to many types of data sources, including on-premises databases, Microsoft Excel workbooks, and cloud services. Currently, there are over 110 Power BI-specific connectors to cloud services such as GitHub and Marketo. You can also connect to generic sources through XML, CSV, text, and ODBC. Power BI will even extract tabular data directly from a website URL.
In this module, we will build out a dashboard for Contoso Manufacturing displaying their sales data for various products. To follow along with the next steps, visit /power-bi/create-reports/sample-financial-download and download the financial sample workbook to your local files or One Drive. If this is your first time using Power BI Desktop, please visit /power-bi/fundamentals/desktop-get-the-desktop for download instructions.
Start Power BI Desktop, and choose Get Data from the ribbon on the Home tab.
Choose Excel and press Connect.
Find the financial sample workbook which you downloaded and saved locally or to your OneDrive. Select the file and click Open.
A dialogue box with the tables in your data should open. Click the box next to the financials table. You will see a preview of the data displayed. Select Load.
You can now see that the fields have populated on the farthest right pane. You are currently in the report building tab. Select the data tab to see a preview of your data.
Now you have loaded your data and will shortly be ready to build visuals, but first, let's transform our data into exactly what we want.
Data doesn't always come into your report clean, or ready to use. You may need additional columns or to rename or hide existing columns. You may have multiple data sources and need to define a relationship between them. All of these tasks are known as data transformation.