AWS Certified Advanced Networking - Specialty - (ANS-C01) Exam Questions
Total Questions
Last Updated
1st Try Guaranteed

Experts Verified
Question 11 Multiple Choice
A VPC peering connection exists between VPC A and VPC B. The network team has added the following additional configurations to the existing peering connection:
VPC A has an AWS Direct Connect connection to a corporate network
VPC A has a VPC gateway endpoint that connects it to Amazon S3
What will be the outcome? (Select Two)
Explanation

Click "Show Answer" to see the explanation here
Correct options:
Traffic from the corporate network cannot directly access VPC B by using the AWS Direct Connect connection to VPC A
You have a VPC peering connection between VPC A and VPC B. VPC A also has a Site-to-Site VPN connection or an AWS Direct Connect connection to a corporate network. Edge-to-edge routing is not supported; you cannot use VPC A to extend the peering relationship to exist between VPC B and the corporate network.
Edge-to-edge routing through an AWS Direct Connect connection: 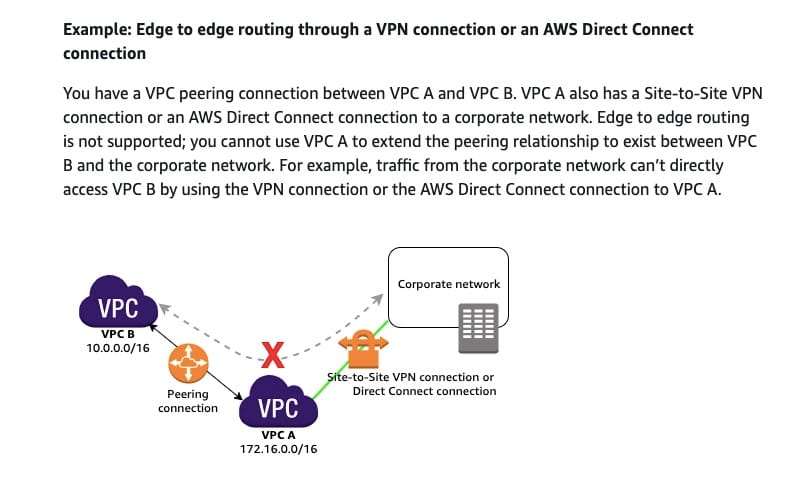 via - https://docs.aws.amazon.com/vpc/latest/peering/invalid-peering-configurations.html#edge-to-edge-vgw
VPC B can't directly access Amazon S3 using the VPC gateway endpoint connection to VPC A
You have a VPC peering connection between VPC A and VPC B. VPC A has a VPC gateway endpoint that connects it to Amazon S3. Edge-to-edge routing is not supported; you cannot use VPC A to extend the peering relationship to exist between VPC B and Amazon S3. For example, VPC B can't directly access Amazon S3 using the VPC gateway endpoint connection to VPC A.
Edge to edge routing through a VPC gateway endpoint: 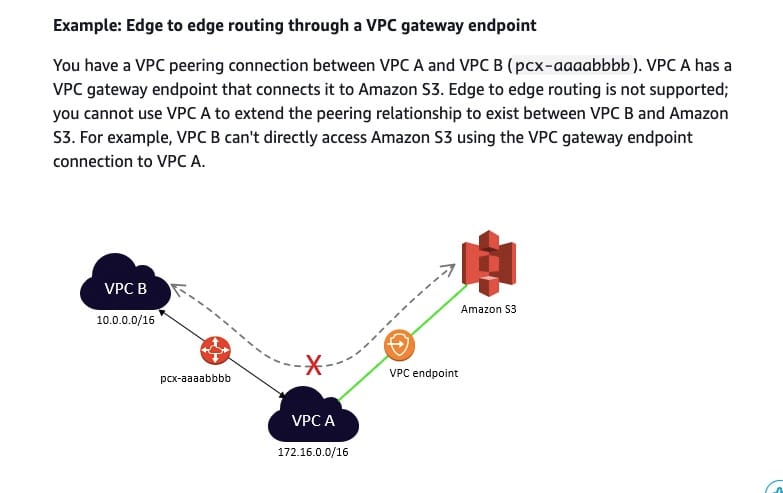 via - https://docs.aws.amazon.com/vpc/latest/peering/invalid-peering-configurations.html#edge-to-edge-vgw
Limitations on edge-to-edge routing through a gateway or private connection: 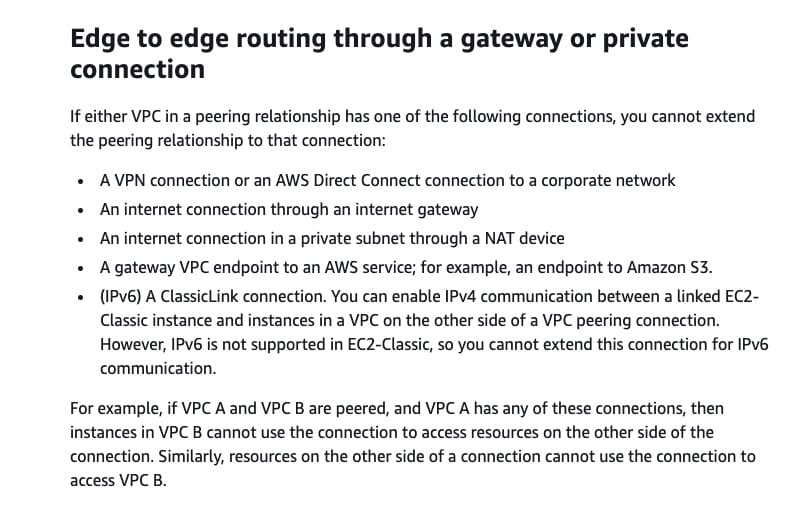 via - https://docs.aws.amazon.com/vpc/latest/peering/invalid-peering-configurations.html#edge-to-edge-vgw
Incorrect options:
VPC A can be used to extend the peering relationship between VPC B and the corporate network
VPC B can directly access Amazon S3 using the VPC gateway endpoint connection to VPC A
Traffic from the corporate network can access VPC B if the AWS Direct Connect connection to VPC A is converted to a Site-to-Site VPN connection to VPC A
These three options contradict the explanation provided above, so these options are incorrect.
Reference:
https://docs.aws.amazon.com/vpc/latest/peering/invalid-peering-configurations.html#edge-to-edge-vgw
Explanation
Correct options:
Traffic from the corporate network cannot directly access VPC B by using the AWS Direct Connect connection to VPC A
You have a VPC peering connection between VPC A and VPC B. VPC A also has a Site-to-Site VPN connection or an AWS Direct Connect connection to a corporate network. Edge-to-edge routing is not supported; you cannot use VPC A to extend the peering relationship to exist between VPC B and the corporate network.
Edge-to-edge routing through an AWS Direct Connect connection: via - https://docs.aws.amazon.com/vpc/latest/peering/invalid-peering-configurations.html#edge-to-edge-vgw
VPC B can't directly access Amazon S3 using the VPC gateway endpoint connection to VPC A
You have a VPC peering connection between VPC A and VPC B. VPC A has a VPC gateway endpoint that connects it to Amazon S3. Edge-to-edge routing is not supported; you cannot use VPC A to extend the peering relationship to exist between VPC B and Amazon S3. For example, VPC B can't directly access Amazon S3 using the VPC gateway endpoint connection to VPC A.
Edge to edge routing through a VPC gateway endpoint: via - https://docs.aws.amazon.com/vpc/latest/peering/invalid-peering-configurations.html#edge-to-edge-vgw
Limitations on edge-to-edge routing through a gateway or private connection: via - https://docs.aws.amazon.com/vpc/latest/peering/invalid-peering-configurations.html#edge-to-edge-vgw
Incorrect options:
VPC A can be used to extend the peering relationship between VPC B and the corporate network
VPC B can directly access Amazon S3 using the VPC gateway endpoint connection to VPC A
Traffic from the corporate network can access VPC B if the AWS Direct Connect connection to VPC A is converted to a Site-to-Site VPN connection to VPC A
These three options contradict the explanation provided above, so these options are incorrect.
Reference:
https://docs.aws.amazon.com/vpc/latest/peering/invalid-peering-configurations.html#edge-to-edge-vgw
Question 12 Single Choice
An e-commerce company has its technology infrastructure deployed in hybrid mode with applications running in a single AWS Region as well as its on-premises data center. The company has a 10 Gbps AWS Direct Connect connection from the data center to AWS that is 70% utilized. The company wants to deploy a new flagship application on AWS that will connect with existing applications running on-premises. The application SLA requires a minimum of 99.9% network uptime between the on-premises data center and the AWS Cloud. The company has an AWS Enterprise Support plan.
Which of the following options would you recommend as the MOST cost-effective solution to address this requirement?
Explanation
Click "Show Answer" to see the explanation here
Correct option:
Purchase another 10 Gbps Direct Connect dedicated connection from AWS in a different Direct Connect location that terminates in the associated AWS Region. Set up a new virtual interface (VIF) to the existing VPC and use BGP for load balancing
AWS Direct Connect is a cloud service solution that makes it easy to establish a dedicated network connection from your premises to AWS. Using AWS Direct Connect, you create a private connection between AWS and your data center. AWS Direct Connect is compatible with all AWS services accessible over the internet and is available in speeds starting at 50 Mbps and scaling up to 100 Gbps.
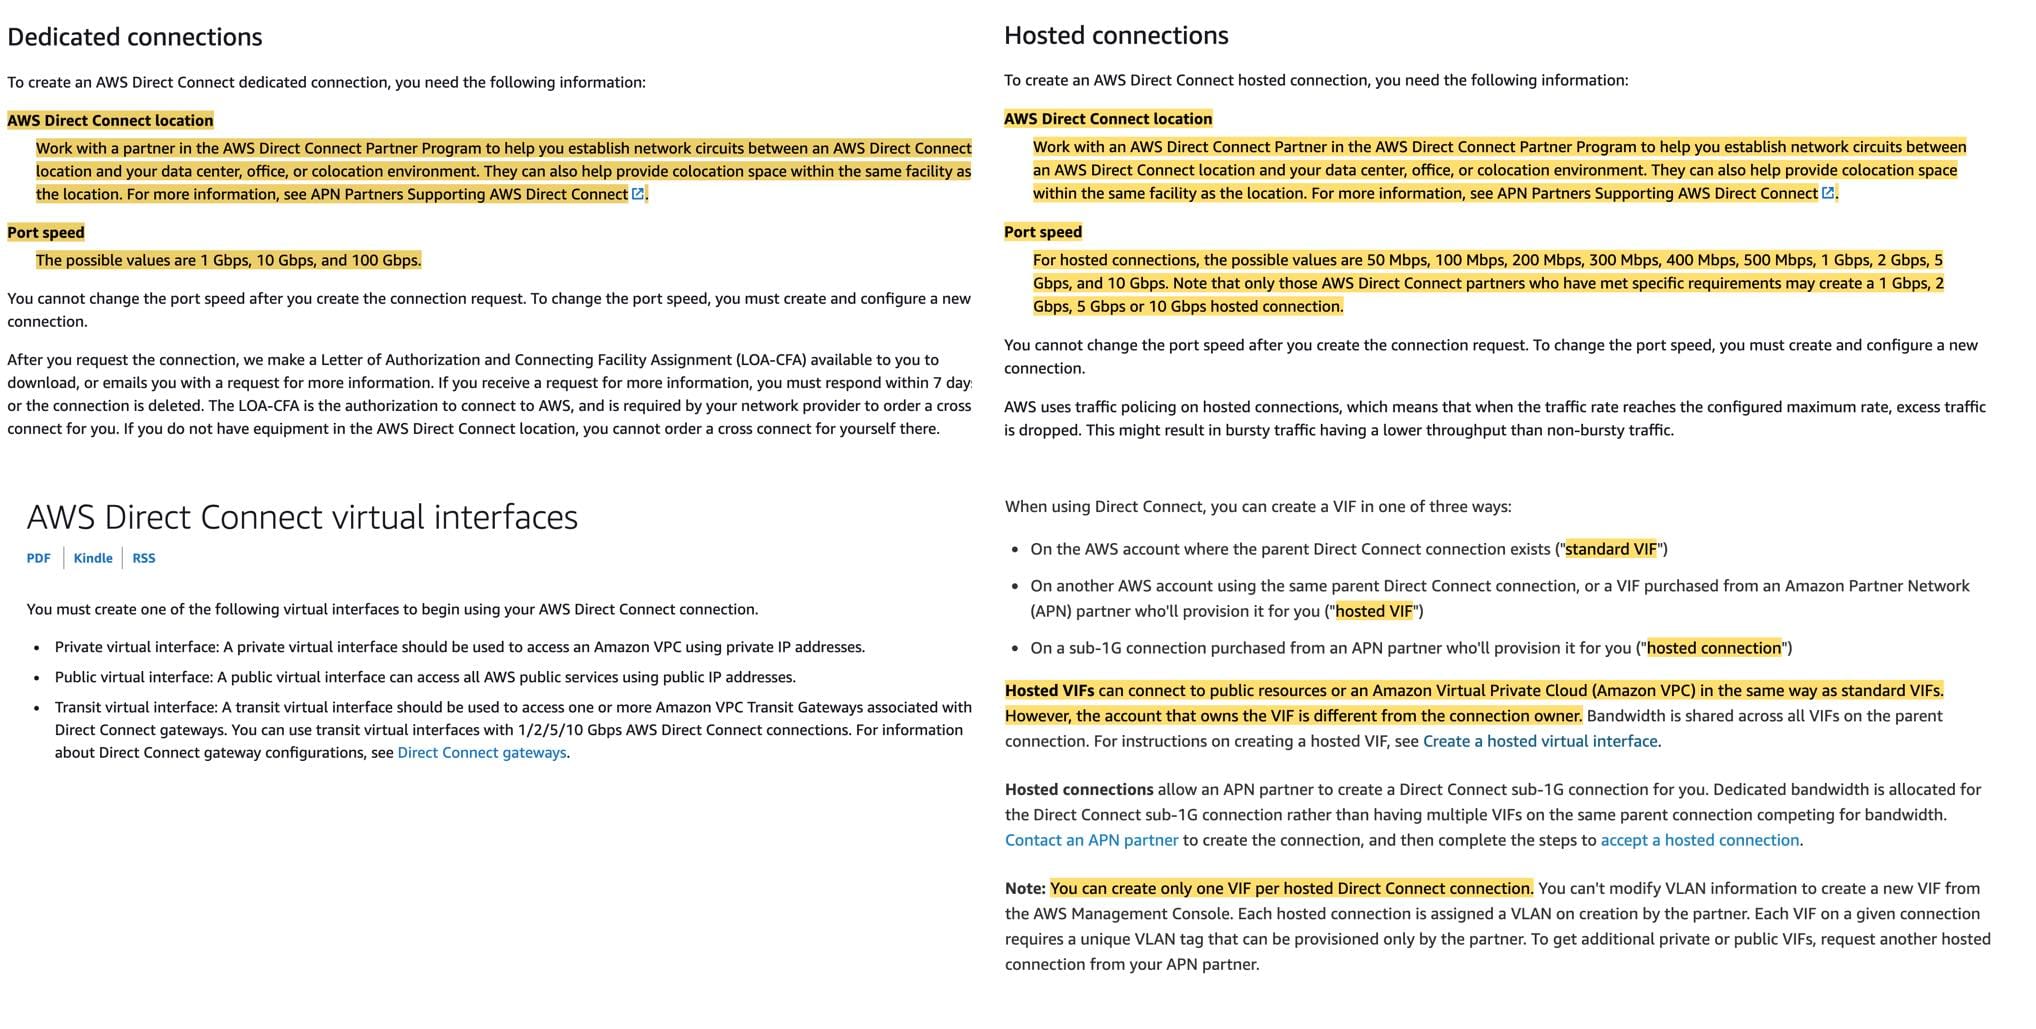
There are two types of Direct Connect connections:
Dedicated Connection: A physical Ethernet connection associated with a single customer. Customers can request a dedicated connection through the AWS Direct Connect console, the CLI, or the API.
Hosted Connection: A physical Ethernet connection that an AWS Direct Connect Partner provisions on behalf of a customer. Customers request a hosted connection by contacting a partner in the AWS Direct Connect Partner Program, which provisions the connection.
You can use local preference BGP community tags to achieve load balancing and route preference for incoming traffic to your network. For each prefix that you advertise over a BGP session, you can apply a community tag to indicate the priority of the associated path for returning traffic.
The following local preference BGP community tags are supported: 7224:7100—Low preference 7224:7200—Medium preference 7224:7300—High preference Local preference BGP community tags are mutually exclusive.
A Virtual Interface (VIF) is necessary to access AWS services, and can be either public, private or transit, like so:
Private virtual interface: A private virtual interface should be used to access an Amazon VPC using private IP addresses.
Public virtual interface: A public virtual interface can access all AWS public services using public IP addresses. A public virtual interface enables access to public services, such as Amazon S3.
Transit virtual interface: A transit virtual interface should be used to access one or more Amazon VPC Transit Gateways associated with Direct Connect gateways. You can use transit virtual interfaces with 1/2/5/10 Gbps AWS Direct Connect connections.
Exam alert - You should note the allowed VIF types for the various configurations of Direct Connect connections:
A Hosted Connection with a capacity of 500 Mbps or less can support one private VIF or one public VIF. A Hosted Connection with a capacity of 1 Gbps or more can support one private, public, or transit VIF. Each Hosted Connection supports a single VIF and you can obtain multiple VIFs by configuring multiple hosted connections.
Hosted VIFs can connect to public resources or an Amazon Virtual Private Cloud (Amazon VPC) in the same way as standard VIFs. However, the account that owns the VIF is different from the connection owner. Bandwidth is shared across all VIFs on the parent connection. A hosted VIF can support one private VIF or one public VIF.
A Dedicated Connection can support up to 50 public/private VIFs and 1 transit VIF.
 via - https://docs.aws.amazon.com/directconnect/latest/UserGuide/WorkingWithConnections.html https://aws.amazon.com/premiumsupport/knowledge-center/direct-connect-types/ https://docs.aws.amazon.com/directconnect/latest/UserGuide/WorkingWithVirtualInterfaces.html
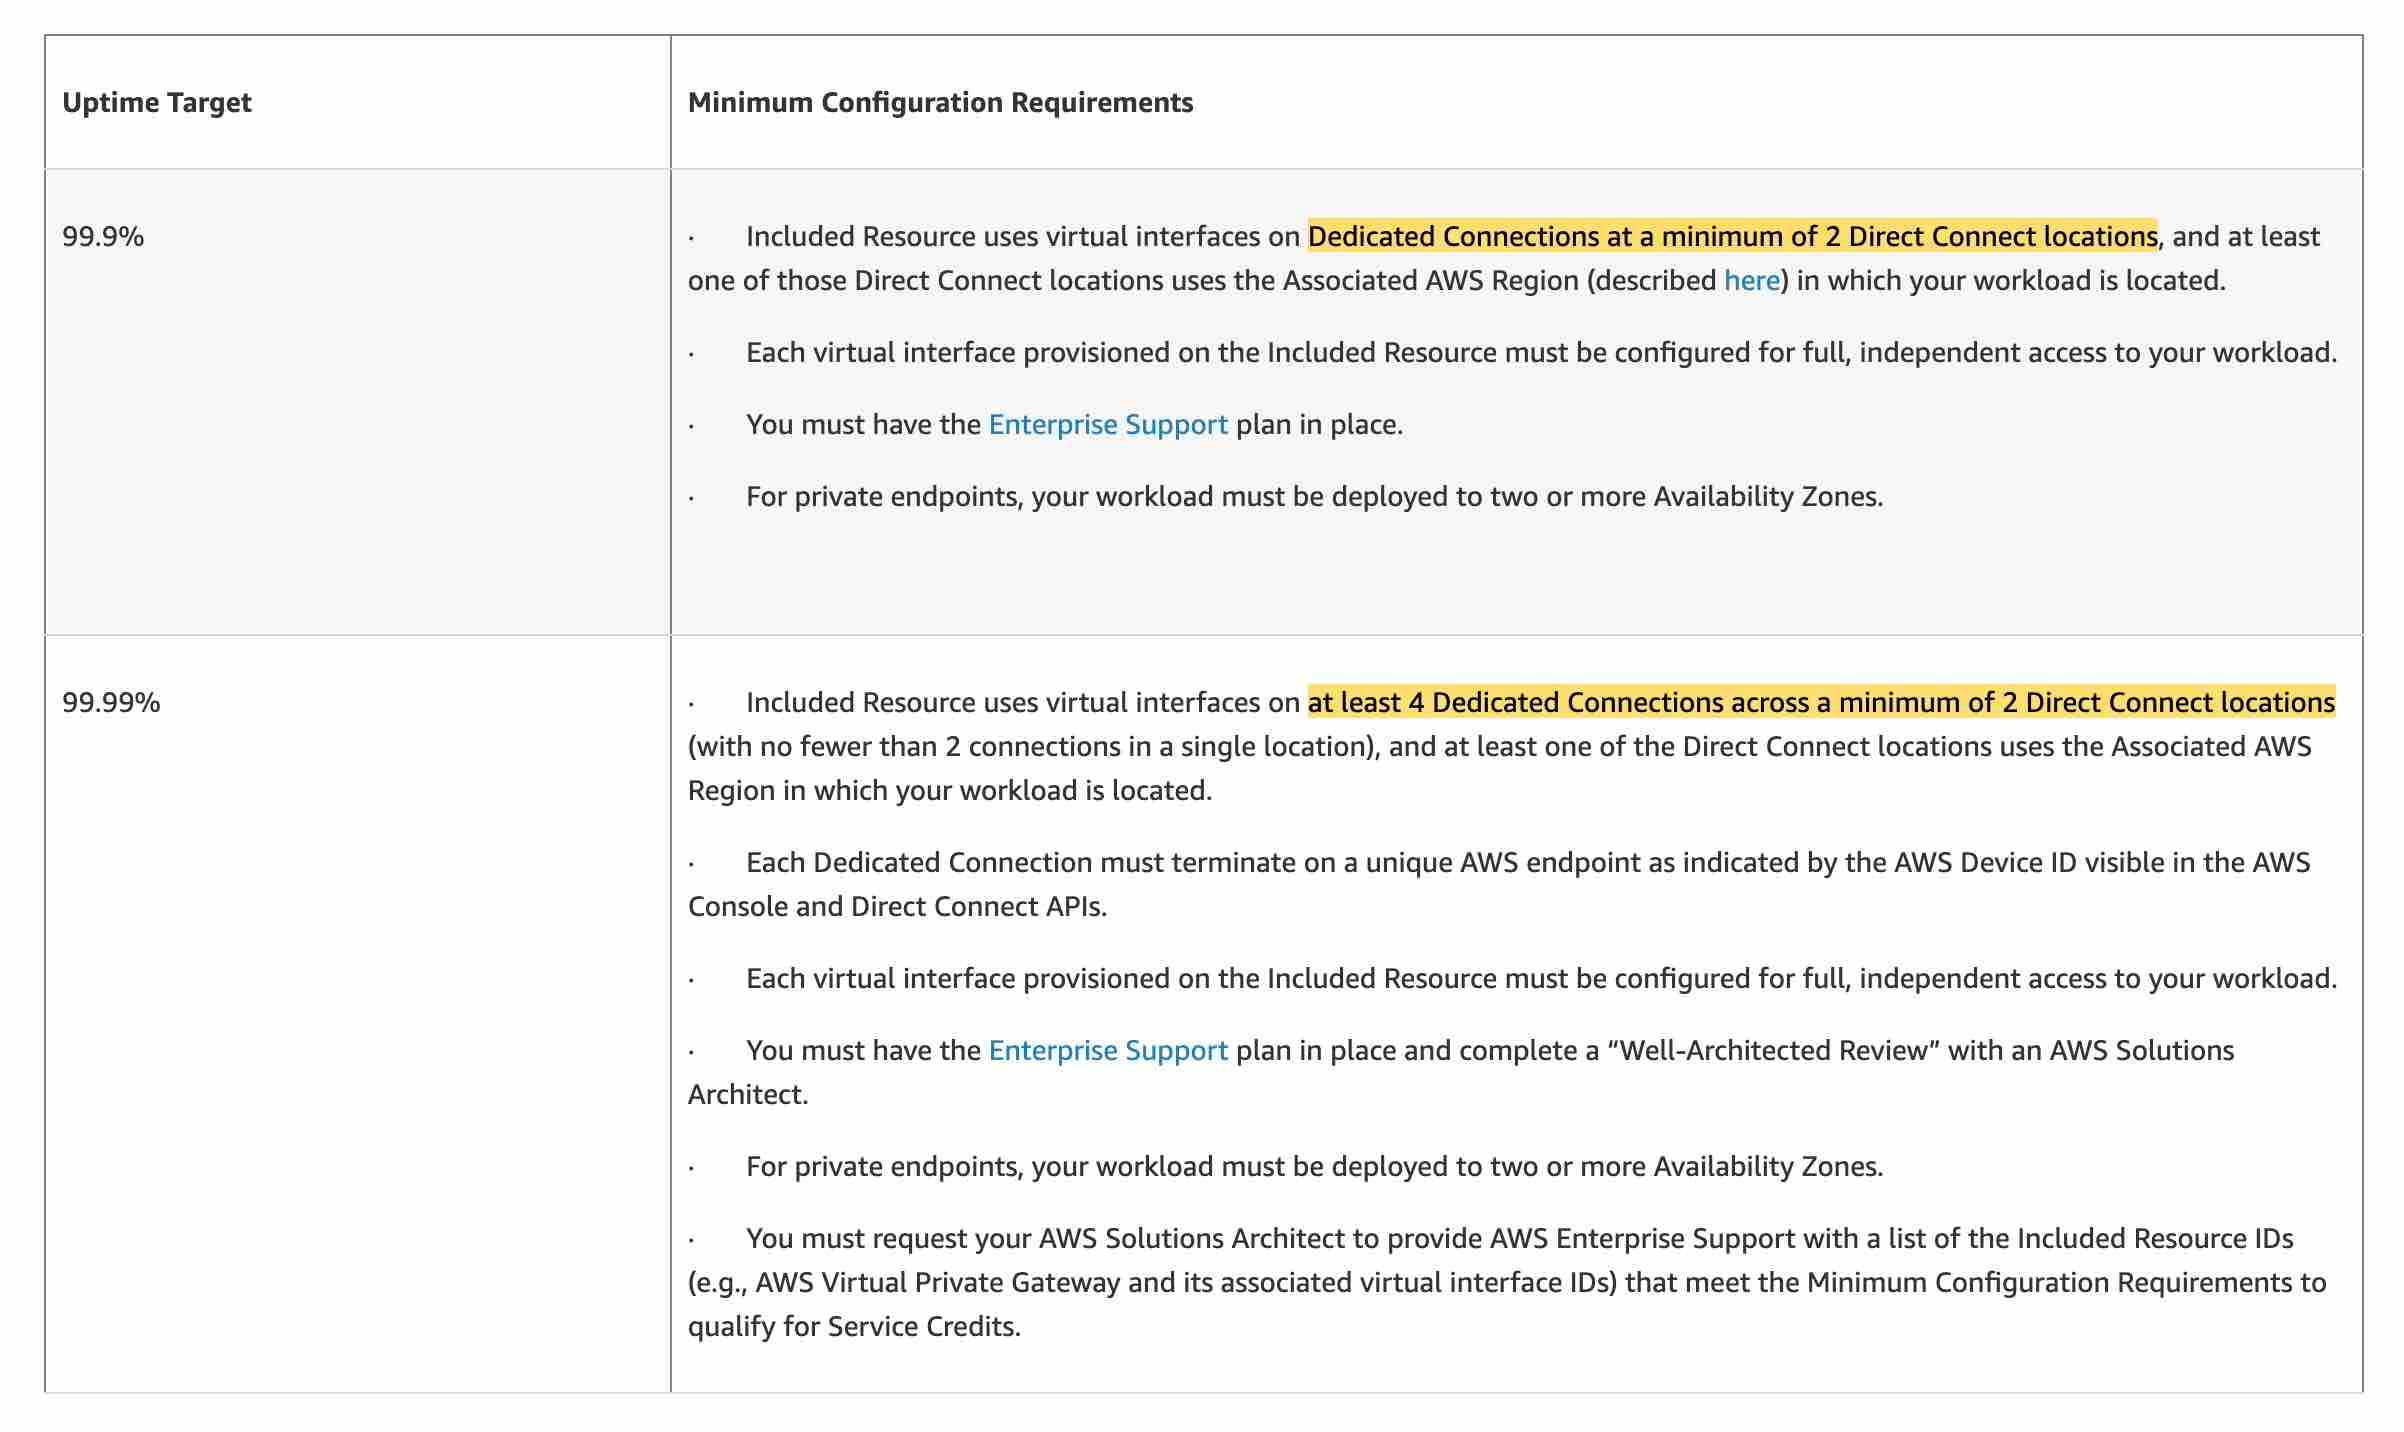
“Uptime Target” means a percentage of Maximum Uptime in a monthly billing cycle applicable to your Included Resource, based upon meeting the Minimum Configuration Requirements. To ensure an uptime target of 99.9% as mandated in the given use case, the included resources should use virtual interfaces on Dedicated Connections at a minimum of 2 Direct Connect locations, and at least one of those Direct Connect locations uses the Associated AWS Region in which your workload is located.
 via - https://aws.amazon.com/directconnect/sla/
Incorrect options:
Purchase another 10 Gbps Direct Connect hosted connection through an AWS Direct Connect partner in a different Direct Connect location that terminates in the associated AWS Region. Set up a new virtual interface (VIF) to the existing VPC and use BGP for load balancing
Purchase two new Direct Connect hosted connections of 5 Gbps each through an AWS Direct Connect partner. Provision two virtual interfaces (VIFs) to the existing VPC on both Direct Connect connections and use BGP for load balancing. Terminate the existing 10 Gbps Direct Connect connection
As mentioned in the explanation above, to guarantee an SLA of 99.9%, you must use dedicated Direct Connect connections and NOT hosted connections. So both these options are incorrect.
Purchase another 10 Gbps Direct Connect dedicated connection from AWS in the existing Direct Connect location that terminates in the associated AWS Region. Set up a new virtual interface (VIF) to the existing VPC and use BGP for load balancing - To guarantee an SLA of 99.9%, you must use dedicated Direct Connect connections at a minimum of 2 Direct Connect locations rather than a single Direct Connect location. So this option is incorrect.
References:
https://aws.amazon.com/directconnect/sla/
https://aws.amazon.com/directconnect/faqs/
https://docs.aws.amazon.com/directconnect/latest/UserGuide/routing-and-bgp.html
https://docs.aws.amazon.com/directconnect/latest/UserGuide/WorkingWithConnections.html
https://aws.amazon.com/premiumsupport/knowledge-center/direct-connect-types/
https://docs.aws.amazon.com/directconnect/latest/UserGuide/WorkingWithVirtualInterfaces.html
Explanation
Correct option:
Purchase another 10 Gbps Direct Connect dedicated connection from AWS in a different Direct Connect location that terminates in the associated AWS Region. Set up a new virtual interface (VIF) to the existing VPC and use BGP for load balancing
AWS Direct Connect is a cloud service solution that makes it easy to establish a dedicated network connection from your premises to AWS. Using AWS Direct Connect, you create a private connection between AWS and your data center. AWS Direct Connect is compatible with all AWS services accessible over the internet and is available in speeds starting at 50 Mbps and scaling up to 100 Gbps.
There are two types of Direct Connect connections:
Dedicated Connection: A physical Ethernet connection associated with a single customer. Customers can request a dedicated connection through the AWS Direct Connect console, the CLI, or the API.
Hosted Connection: A physical Ethernet connection that an AWS Direct Connect Partner provisions on behalf of a customer. Customers request a hosted connection by contacting a partner in the AWS Direct Connect Partner Program, which provisions the connection.
You can use local preference BGP community tags to achieve load balancing and route preference for incoming traffic to your network. For each prefix that you advertise over a BGP session, you can apply a community tag to indicate the priority of the associated path for returning traffic.
The following local preference BGP community tags are supported: 7224:7100—Low preference 7224:7200—Medium preference 7224:7300—High preference Local preference BGP community tags are mutually exclusive.
A Virtual Interface (VIF) is necessary to access AWS services, and can be either public, private or transit, like so:
Private virtual interface: A private virtual interface should be used to access an Amazon VPC using private IP addresses.
Public virtual interface: A public virtual interface can access all AWS public services using public IP addresses. A public virtual interface enables access to public services, such as Amazon S3.
Transit virtual interface: A transit virtual interface should be used to access one or more Amazon VPC Transit Gateways associated with Direct Connect gateways. You can use transit virtual interfaces with 1/2/5/10 Gbps AWS Direct Connect connections.
Exam alert - You should note the allowed VIF types for the various configurations of Direct Connect connections:
A Hosted Connection with a capacity of 500 Mbps or less can support one private VIF or one public VIF. A Hosted Connection with a capacity of 1 Gbps or more can support one private, public, or transit VIF. Each Hosted Connection supports a single VIF and you can obtain multiple VIFs by configuring multiple hosted connections.
Hosted VIFs can connect to public resources or an Amazon Virtual Private Cloud (Amazon VPC) in the same way as standard VIFs. However, the account that owns the VIF is different from the connection owner. Bandwidth is shared across all VIFs on the parent connection. A hosted VIF can support one private VIF or one public VIF.
A Dedicated Connection can support up to 50 public/private VIFs and 1 transit VIF.
via - https://docs.aws.amazon.com/directconnect/latest/UserGuide/WorkingWithConnections.html https://aws.amazon.com/premiumsupport/knowledge-center/direct-connect-types/ https://docs.aws.amazon.com/directconnect/latest/UserGuide/WorkingWithVirtualInterfaces.html
“Uptime Target” means a percentage of Maximum Uptime in a monthly billing cycle applicable to your Included Resource, based upon meeting the Minimum Configuration Requirements. To ensure an uptime target of 99.9% as mandated in the given use case, the included resources should use virtual interfaces on Dedicated Connections at a minimum of 2 Direct Connect locations, and at least one of those Direct Connect locations uses the Associated AWS Region in which your workload is located.
via - https://aws.amazon.com/directconnect/sla/
Incorrect options:
Purchase another 10 Gbps Direct Connect hosted connection through an AWS Direct Connect partner in a different Direct Connect location that terminates in the associated AWS Region. Set up a new virtual interface (VIF) to the existing VPC and use BGP for load balancing
Purchase two new Direct Connect hosted connections of 5 Gbps each through an AWS Direct Connect partner. Provision two virtual interfaces (VIFs) to the existing VPC on both Direct Connect connections and use BGP for load balancing. Terminate the existing 10 Gbps Direct Connect connection
As mentioned in the explanation above, to guarantee an SLA of 99.9%, you must use dedicated Direct Connect connections and NOT hosted connections. So both these options are incorrect.
Purchase another 10 Gbps Direct Connect dedicated connection from AWS in the existing Direct Connect location that terminates in the associated AWS Region. Set up a new virtual interface (VIF) to the existing VPC and use BGP for load balancing - To guarantee an SLA of 99.9%, you must use dedicated Direct Connect connections at a minimum of 2 Direct Connect locations rather than a single Direct Connect location. So this option is incorrect.
References:
https://aws.amazon.com/directconnect/sla/
https://aws.amazon.com/directconnect/faqs/
https://docs.aws.amazon.com/directconnect/latest/UserGuide/routing-and-bgp.html
https://docs.aws.amazon.com/directconnect/latest/UserGuide/WorkingWithConnections.html
https://aws.amazon.com/premiumsupport/knowledge-center/direct-connect-types/
https://docs.aws.amazon.com/directconnect/latest/UserGuide/WorkingWithVirtualInterfaces.html
Question 13 Single Choice
An analytics company uses Amazon QuickSight (Enterprise Edition) to easily create and publish interactive BI dashboards that can be accessed from any device. For a specific requirement, the company needs to create a private connection from Amazon QuickSight to an Amazon RDS DB instance that's in a private subnet to fetch data for analysis.
Which of the following represents an optimal solution for configuring a private connection between QuickSight and Amazon RDS DB instance?
Explanation
Click "Show Answer" to see the explanation here
Correct option:
Create a new private subnet in the same VPC as the Amazon RDS DB instance. Create a new security group with necessary inbound rules for QuickSight in the same VPC. Sign in to QuickSight as a QuickSight admin and create a new QuickSight VPC connection. Create a new dataset from the RDS DB instance
Amazon QuickSight Enterprise edition is fully integrated with the Amazon VPC service. A VPC based on this service closely resembles a traditional network that you operate in your own data center. It enables you to secure and isolate traffic between resources. You define and control the network elements to suit your requirements, while still getting the benefit of cloud networking and the scalable infrastructure of AWS.
By creating a VPC connection in QuickSight, you're adding an elastic network interface in your VPC. This network interface allows QuickSight to exchange network traffic with a network instance within your VPC. You can provide all of the standard security controls for this network traffic, as you do with other traffic in your VPC. Route tables, network access control lists (ACLs), subnets, and security groups settings all apply to network traffic to and from QuickSight in the same way that they apply to traffic between other instances in your VPC.
When you register a VPC connection with QuickSight, you can securely connect to data that's available only in your VPC, for example: 1. Data you can reach by IP address 2. Data that isn't available on the public internet 3. Private databases 4. On-premises data
This works if you set up connectivity between the VPC and your on-premises network. For example, you might set up connectivity with AWS Direct Connect, a virtual private network (VPN), or a proxy.
After you connect to the data, you can use it to create data analyses and publish secure data dashboards.
Incorrect options:
Amazon QuickSight Enterprise edition is fully integrated with the Amazon VPC service. Create an ENI in QuickSight that points to the VPC that hosts the RDS DB instance. However, the subnet has to be a private subnet and not a public subnet - When you create a VPC connection in QuickSight, an elastic network interface is added in your VPC. ENI is present on the VPC side and not on the QuickSight side of the connection.
Create a new private subnet in the same VPC as the Amazon RDS DB instance. Create a new network Access Control List (ACL) with necessary inbound rules for QuickSight in the same VPC. Connect from QuckSight using VPC connector - By creating a VPC connection in QuickSight, you're adding an elastic network interface in your VPC. You define a Security Group and not an NACL for an ENI.
Create a Private Virtual Interface between VPC that hosts Amazon RDS DB instance and QuickSight. Use this connection to privately access necessary data from RDS DB - A private virtual interface is used to access an Amazon VPC using private IP addresses. This interface is used by the AWS Direct Connect connection. This option has been added as a distractor.
References:
https://docs.aws.amazon.com/quicksight/latest/user/working-with-aws-vpc.html
https://docs.aws.amazon.com/quicksight/latest/user/vpc-creating-a-connection-in-quicksight.html
https://aws.amazon.com/premiumsupport/knowledge-center/quicksight-redshift-private-connection/
Explanation
Correct option:
Create a new private subnet in the same VPC as the Amazon RDS DB instance. Create a new security group with necessary inbound rules for QuickSight in the same VPC. Sign in to QuickSight as a QuickSight admin and create a new QuickSight VPC connection. Create a new dataset from the RDS DB instance
Amazon QuickSight Enterprise edition is fully integrated with the Amazon VPC service. A VPC based on this service closely resembles a traditional network that you operate in your own data center. It enables you to secure and isolate traffic between resources. You define and control the network elements to suit your requirements, while still getting the benefit of cloud networking and the scalable infrastructure of AWS.
By creating a VPC connection in QuickSight, you're adding an elastic network interface in your VPC. This network interface allows QuickSight to exchange network traffic with a network instance within your VPC. You can provide all of the standard security controls for this network traffic, as you do with other traffic in your VPC. Route tables, network access control lists (ACLs), subnets, and security groups settings all apply to network traffic to and from QuickSight in the same way that they apply to traffic between other instances in your VPC.
When you register a VPC connection with QuickSight, you can securely connect to data that's available only in your VPC, for example: 1. Data you can reach by IP address 2. Data that isn't available on the public internet 3. Private databases 4. On-premises data
This works if you set up connectivity between the VPC and your on-premises network. For example, you might set up connectivity with AWS Direct Connect, a virtual private network (VPN), or a proxy.
After you connect to the data, you can use it to create data analyses and publish secure data dashboards.
Incorrect options:
Amazon QuickSight Enterprise edition is fully integrated with the Amazon VPC service. Create an ENI in QuickSight that points to the VPC that hosts the RDS DB instance. However, the subnet has to be a private subnet and not a public subnet - When you create a VPC connection in QuickSight, an elastic network interface is added in your VPC. ENI is present on the VPC side and not on the QuickSight side of the connection.
Create a new private subnet in the same VPC as the Amazon RDS DB instance. Create a new network Access Control List (ACL) with necessary inbound rules for QuickSight in the same VPC. Connect from QuckSight using VPC connector - By creating a VPC connection in QuickSight, you're adding an elastic network interface in your VPC. You define a Security Group and not an NACL for an ENI.
Create a Private Virtual Interface between VPC that hosts Amazon RDS DB instance and QuickSight. Use this connection to privately access necessary data from RDS DB - A private virtual interface is used to access an Amazon VPC using private IP addresses. This interface is used by the AWS Direct Connect connection. This option has been added as a distractor.
References:
https://docs.aws.amazon.com/quicksight/latest/user/working-with-aws-vpc.html
https://docs.aws.amazon.com/quicksight/latest/user/vpc-creating-a-connection-in-quicksight.html
https://aws.amazon.com/premiumsupport/knowledge-center/quicksight-redshift-private-connection/
Question 14 Single Choice
A developer has configured a private hosted zone using Route 53. The developer needs to configure health checks for record sets within the private hosted zone that are associated with EC2 instances.
How can the developer build a solution to address the given use-case?
Explanation
Click "Show Answer" to see the explanation here
Correct option:
Set up a CloudWatch metric that checks the status of the EC2 StatusCheckFailed metric, add an alarm to the metric, and then configure a health check that monitors the state of the alarm
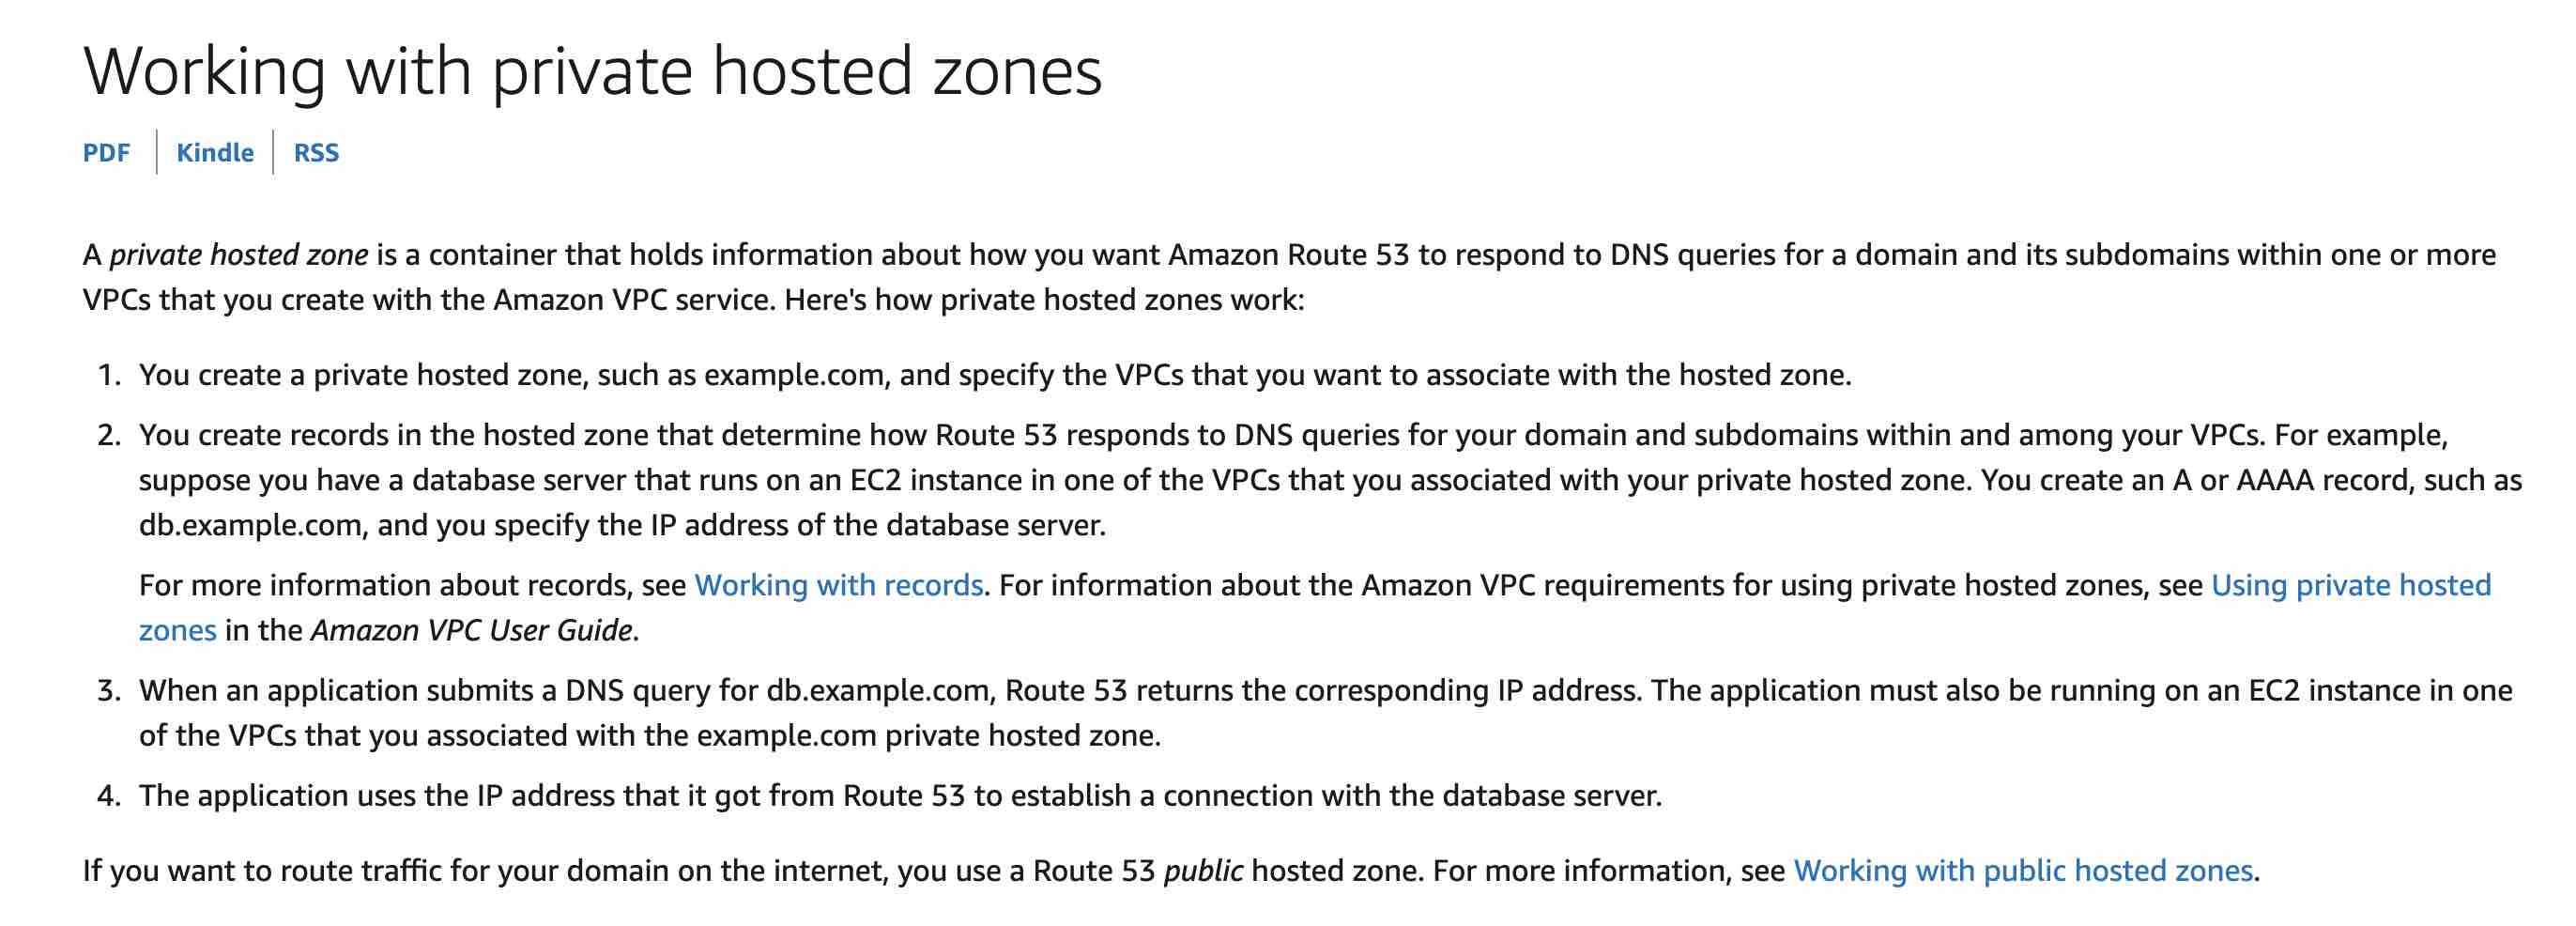
A private hosted zone is a container that holds information about how you want Amazon Route 53 to respond to DNS queries for a domain and its subdomains within one or more VPCs that you create with the Amazon VPC service.
 via https://docs.aws.amazon.com/Route53/latest/DeveloperGuide/hosted-zones-private.html
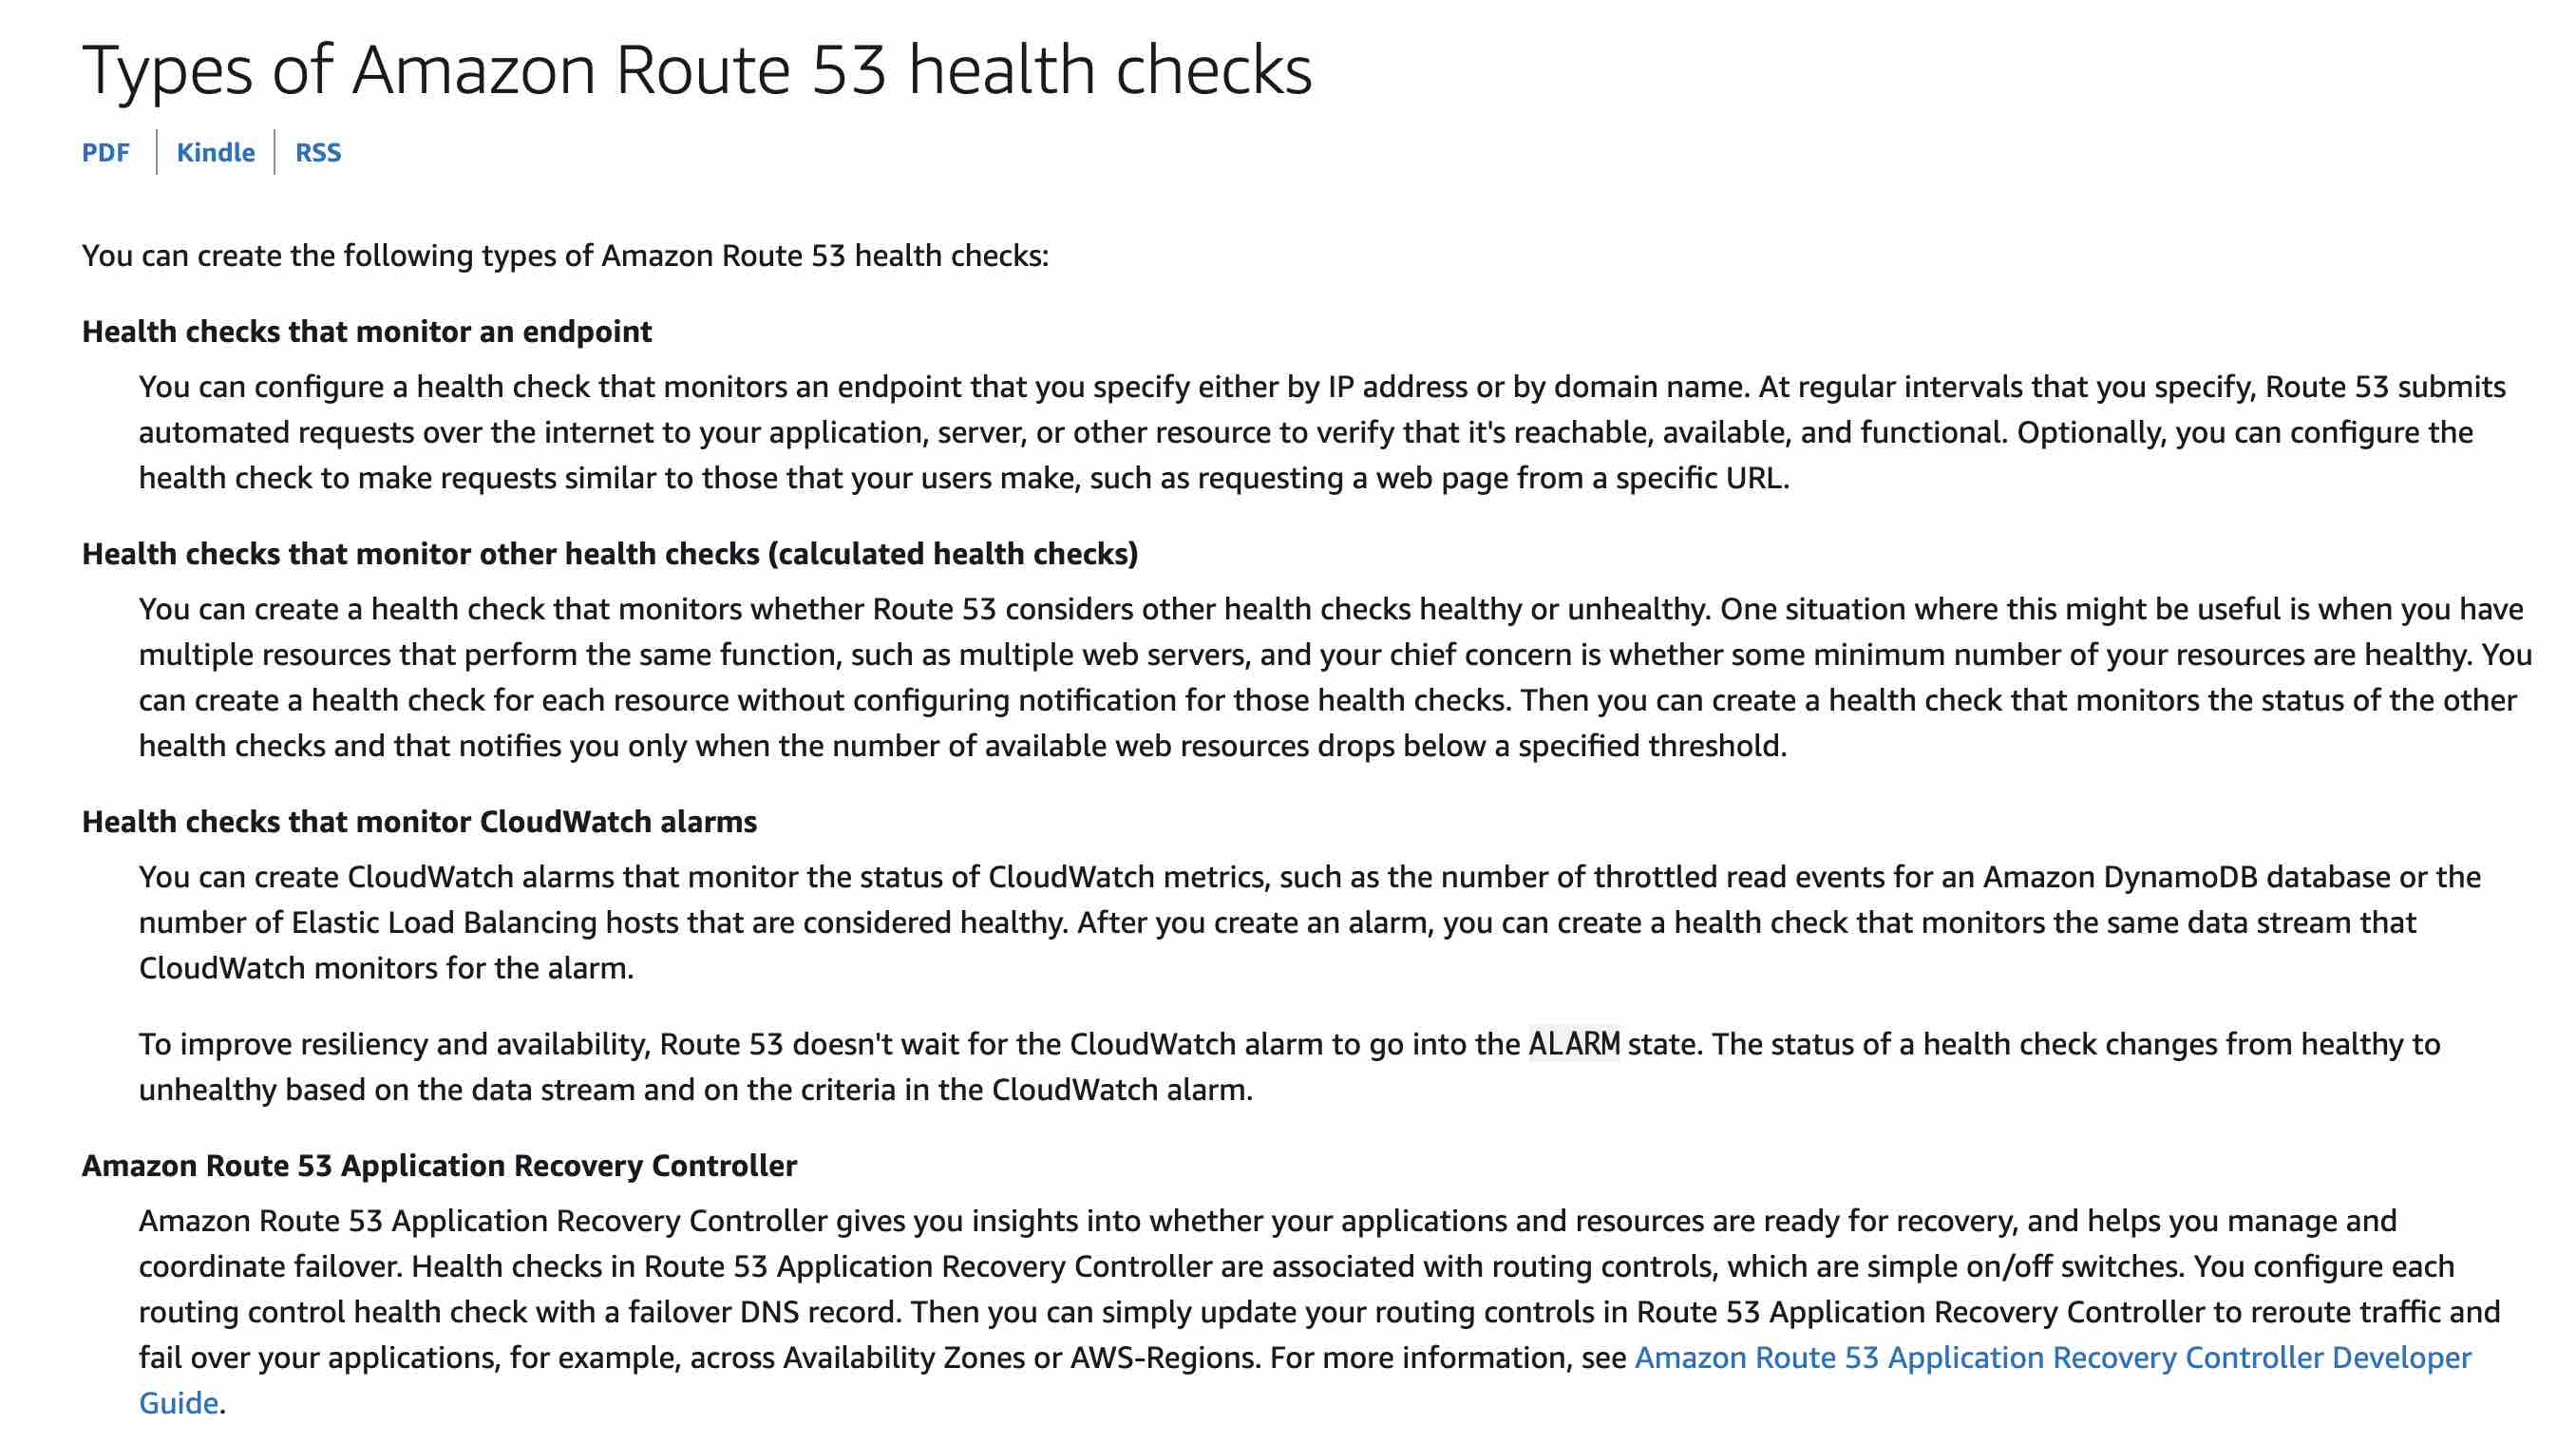
Amazon Route 53 health checks monitor the health and performance of your web applications, web servers, and other resources. Each health check that you create can monitor one of the following:
The health of a specified resource, such as a web server.
The status of other health checks.
The status of an Amazon CloudWatch alarm.
Additionally, with Amazon Route 53 Application Recovery Controller, you can set up routing control health checks with DNS failover records to manage traffic failover for your application.
For the given use-case, you need to create a CloudWatch metric that checks the status of the EC2 StatusCheckFailed metric, add an alarm to the metric, and then create a health check that is based on the data stream for the alarm. To improve resiliency and availability, Route 53 doesn't wait for the CloudWatch alarm to go into the ALARM state. The status of a health check changes from healthy to unhealthy based on the data stream and the criteria in the CloudWatch alarm.
 via https://docs.aws.amazon.com/Route53/latest/DeveloperGuide/health-checks-types.html
Incorrect options:
Set up a Route 53 health check that monitors an SNS topic which in turn notifies a CloudWatch alarm when the EC2 StatusCheckFailed metric fails - As mentioned above, the Route 53 health checks cannot monitor an SNS topic, so this option is incorrect.
Set up a Route 53 health check to a private IP associated with the instances inside the VPC to be checked - Route 53 health checkers are outside the VPC. To check the health of an endpoint within a VPC by IP address, you must assign a public IP address to the instance in the VPC. Therefore, you cannot set up a Route 53 health check to a private IP associated with an instance.
Set up a CloudWatch metric that checks the status of the EC2 StatusCheckFailed metric and then configure a health check that monitors the status of the metric - Route 53 health checks can monitor CloudWatch alarms. The Route 53 health checks cannot directly monitor the CloudWatch metrics, so this option is incorrect.
References:
https://docs.aws.amazon.com/Route53/latest/DeveloperGuide/dns-failover.html
https://docs.aws.amazon.com/Route53/latest/DeveloperGuide/hosted-zones-private.html
https://docs.aws.amazon.com/Route53/latest/DeveloperGuide/dns-failover-private-hosted-zones.html
https://docs.aws.amazon.com/Route53/latest/DeveloperGuide/health-checks-types.html
Explanation
Correct option:
Set up a CloudWatch metric that checks the status of the EC2 StatusCheckFailed metric, add an alarm to the metric, and then configure a health check that monitors the state of the alarm
A private hosted zone is a container that holds information about how you want Amazon Route 53 to respond to DNS queries for a domain and its subdomains within one or more VPCs that you create with the Amazon VPC service.
via https://docs.aws.amazon.com/Route53/latest/DeveloperGuide/hosted-zones-private.html
Amazon Route 53 health checks monitor the health and performance of your web applications, web servers, and other resources. Each health check that you create can monitor one of the following:
The health of a specified resource, such as a web server.
The status of other health checks.
The status of an Amazon CloudWatch alarm.
Additionally, with Amazon Route 53 Application Recovery Controller, you can set up routing control health checks with DNS failover records to manage traffic failover for your application.
For the given use-case, you need to create a CloudWatch metric that checks the status of the EC2 StatusCheckFailed metric, add an alarm to the metric, and then create a health check that is based on the data stream for the alarm. To improve resiliency and availability, Route 53 doesn't wait for the CloudWatch alarm to go into the ALARM state. The status of a health check changes from healthy to unhealthy based on the data stream and the criteria in the CloudWatch alarm.
via https://docs.aws.amazon.com/Route53/latest/DeveloperGuide/health-checks-types.html
Incorrect options:
Set up a Route 53 health check that monitors an SNS topic which in turn notifies a CloudWatch alarm when the EC2 StatusCheckFailed metric fails - As mentioned above, the Route 53 health checks cannot monitor an SNS topic, so this option is incorrect.
Set up a Route 53 health check to a private IP associated with the instances inside the VPC to be checked - Route 53 health checkers are outside the VPC. To check the health of an endpoint within a VPC by IP address, you must assign a public IP address to the instance in the VPC. Therefore, you cannot set up a Route 53 health check to a private IP associated with an instance.
Set up a CloudWatch metric that checks the status of the EC2 StatusCheckFailed metric and then configure a health check that monitors the status of the metric - Route 53 health checks can monitor CloudWatch alarms. The Route 53 health checks cannot directly monitor the CloudWatch metrics, so this option is incorrect.
References:
https://docs.aws.amazon.com/Route53/latest/DeveloperGuide/dns-failover.html
https://docs.aws.amazon.com/Route53/latest/DeveloperGuide/hosted-zones-private.html
https://docs.aws.amazon.com/Route53/latest/DeveloperGuide/dns-failover-private-hosted-zones.html
https://docs.aws.amazon.com/Route53/latest/DeveloperGuide/health-checks-types.html
Question 15 Single Choice
A company has a Direct Connect connection between its on-premises data center and its VPC on the AWS Cloud. An application running on an EC2 instance in the VPC needs to access customer data stored in the on-premises data center with consistent performance. To meet the compliance guidelines, the data should remain encrypted during this operation.
As an AWS Certified Networking Specialist, which of the following solutions would you recommend to address these requirements?
Explanation
Click "Show Answer" to see the explanation here
Correct option:
Set up a public virtual interface on the Direct Connect connection. Create an AWS Site-to-Site VPN between the customer gateway and the virtual private gateway in the VPC
AWS Direct Connect is a networking service that provides an alternative to using the internet to connect to AWS. Using Direct Connect, data that would have previously been transported over the internet is delivered through a private network connection between your facilities and AWS
AWS Direct Connect (DX) provides three types of virtual interfaces - public, private, and transit.
Private virtual interface: A private virtual interface should be used to access an Amazon VPC using private IP addresses.
Public virtual interface: A public virtual interface can access all AWS public services using public IP addresses.
Transit virtual interface: A transit virtual interface should be used to access one or more Amazon VPC Transit Gateways associated with Direct Connect gateways. You can use transit virtual interfaces with 1/2/5/10 Gbps AWS Direct Connect connections.
Direct Connect Virtual Interfaces: 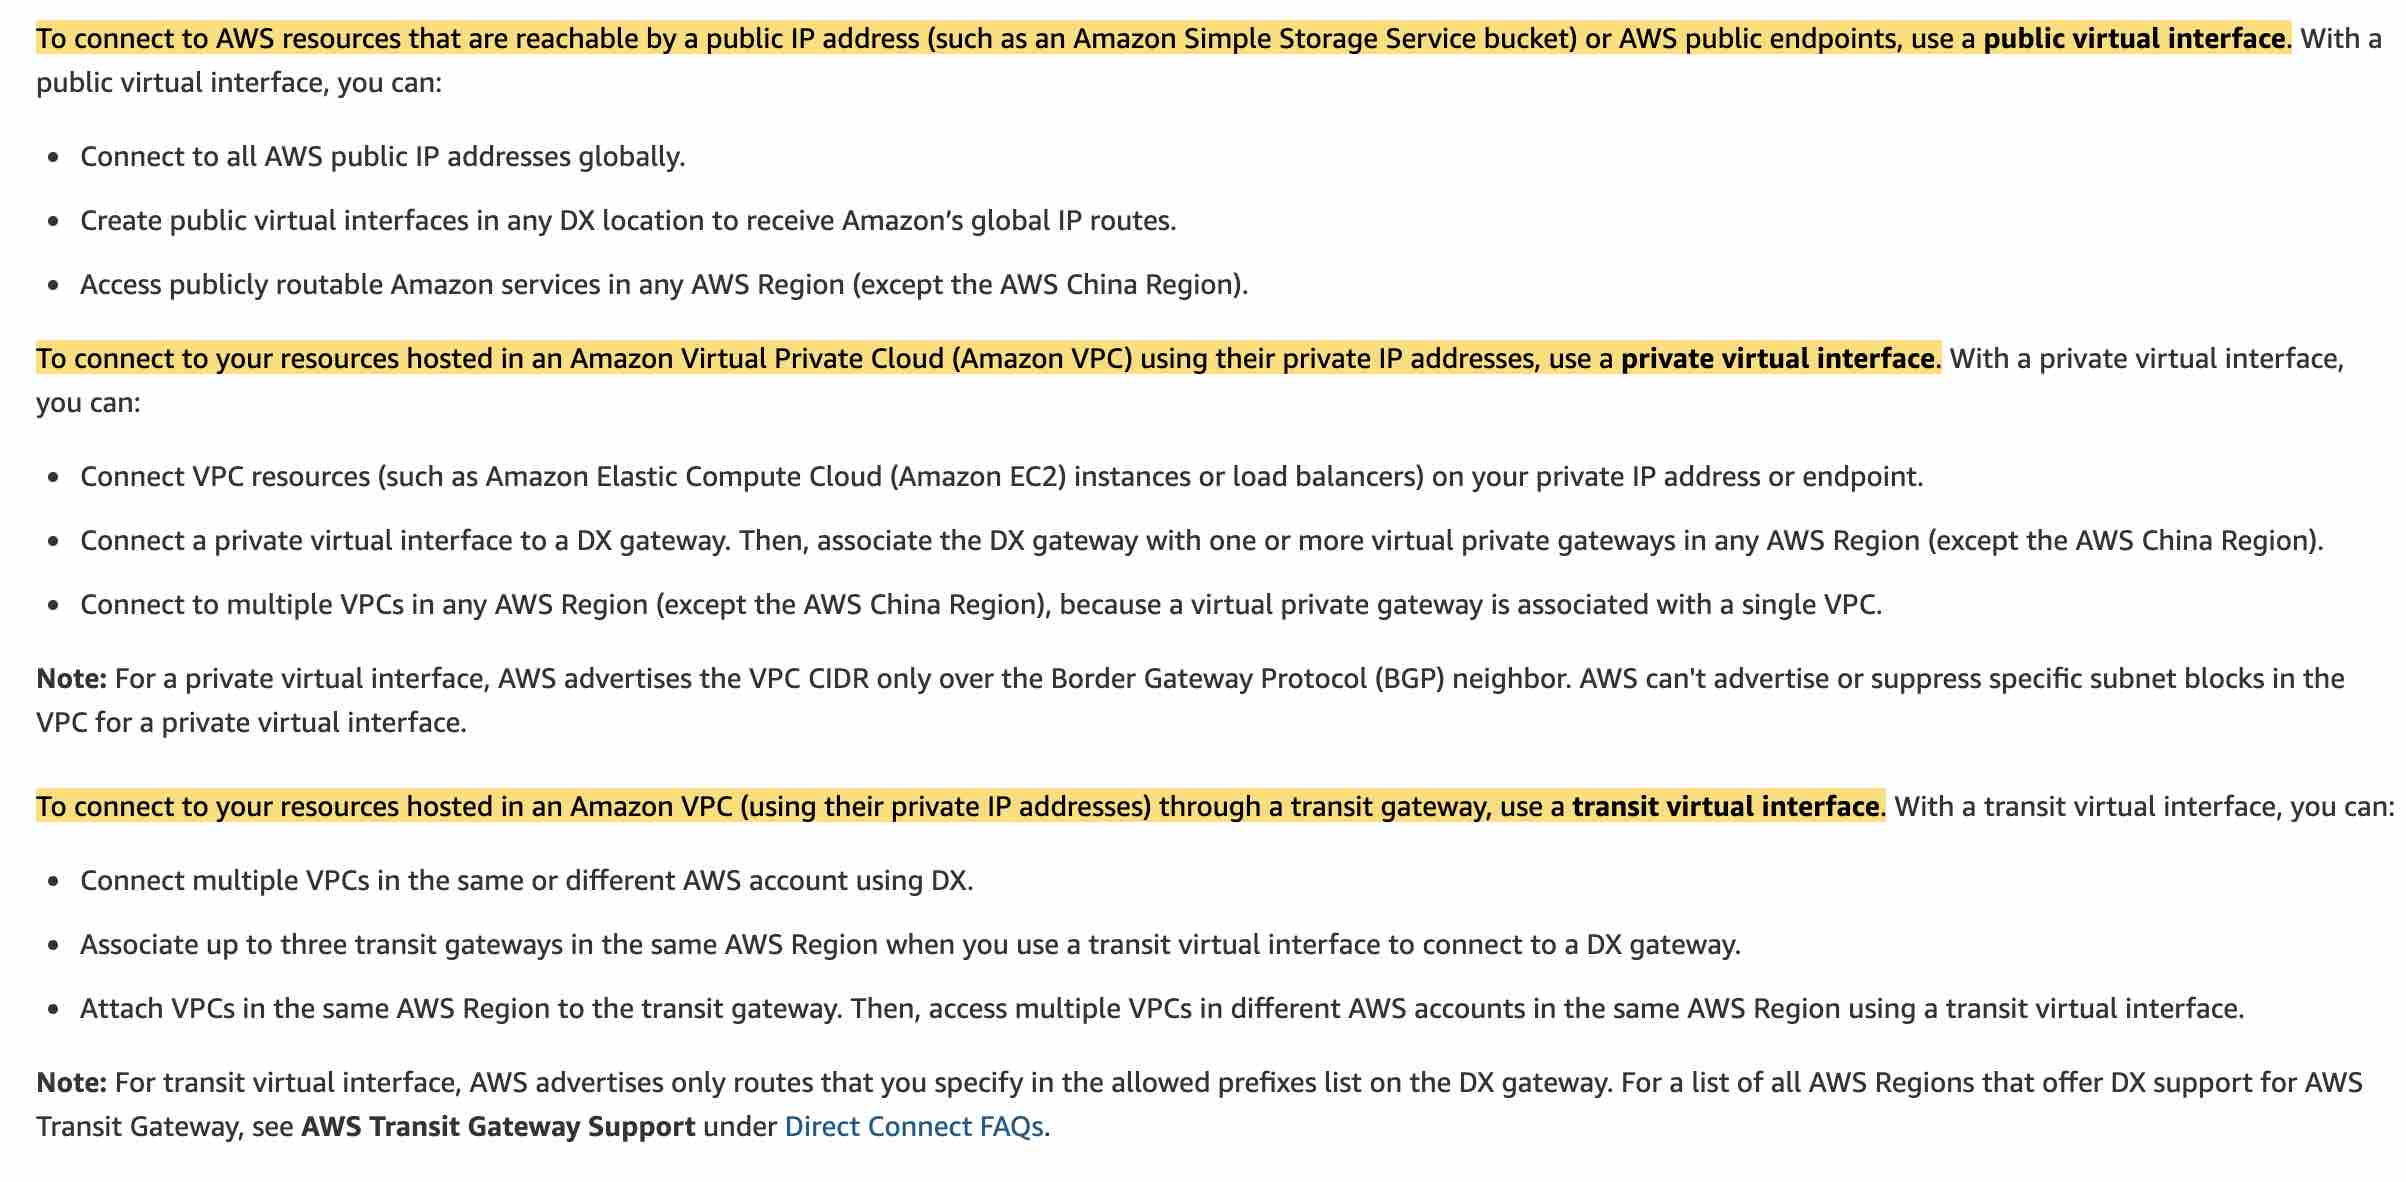 via - https://aws.amazon.com/premiumsupport/knowledge-center/public-private-interface-dx/
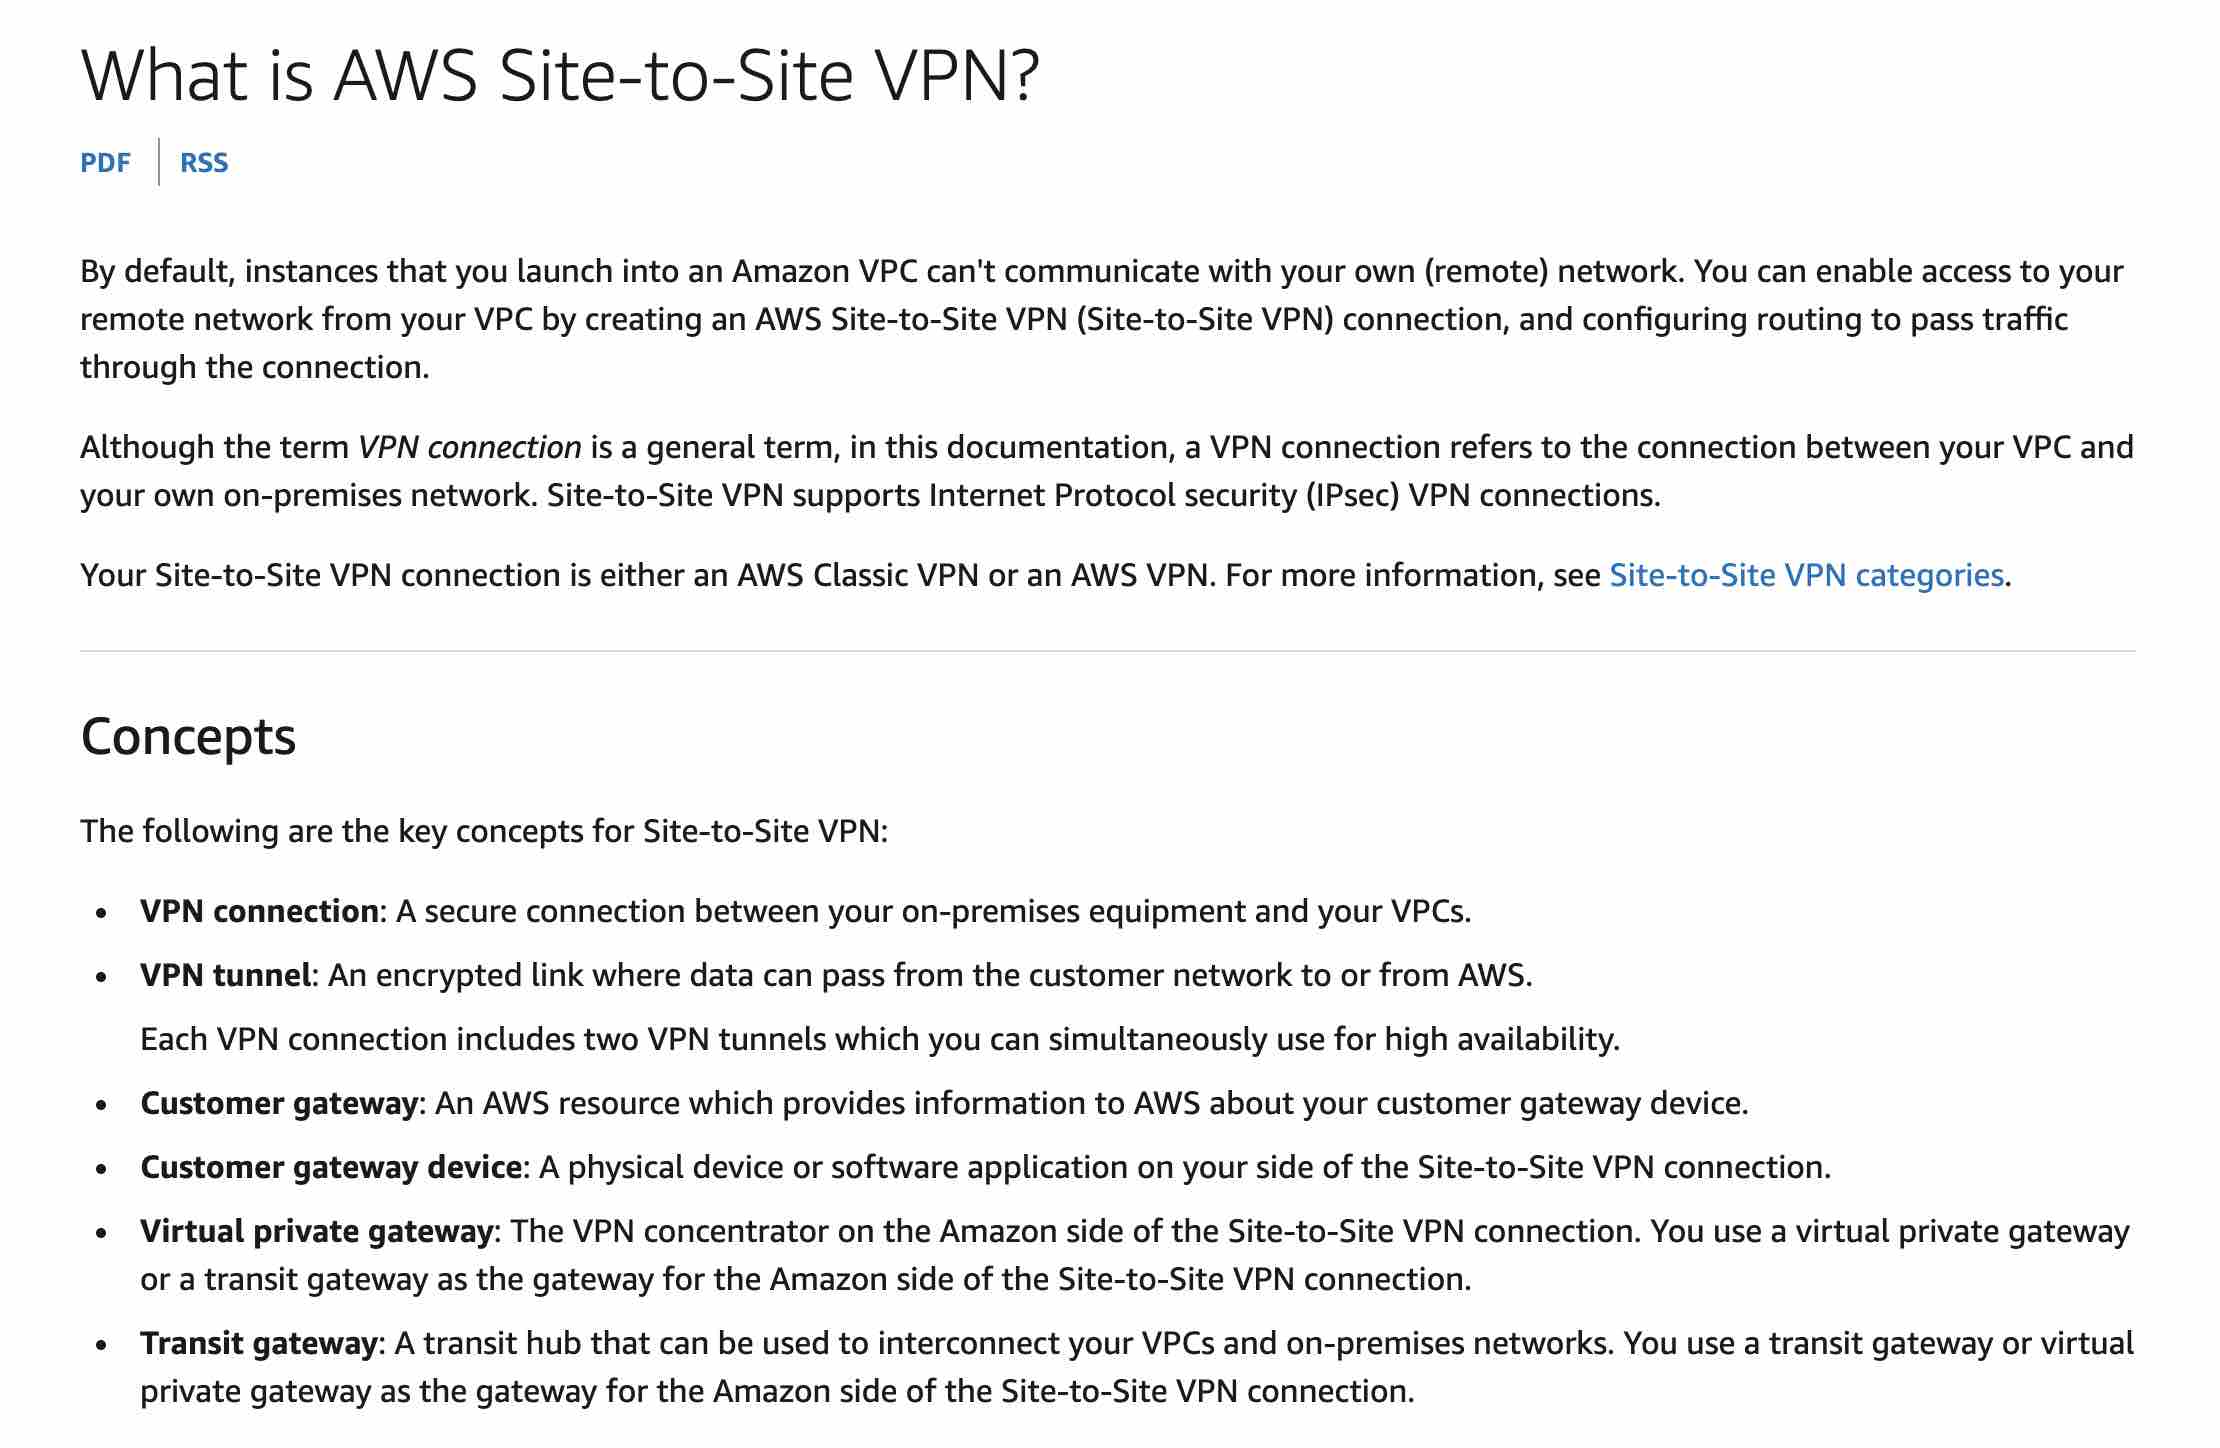
By default, instances that you launch into an Amazon VPC can't communicate with your own (remote) network. You can enable access to your remote network from your VPC by creating an AWS Site-to-Site VPN (Site-to-Site VPN) connection, and configuring routing to pass traffic through the connection.
 via - https://docs.aws.amazon.com/vpn/latest/s2svpn/VPC_VPN.html
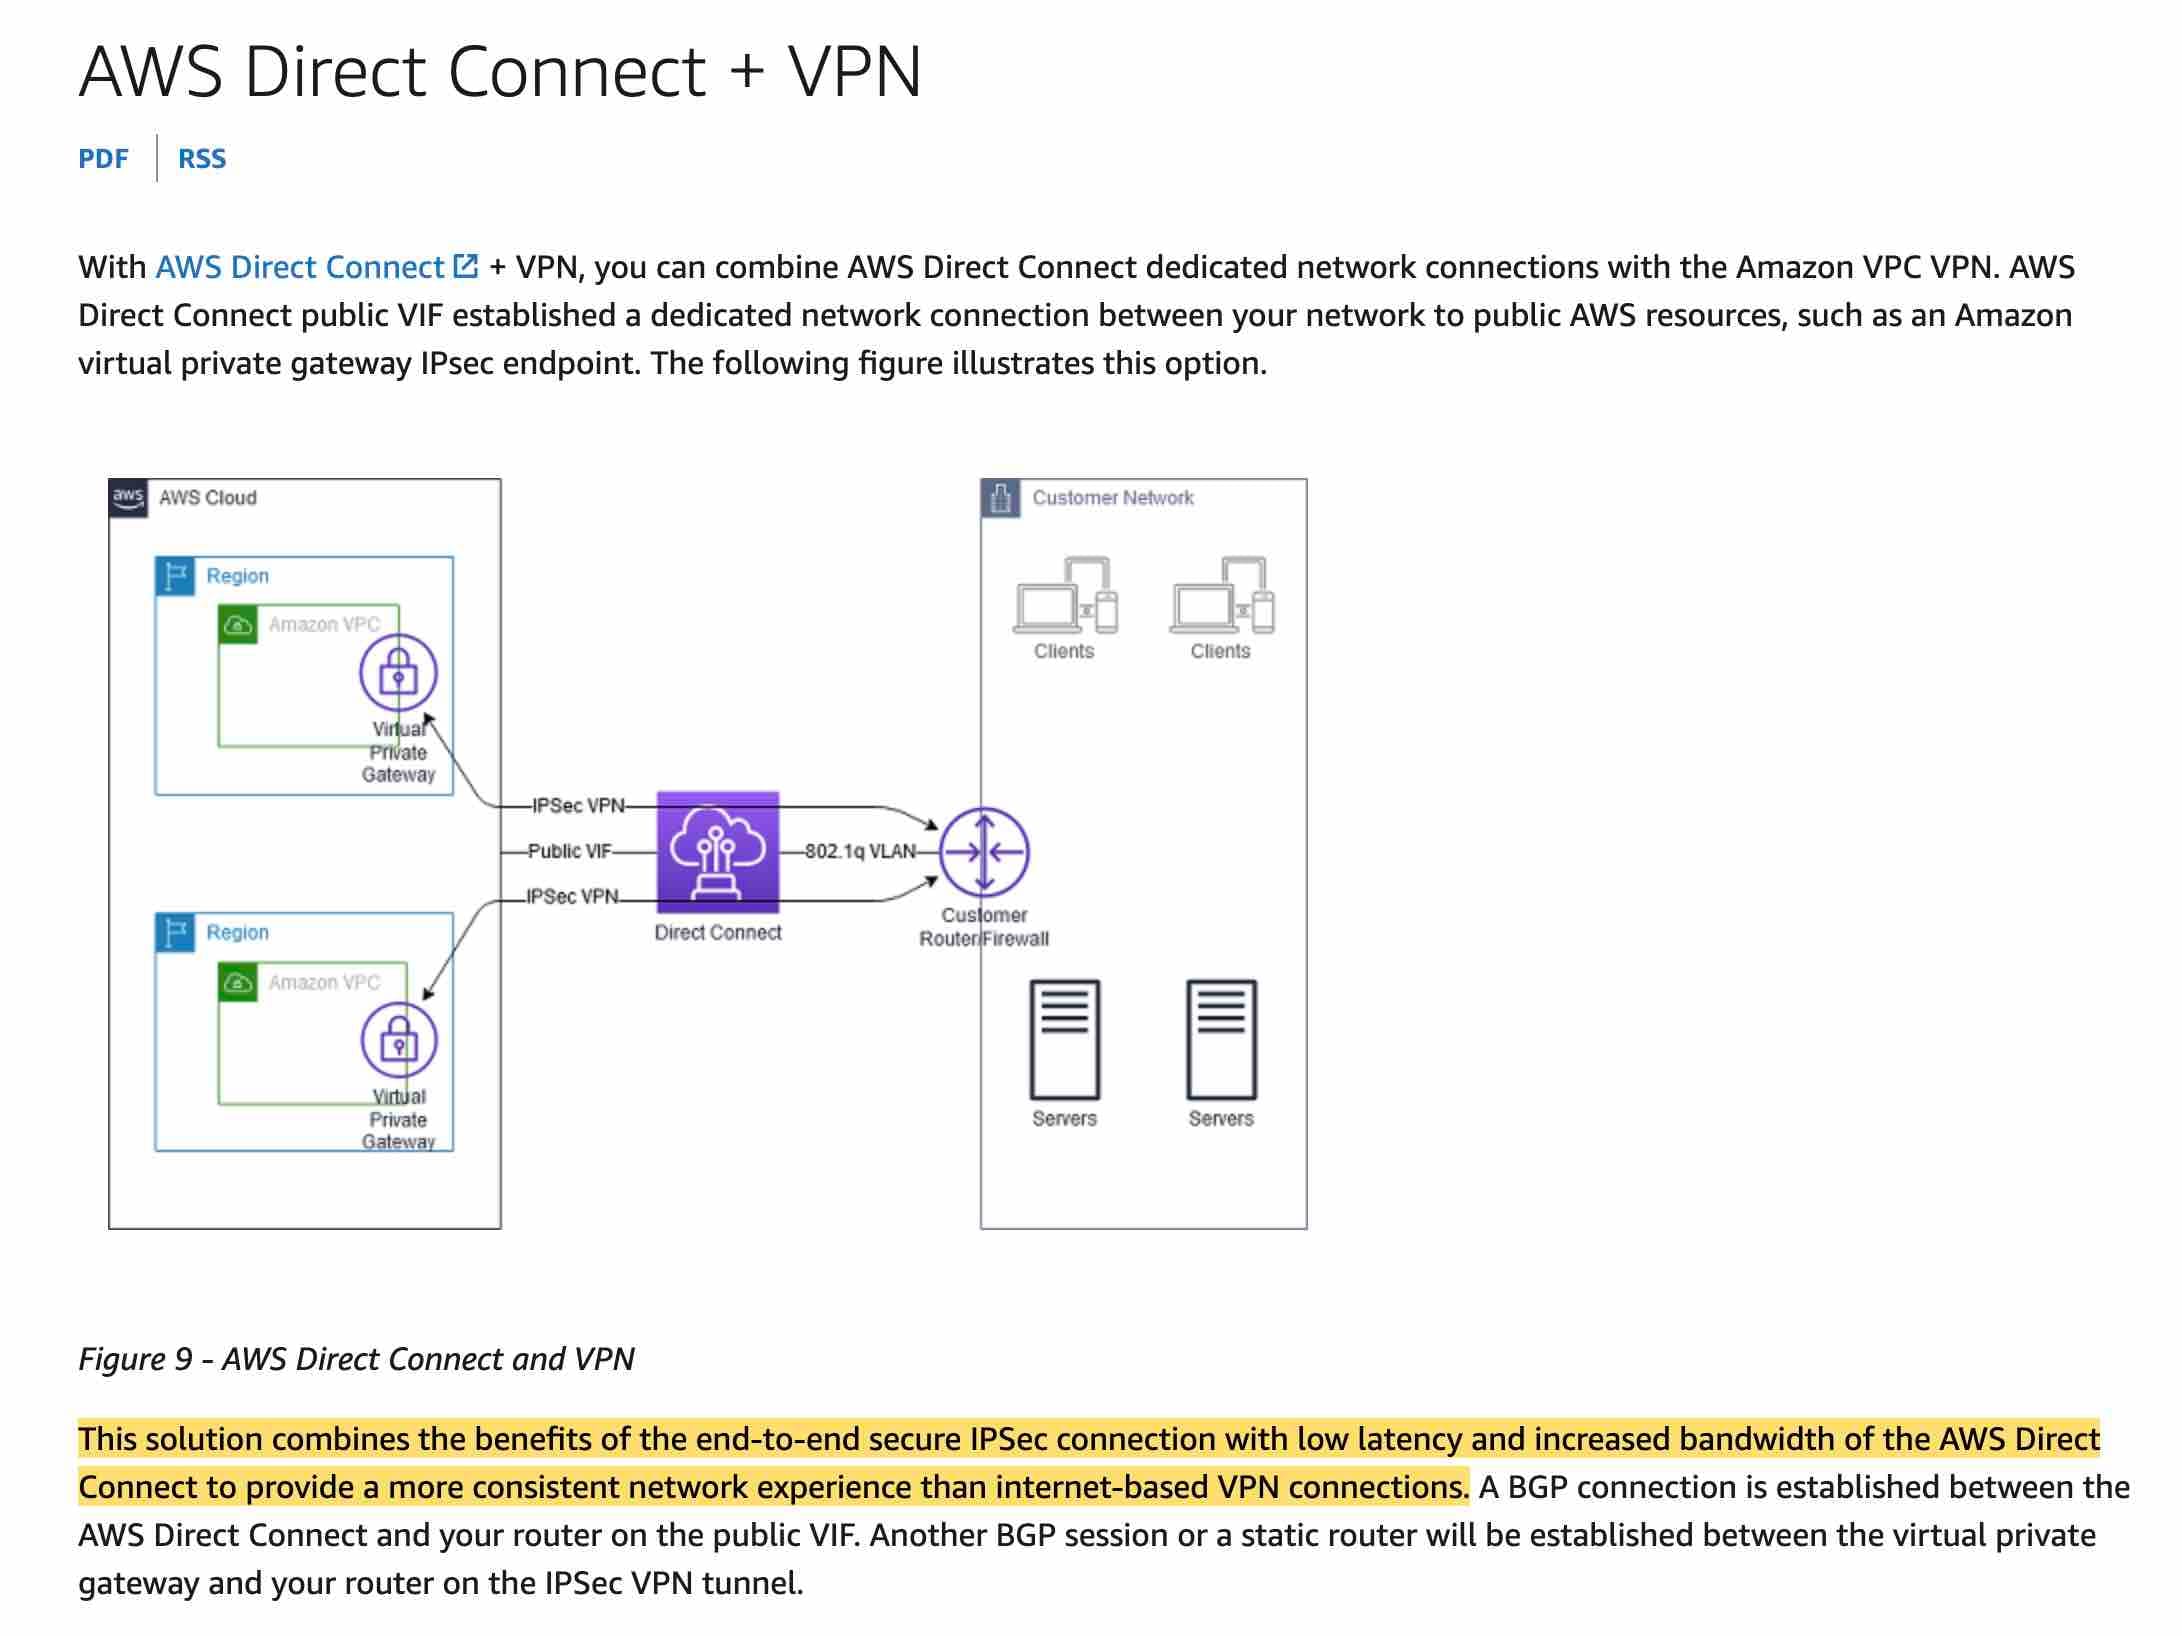
You can combine AWS Direct Connect dedicated network connections with the Amazon VPC VPN. AWS Direct Connect public VIF can be used to establish a dedicated network connection between your network to public AWS resources, such as an Amazon virtual private gateway IPsec endpoint. This solution combines the benefits of the end-to-end secure IPSec connection with low latency and increased bandwidth of the AWS Direct Connect to provide a more consistent network experience than internet-based VPN connections.
 via
via Incorrect options:
Set up a private virtual interface on the Direct Connect connection. Create an AWS Site-to-Site VPN between the customer gateway and the virtual private gateway in the VPC - You cannot use a private VIF on the Direct Connect connection to create an AWS Site-to-Site VPN between the customer gateway and the virtual private gateway.
Set up a transit virtual interface on the Direct Connect connection. Create an AWS Site-to-Site VPN between the customer gateway and the virtual private gateway in the VPC - You cannot use a transit VIF on the Direct Connect connection to create an AWS Site-to-Site VPN between the customer gateway and the virtual private gateway.
Set up a public virtual interface on the Direct Connect connection. Create an AWS Site-to-Site VPN between the customer gateway and the virtual public gateway in the VPC - There is no such thing as a virtual public gateway. This option has been added as a distractor.
References:
https://docs.aws.amazon.com/directconnect/latest/UserGuide/WorkingWithVirtualInterfaces.html
https://aws.amazon.com/premiumsupport/knowledge-center/public-private-interface-dx/
Explanation
Correct option:
Set up a public virtual interface on the Direct Connect connection. Create an AWS Site-to-Site VPN between the customer gateway and the virtual private gateway in the VPC
AWS Direct Connect is a networking service that provides an alternative to using the internet to connect to AWS. Using Direct Connect, data that would have previously been transported over the internet is delivered through a private network connection between your facilities and AWS
AWS Direct Connect (DX) provides three types of virtual interfaces - public, private, and transit.
Private virtual interface: A private virtual interface should be used to access an Amazon VPC using private IP addresses.
Public virtual interface: A public virtual interface can access all AWS public services using public IP addresses.
Transit virtual interface: A transit virtual interface should be used to access one or more Amazon VPC Transit Gateways associated with Direct Connect gateways. You can use transit virtual interfaces with 1/2/5/10 Gbps AWS Direct Connect connections.
Direct Connect Virtual Interfaces: via - https://aws.amazon.com/premiumsupport/knowledge-center/public-private-interface-dx/
By default, instances that you launch into an Amazon VPC can't communicate with your own (remote) network. You can enable access to your remote network from your VPC by creating an AWS Site-to-Site VPN (Site-to-Site VPN) connection, and configuring routing to pass traffic through the connection.
via - https://docs.aws.amazon.com/vpn/latest/s2svpn/VPC_VPN.html
You can combine AWS Direct Connect dedicated network connections with the Amazon VPC VPN. AWS Direct Connect public VIF can be used to establish a dedicated network connection between your network to public AWS resources, such as an Amazon virtual private gateway IPsec endpoint. This solution combines the benefits of the end-to-end secure IPSec connection with low latency and increased bandwidth of the AWS Direct Connect to provide a more consistent network experience than internet-based VPN connections.
Incorrect options:
Set up a private virtual interface on the Direct Connect connection. Create an AWS Site-to-Site VPN between the customer gateway and the virtual private gateway in the VPC - You cannot use a private VIF on the Direct Connect connection to create an AWS Site-to-Site VPN between the customer gateway and the virtual private gateway.
Set up a transit virtual interface on the Direct Connect connection. Create an AWS Site-to-Site VPN between the customer gateway and the virtual private gateway in the VPC - You cannot use a transit VIF on the Direct Connect connection to create an AWS Site-to-Site VPN between the customer gateway and the virtual private gateway.
Set up a public virtual interface on the Direct Connect connection. Create an AWS Site-to-Site VPN between the customer gateway and the virtual public gateway in the VPC - There is no such thing as a virtual public gateway. This option has been added as a distractor.
References:
https://docs.aws.amazon.com/directconnect/latest/UserGuide/WorkingWithVirtualInterfaces.html
https://aws.amazon.com/premiumsupport/knowledge-center/public-private-interface-dx/
Question 16 Single Choice
An ecommerce company has a hybrid environment between its on-premises data center and the AWS Cloud. The company wants to use the Elastic File System (EFS) to store and share data between the on-premises applications that need to resolve DNS queries through the on-premises DNS servers. The company wants to use a custom domain name to connect to EFS. The company also wants to avoid using the Amazon EFS target IP address.
Which of the following solutions would you recommend to address these requirements?
Explanation
Click "Show Answer" to see the explanation here
Correct option:
Set up a Route 53 Resolver inbound endpoint and configure it for the EFS-specific VPC. Set up a Route 53 private hosted zone and add a new CNAME record with the value of the EFS DNS name. Configure forwarding rules on the on-premises DNS servers to forward queries for the custom domain host to the Route 53 private hosted zone
When you create a VPC using Amazon VPC, Route 53 Resolver automatically uses a Resolver on the VPC to answer DNS queries for local Amazon VPC domain names for EC2 instances (ec2-192-0-2-44.compute-1.amazonaws.com) and records in private hosted zones (acme.example.com). For all other domain names, Resolver performs recursive lookups against public name servers.
When you create a VPC, the Route 53 Resolver that is created by default, maps to a DNS server that runs on a reserved IP address for the VPC network range, plus 2. For example, the DNS Server on a 10.0.0.0/16 network is located at 10.0.0.2. For VPCs with multiple IPv4 CIDR blocks, the DNS server IP address is located in the primary CIDR block. The DNS server does not reside within a specific subnet or Availability Zone in a VPC.
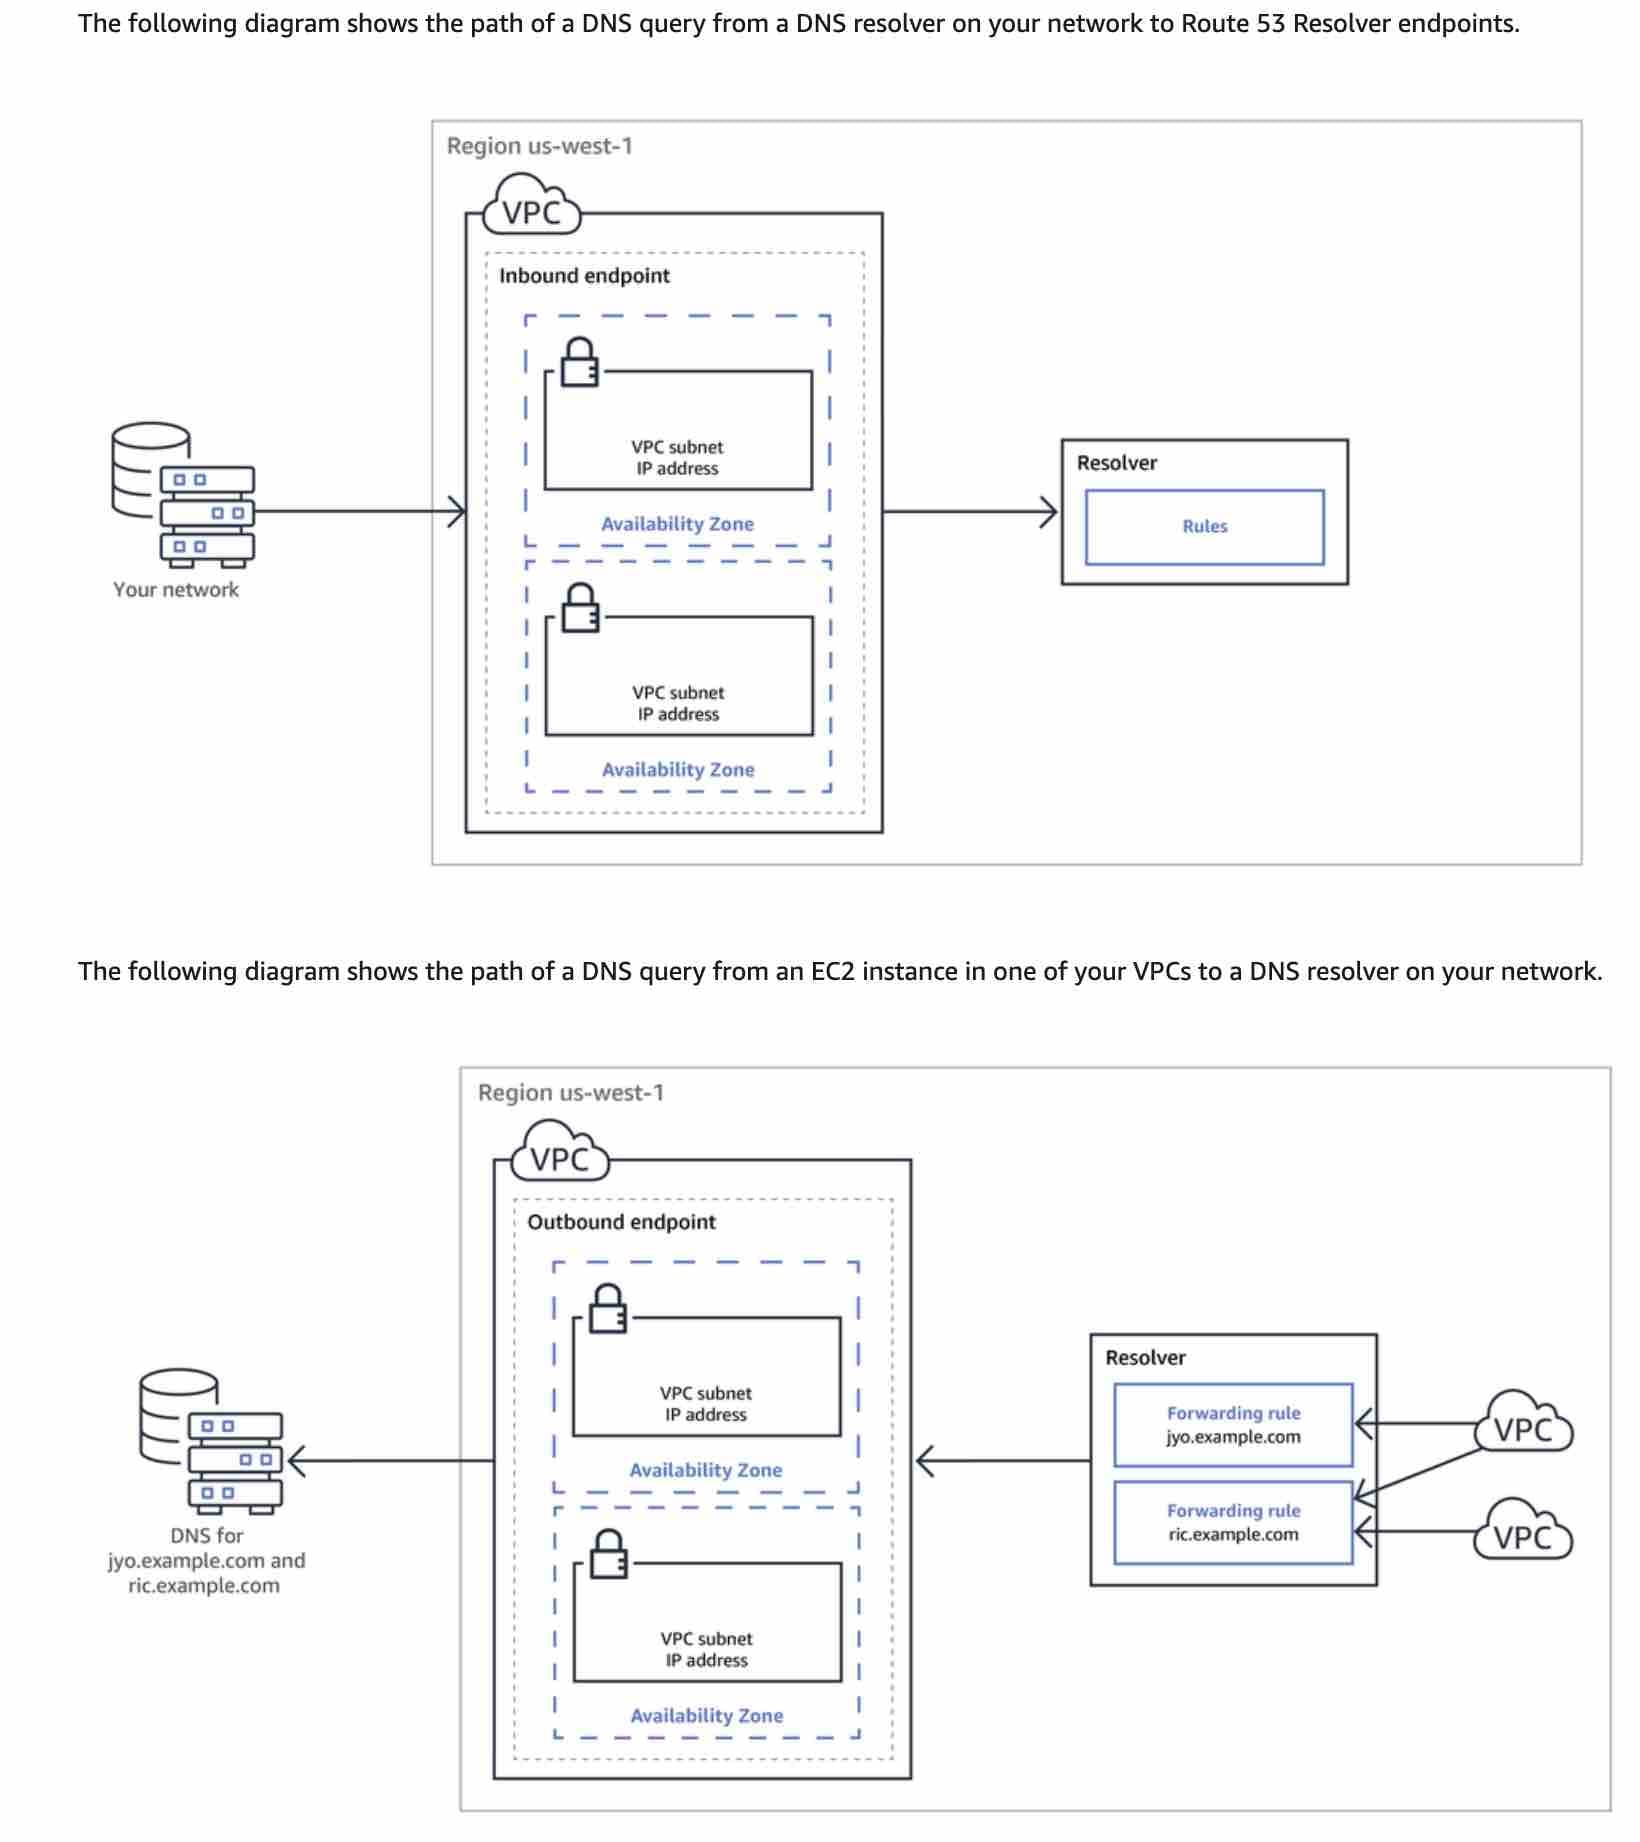
The Resolver additionally contains endpoints that you configure to answer DNS queries to and from your on-premises environment. Before you start to forward queries, you create Resolver inbound and/or outbound endpoints in the connected VPC. These endpoints provide a path for inbound or outbound queries.
For the given use case, the company wants to use EFS to store and share data via a custom domain name to connect to Amazon EFS through the on-premises DNS servers. So you need to create a Resolver inbound endpoint so that the DNS resolvers on your network can forward DNS queries to Route 53 Resolver via this endpoint. This allows your DNS resolvers to easily resolve domain names for AWS resources such as EC2 instances or records in a Route 53 private hosted zone.
 via - https://docs.aws.amazon.com/Route53/latest/DeveloperGuide/resolver.html
Incorrect options:
Set up a Route 53 Resolver inbound endpoint and configure it for the EFS-specific VPC. Set up a Route 53 public-hosted zone and add a new PTR record with the value of the EFS DNS name. Configure forwarding rules on the on-premises DNS servers to forward queries for the custom domain host to the Route 53 public hosted zone - You cannot use a PTR record for the given use case, as it's used to enable reverse DNS functionality for Route 53. A PTR record maps an IP address to the corresponding domain name.
Set up a Route 53 Resolver inbound endpoint and configure it for the EFS-specific VPC. Set up a Route 53 public-hosted zone and add a new CNAME record with the value of the EFS DNS name. Configure forwarding rules on the on-premises DNS servers to forward queries for the custom domain host to the Route 53 public hosted zone - You cannot use a Route 53 public hosted zone for the given use case as it makes the endpoint public.
Set up a Route 53 Resolver outbound endpoint and configure it for the EFS-specific VPC. Set up a Route 53 public-hosted zone and add a new CNAME record with the value of the EFS DNS name. Configure forwarding rules on the on-premises DNS servers to forward queries for the custom domain host to the Route 53 public hosted zone - Resolver outbound endpoints are used to forward selected queries, you create Resolver rules that specify the domain names for the DNS queries that you want to forward (such as example.com), and the IP addresses of the DNS resolvers on your network that you want to forward the queries to. For the given use case, the company wants to use EFS to store and share data via a custom domain name to connect to Amazon EFS through the on-premises DNS servers, so you cannot use an outbound endpoint.
References:
https://docs.aws.amazon.com/Route53/latest/DeveloperGuide/resolver.html
https://aws.amazon.com/premiumsupport/knowledge-center/route53-resolve-with-inbound-endpoint/
https://docs.aws.amazon.com/Route53/latest/DeveloperGuide/ResourceRecordTypes.html
https://aws.amazon.com/premiumsupport/knowledge-center/efs-mount-fqdn-microsoft-ad/
https://docs.aws.amazon.com/efs/latest/ug/mounting-fs-mount-cmd-dns-name.html
Explanation
Correct option:
Set up a Route 53 Resolver inbound endpoint and configure it for the EFS-specific VPC. Set up a Route 53 private hosted zone and add a new CNAME record with the value of the EFS DNS name. Configure forwarding rules on the on-premises DNS servers to forward queries for the custom domain host to the Route 53 private hosted zone
When you create a VPC using Amazon VPC, Route 53 Resolver automatically uses a Resolver on the VPC to answer DNS queries for local Amazon VPC domain names for EC2 instances (ec2-192-0-2-44.compute-1.amazonaws.com) and records in private hosted zones (acme.example.com). For all other domain names, Resolver performs recursive lookups against public name servers.
When you create a VPC, the Route 53 Resolver that is created by default, maps to a DNS server that runs on a reserved IP address for the VPC network range, plus 2. For example, the DNS Server on a 10.0.0.0/16 network is located at 10.0.0.2. For VPCs with multiple IPv4 CIDR blocks, the DNS server IP address is located in the primary CIDR block. The DNS server does not reside within a specific subnet or Availability Zone in a VPC.
The Resolver additionally contains endpoints that you configure to answer DNS queries to and from your on-premises environment. Before you start to forward queries, you create Resolver inbound and/or outbound endpoints in the connected VPC. These endpoints provide a path for inbound or outbound queries.
For the given use case, the company wants to use EFS to store and share data via a custom domain name to connect to Amazon EFS through the on-premises DNS servers. So you need to create a Resolver inbound endpoint so that the DNS resolvers on your network can forward DNS queries to Route 53 Resolver via this endpoint. This allows your DNS resolvers to easily resolve domain names for AWS resources such as EC2 instances or records in a Route 53 private hosted zone.
via - https://docs.aws.amazon.com/Route53/latest/DeveloperGuide/resolver.html
Incorrect options:
Set up a Route 53 Resolver inbound endpoint and configure it for the EFS-specific VPC. Set up a Route 53 public-hosted zone and add a new PTR record with the value of the EFS DNS name. Configure forwarding rules on the on-premises DNS servers to forward queries for the custom domain host to the Route 53 public hosted zone - You cannot use a PTR record for the given use case, as it's used to enable reverse DNS functionality for Route 53. A PTR record maps an IP address to the corresponding domain name.
Set up a Route 53 Resolver inbound endpoint and configure it for the EFS-specific VPC. Set up a Route 53 public-hosted zone and add a new CNAME record with the value of the EFS DNS name. Configure forwarding rules on the on-premises DNS servers to forward queries for the custom domain host to the Route 53 public hosted zone - You cannot use a Route 53 public hosted zone for the given use case as it makes the endpoint public.
Set up a Route 53 Resolver outbound endpoint and configure it for the EFS-specific VPC. Set up a Route 53 public-hosted zone and add a new CNAME record with the value of the EFS DNS name. Configure forwarding rules on the on-premises DNS servers to forward queries for the custom domain host to the Route 53 public hosted zone - Resolver outbound endpoints are used to forward selected queries, you create Resolver rules that specify the domain names for the DNS queries that you want to forward (such as example.com), and the IP addresses of the DNS resolvers on your network that you want to forward the queries to. For the given use case, the company wants to use EFS to store and share data via a custom domain name to connect to Amazon EFS through the on-premises DNS servers, so you cannot use an outbound endpoint.
References:
https://docs.aws.amazon.com/Route53/latest/DeveloperGuide/resolver.html
https://aws.amazon.com/premiumsupport/knowledge-center/route53-resolve-with-inbound-endpoint/
https://docs.aws.amazon.com/Route53/latest/DeveloperGuide/ResourceRecordTypes.html
https://aws.amazon.com/premiumsupport/knowledge-center/efs-mount-fqdn-microsoft-ad/
https://docs.aws.amazon.com/efs/latest/ug/mounting-fs-mount-cmd-dns-name.html
Question 17 Multiple Choice
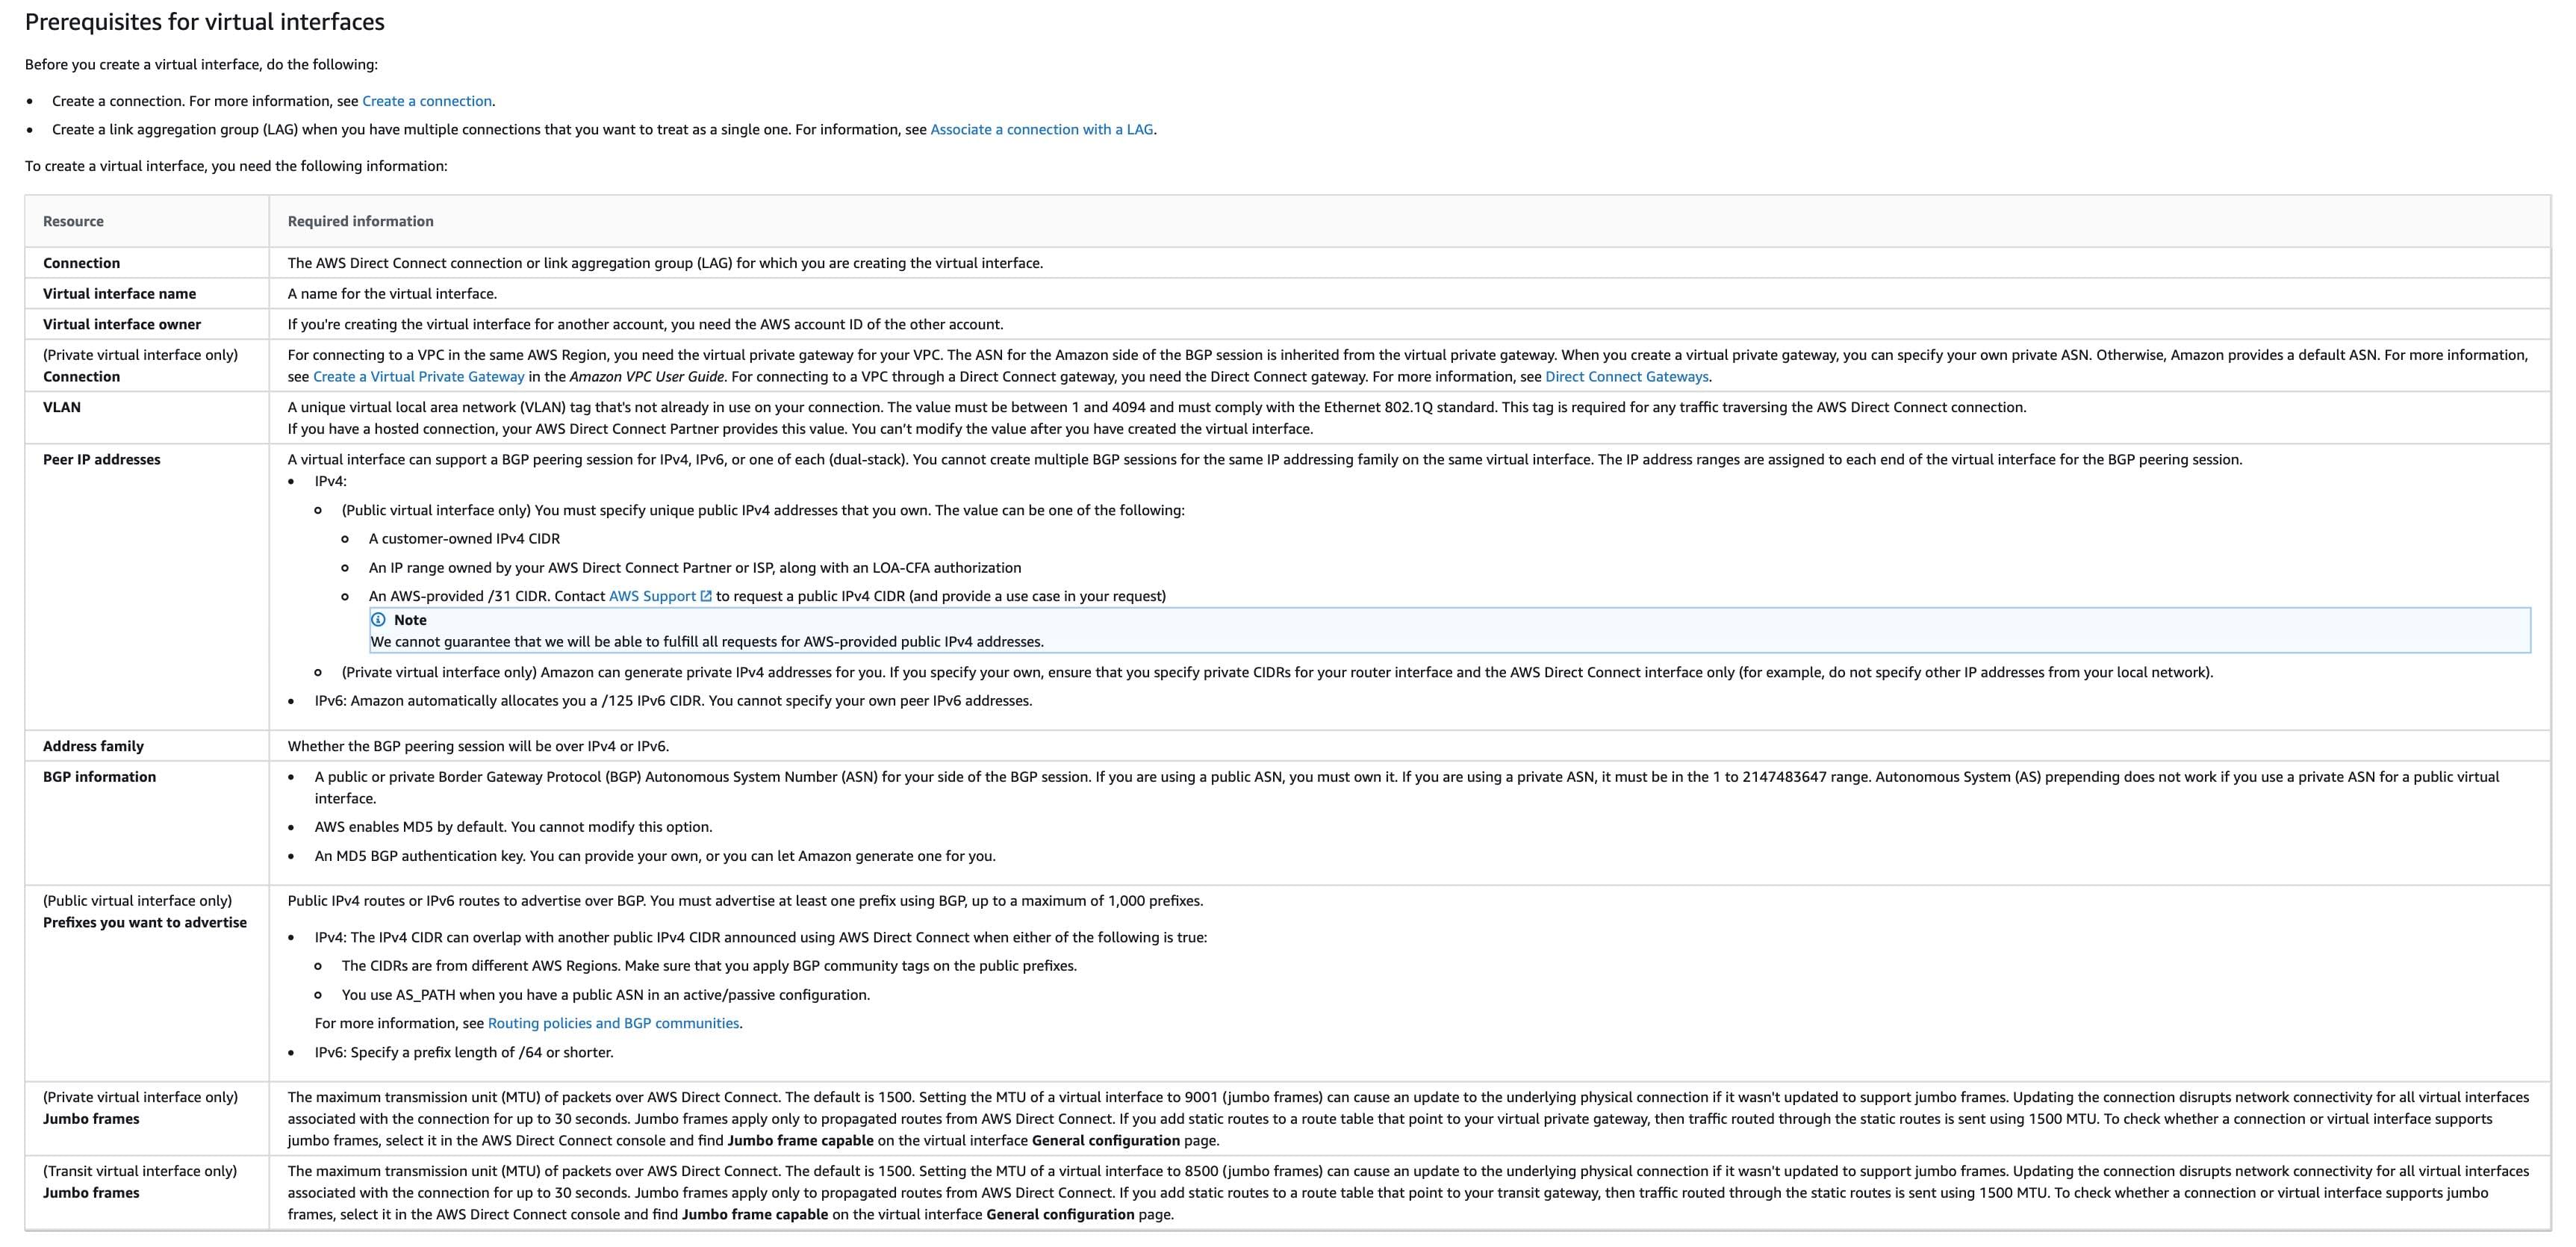
The networking team at a retail company is configuring a virtual interface for accessing your VPC on a newly provisioned 10-Gbps AWS Direct Connect connection.
Which of the following configuration values do you need to provide? (Select two)
Explanation
Click "Show Answer" to see the explanation here
Correct options:
A Virtual Interface (VIF) is necessary to access AWS services, and can be either public, private, or transit:
Private virtual interface: A private virtual interface should be used to access an Amazon VPC using private IP addresses.
Public virtual interface: A public virtual interface can access all AWS public services using public IP addresses.
Transit virtual interface: A transit virtual interface should be used to access one or more Amazon VPC Transit Gateways associated with Direct Connect gateways. You can use transit virtual interfaces with 1/2/5/10 Gbps AWS Direct Connect connections.
Virtual private gateway
For connecting to a VPC in the same AWS Region, you need the virtual private gateway for your VPC. The ASN for the Amazon side of the BGP session is inherited from the virtual private gateway. For connecting to a VPC through a Direct Connect gateway, you need the Direct Connect gateway.
Virtual local area network (VLAN) ID
You need to specify a unique virtual local area network (VLAN) tag that's not already in use on your connection. The value must be between 1 and 4094 and must comply with the Ethernet 802.1Q standard. This tag is required for any traffic traversing the AWS Direct Connect connection.
 via - https://docs.aws.amazon.com/directconnect/latest/UserGuide/WorkingWithVirtualInterfaces.html
Incorrect options:
IP prefixes to advertise - You need to specify the prefixes that you want to advertise only for public virtual interfaces. So this option is not mandatory.
Public Autonomous System Number (ASN) - You can use either a public or private Border Gateway Protocol (BGP) Autonomous System Number (ASN) for your side of the BGP session. If you are using a public ASN, you must own it. If you are using a private ASN, it must be in the 1 to 2147483647 range. Autonomous System (AS) prepending does not work if you use a private ASN for a public virtual interface.
Direct Connect location - This option has been added as a distractor. You don't need to specify the Direct Connect location while setting up a virtual interface.
Reference:
https://docs.aws.amazon.com/directconnect/latest/UserGuide/WorkingWithVirtualInterfaces.html
Explanation
Correct options:
A Virtual Interface (VIF) is necessary to access AWS services, and can be either public, private, or transit:
Private virtual interface: A private virtual interface should be used to access an Amazon VPC using private IP addresses.
Public virtual interface: A public virtual interface can access all AWS public services using public IP addresses.
Transit virtual interface: A transit virtual interface should be used to access one or more Amazon VPC Transit Gateways associated with Direct Connect gateways. You can use transit virtual interfaces with 1/2/5/10 Gbps AWS Direct Connect connections.
Virtual private gateway
For connecting to a VPC in the same AWS Region, you need the virtual private gateway for your VPC. The ASN for the Amazon side of the BGP session is inherited from the virtual private gateway. For connecting to a VPC through a Direct Connect gateway, you need the Direct Connect gateway.
Virtual local area network (VLAN) ID
You need to specify a unique virtual local area network (VLAN) tag that's not already in use on your connection. The value must be between 1 and 4094 and must comply with the Ethernet 802.1Q standard. This tag is required for any traffic traversing the AWS Direct Connect connection.
via - https://docs.aws.amazon.com/directconnect/latest/UserGuide/WorkingWithVirtualInterfaces.html
Incorrect options:
IP prefixes to advertise - You need to specify the prefixes that you want to advertise only for public virtual interfaces. So this option is not mandatory.
Public Autonomous System Number (ASN) - You can use either a public or private Border Gateway Protocol (BGP) Autonomous System Number (ASN) for your side of the BGP session. If you are using a public ASN, you must own it. If you are using a private ASN, it must be in the 1 to 2147483647 range. Autonomous System (AS) prepending does not work if you use a private ASN for a public virtual interface.
Direct Connect location - This option has been added as a distractor. You don't need to specify the Direct Connect location while setting up a virtual interface.
Reference:
https://docs.aws.amazon.com/directconnect/latest/UserGuide/WorkingWithVirtualInterfaces.html
Question 18 Multiple Choice
A company has three VPCs: X, Y, and Z. VPCs X and Z are both peered with VPC Y. The IP address ranges are as follows:
VPC X: 10.1.0.0/16
VPC Y: 192.168.0.0/16
VPC Z: 10.1.0.0/16
Instance x-1 in VPC X has the IP address 10.1.0.10. Instance z-1 in VPC Z has the IP address 10.1.0.10. Instances y-1 and y-2 in VPC Y have the IP addresses 192.168.2.10 and 192.168.2.20 respectively. The instances y-1 and y-2 are in the subnet 192.168.2.0/24.
The networking team at the company has mandated that y-1 must be able to communicate with x-1, and y-2 must be able to communicate with z-1. However, the team has noticed that both y-1 and y-2 are only able to communicate with x-1, instead of y-1 communicating with x-1 and y-2 communicating with z-1.
Which of the following combination of steps will address this issue? (Select two)
Explanation
Click "Show Answer" to see the explanation here
Correct options:
Create two new subnets 192.168.2.0/28 and 192.168.2.16/28 in VPC Y. Move y-1 to subnet 192.168.2.0/28 and y-2 to subnet 192.168.2.16/28 by launching a new instance in the new subnet via an AMI created from the old instance
Create two route tables in VPC Y - one with a route for destination VPC X and another with a route for destination VPC Z
A virtual private cloud (VPC) is a virtual network dedicated to your AWS account. It is logically isolated from other virtual networks in the AWS Cloud. You can launch your AWS resources, such as Amazon EC2 instances, into your VPC. After you create a VPC, you can add one or more subnets in each Availability Zone. A subnet is a range of IP addresses in your VPC. You can launch AWS resources, such as EC2 instances, into a specific subnet. When you create a subnet, you specify the IPv4 CIDR block for the subnet, which is a subset of the VPC CIDR block.
For the given use case, you can create two new subnets 192.168.2.0/28 and 192.168.2.16/28 which will ensure a distinct IP address range for both subnets. You can then migrate the respective instances by creating a new Amazon Machine Image (AMI) from the source instance. An Amazon Machine Image (AMI) provides the information required to launch an instance. Further, you need to create two route tables in VPC Y. Associate the first route table having route for destination VPC X with the subnet 192.168.2.0/28. Associate the second route table having route for destination VPC Z with the subnet 192.168.2.16/28. Although both destination VPCs X and Z have the same IP address range 10.1.0.0/16 however the solution would work as the routes are in separate route tables.
Incorrect options:
Create two new subnets 192.168.2.0/29 and 192.168.2.16/29 in VPC Y. Move y-1 to subnet 192.168.2.0/29 and y-2 to subnet 192.168.2.16/29 by launching a new instance in the new subnet via an AMI created from the old instance - You cannot have subnet CIDR with a /29 range since AWS allows CIDR range only between /28 and /16.
Create two new subnets 192.168.2.0/27 and 192.168.2.16/27 in VPC Y. Move y-1 to subnet 192.168.2.0/27 and y-2 to subnet 192.168.2.16/27 by launching a new instance in the new subnet via an AMI created from the old instance - You cannot have /27 range as it would result in the same IP range - 192.168.2.1 through 192.168.2.31 - to be allocated for both subnets. So this option is incorrect.
Create one route table in VPC Y - with distinct route entries for destination VPC X and VPC Z - You cannot have distinct routes for destination VPC X and VPC Z in the same route table as both the destination VPCs have the same IP address range 10.1.0.0/16.
References:
https://docs.aws.amazon.com/vpc/latest/userguide/VPC_Subnets.html
https://docs.aws.amazon.com/vpc/latest/userguide/vpc-ip-addressing.html
Explanation
Correct options:
Create two new subnets 192.168.2.0/28 and 192.168.2.16/28 in VPC Y. Move y-1 to subnet 192.168.2.0/28 and y-2 to subnet 192.168.2.16/28 by launching a new instance in the new subnet via an AMI created from the old instance
Create two route tables in VPC Y - one with a route for destination VPC X and another with a route for destination VPC Z
A virtual private cloud (VPC) is a virtual network dedicated to your AWS account. It is logically isolated from other virtual networks in the AWS Cloud. You can launch your AWS resources, such as Amazon EC2 instances, into your VPC. After you create a VPC, you can add one or more subnets in each Availability Zone. A subnet is a range of IP addresses in your VPC. You can launch AWS resources, such as EC2 instances, into a specific subnet. When you create a subnet, you specify the IPv4 CIDR block for the subnet, which is a subset of the VPC CIDR block.
For the given use case, you can create two new subnets 192.168.2.0/28 and 192.168.2.16/28 which will ensure a distinct IP address range for both subnets. You can then migrate the respective instances by creating a new Amazon Machine Image (AMI) from the source instance. An Amazon Machine Image (AMI) provides the information required to launch an instance. Further, you need to create two route tables in VPC Y. Associate the first route table having route for destination VPC X with the subnet 192.168.2.0/28. Associate the second route table having route for destination VPC Z with the subnet 192.168.2.16/28. Although both destination VPCs X and Z have the same IP address range 10.1.0.0/16 however the solution would work as the routes are in separate route tables.
Incorrect options:
Create two new subnets 192.168.2.0/29 and 192.168.2.16/29 in VPC Y. Move y-1 to subnet 192.168.2.0/29 and y-2 to subnet 192.168.2.16/29 by launching a new instance in the new subnet via an AMI created from the old instance - You cannot have subnet CIDR with a /29 range since AWS allows CIDR range only between /28 and /16.
Create two new subnets 192.168.2.0/27 and 192.168.2.16/27 in VPC Y. Move y-1 to subnet 192.168.2.0/27 and y-2 to subnet 192.168.2.16/27 by launching a new instance in the new subnet via an AMI created from the old instance - You cannot have /27 range as it would result in the same IP range - 192.168.2.1 through 192.168.2.31 - to be allocated for both subnets. So this option is incorrect.
Create one route table in VPC Y - with distinct route entries for destination VPC X and VPC Z - You cannot have distinct routes for destination VPC X and VPC Z in the same route table as both the destination VPCs have the same IP address range 10.1.0.0/16.
References:
https://docs.aws.amazon.com/vpc/latest/userguide/VPC_Subnets.html
https://docs.aws.amazon.com/vpc/latest/userguide/vpc-ip-addressing.html
Question 19 Multiple Choice
A company has set up an AWS network consisting of three transit gateways (tgw-1, tgw-2, and tgw-3) each present in different AWS accounts and different AWS Regions. The development team owns transit gateways tgw-1 and tgw-3. Transit gateway tgw-1 has a peering attachment with transit gateway tgw-2 owned by another team. The entire network is within AWS and does not consist of on-premises resources. The company has decided to use Transit Gateway Network Manager for managing the network topology.
Which of the following would you identify as the key points of consideration while implementing this requirement? (Select three)
Explanation
Click "Show Answer" to see the explanation here
Correct options:
To enable multi-account functionality in Network Manager, you first need to set up an account in AWS Organizations
To enable multi-account, you first set up an account in AWS Organizations. This first account becomes the management account. Using this account, you can then add other accounts as member accounts to your organization. This is a pre-requisite for enabling multi-account functionality in Network Manager.
Create a global network in Network Manager and register the transit gateways tgw-1 and tgw-3 with your global network
For the given scenario, the following steps have to be done in Network Manager: 1. Create a global network. 2. Register the transit gateways tgw-1 and tgw-3 with your global network.
When you register transit gateway tgw-1 in the Network Manager, you can see information about transit gateway tgw-2 in your global network
When you register tgw-1, the transit gateway peering attachment is included in the global network, and you can see information about tgw-2.
AWS-only multi-Region and multi-account global network: 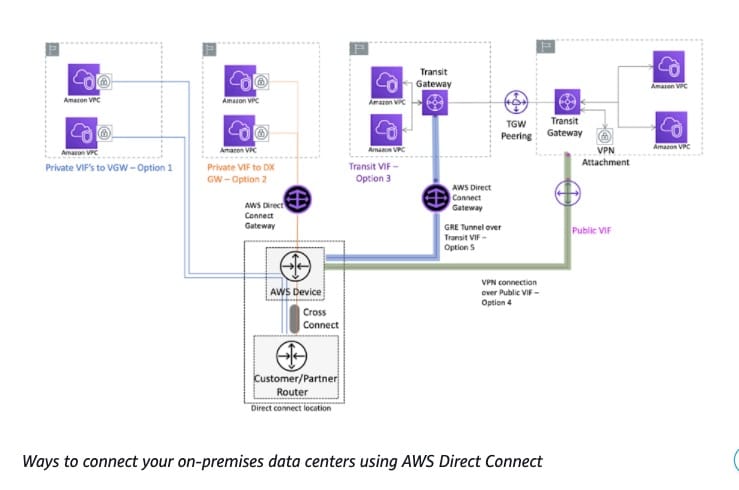 via - https://docs.aws.amazon.com/vpc/latest/tgwnm/network-manager-scenarios.html
Incorrect options:
A global network can be created only when a communication channel needs to be established between the AWS network and your on-premises network - A global network is a container for your network objects. A global network can be created for your AWS network alone too.
When you register transit gateway tgw-1 in the Network Manager, attachments on transit gateway tgw-2 get included in your global network - When you register tgw-1, the transit gateway peering attachment is included in the global network, and you can see information about tgw-2. However, any attachments for tgw-2 are not included in your global network. To see attachments for tgw-2, you must enable multi-account access.
Create a device and a link and associate this to the peering connection between gateways tgw-1, tgw-2 on Network Manager. This process includes data of attachments on transit gateway tgw-2 to your global network - This statement is incorrect. The peering connection gets added to the global network when you register transit gateway tgw-1.
Reference:
https://docs.aws.amazon.com/vpc/latest/tgwnm/network-manager-scenarios.html
Explanation
Correct options:
To enable multi-account functionality in Network Manager, you first need to set up an account in AWS Organizations
To enable multi-account, you first set up an account in AWS Organizations. This first account becomes the management account. Using this account, you can then add other accounts as member accounts to your organization. This is a pre-requisite for enabling multi-account functionality in Network Manager.
Create a global network in Network Manager and register the transit gateways tgw-1 and tgw-3 with your global network
For the given scenario, the following steps have to be done in Network Manager: 1. Create a global network. 2. Register the transit gateways tgw-1 and tgw-3 with your global network.
When you register transit gateway tgw-1 in the Network Manager, you can see information about transit gateway tgw-2 in your global network
When you register tgw-1, the transit gateway peering attachment is included in the global network, and you can see information about tgw-2.
AWS-only multi-Region and multi-account global network: via - https://docs.aws.amazon.com/vpc/latest/tgwnm/network-manager-scenarios.html
Incorrect options:
A global network can be created only when a communication channel needs to be established between the AWS network and your on-premises network - A global network is a container for your network objects. A global network can be created for your AWS network alone too.
When you register transit gateway tgw-1 in the Network Manager, attachments on transit gateway tgw-2 get included in your global network - When you register tgw-1, the transit gateway peering attachment is included in the global network, and you can see information about tgw-2. However, any attachments for tgw-2 are not included in your global network. To see attachments for tgw-2, you must enable multi-account access.
Create a device and a link and associate this to the peering connection between gateways tgw-1, tgw-2 on Network Manager. This process includes data of attachments on transit gateway tgw-2 to your global network - This statement is incorrect. The peering connection gets added to the global network when you register transit gateway tgw-1.
Reference:
https://docs.aws.amazon.com/vpc/latest/tgwnm/network-manager-scenarios.html
Question 20 Single Choice
A financial services application runs on a fleet of Amazon EC2 instances that are configured with an Auto Scaling Group (ASG). The instances are fronted by an Elastic Load Balancer (ELB). The security team has flagged an exploitable vulnerability in the encryption protocol and cipher that the application uses. The listener of the ELB is configured on an HTTPS protocol.
Which step will you take to secure the application from the newly detected vulnerability?
Explanation
Click "Show Answer" to see the explanation here
Correct option:
Change the security policy on the ELB to disable vulnerable protocols and ciphers - Elastic Load Balancing uses a Secure Socket Layer (SSL) negotiation configuration, known as a security policy, to negotiate SSL connections between a client and the load balancer. A security policy is a combination of protocols and ciphers. The protocol establishes a secure connection between a client and a server and ensures that all data passed between the client and your load balancer is private. A cipher is an encryption algorithm that uses encryption keys to create a coded message. Protocols use several ciphers to encrypt data over the internet. During the connection negotiation process, the client and the load balancer present a list of ciphers and protocols that they each support, in order of preference.
Incorrect options:
Create a strong custom security policy to cover the newly detected vulnerability and attach it to your Application Load Balancer - Elastic Load Balancing provides a wide variety of pre-defined security policies for Application Load Balancers. Application Load Balancers do not support custom security policies.
Add a certificate list to add multiple certificates on the ELB, for additional security - After you create an HTTPS listener, it has a default certificate and an empty certificate list. You can optionally add certificates to the certificate list for the listener. Using a certificate list enables the load balancer to support multiple domains on the same port and provide a different certificate for each domain. Adding the certificate list would not help address this issue.
Create new SSL certificates for all web servers and replace the old ones with the new certificates created - If you use HTTPS (SSL or TLS) for your front-end listener, you must deploy an SSL/TLS certificate on your load balancer. The load balancer uses the certificate to terminate the connection and then decrypt requests from clients before sending them to the instances. Since the listener of the ELB is configured on the HTTPS protocol, you cannot have SSL passthrough to the web servers, hence this option is incorrect.
References:
https://docs.aws.amazon.com/elasticloadbalancing/latest/application/create-https-listener.html
https://docs.aws.amazon.com/elasticloadbalancing/latest/classic/ssl-server-cert.html
Explanation
Correct option:
Change the security policy on the ELB to disable vulnerable protocols and ciphers - Elastic Load Balancing uses a Secure Socket Layer (SSL) negotiation configuration, known as a security policy, to negotiate SSL connections between a client and the load balancer. A security policy is a combination of protocols and ciphers. The protocol establishes a secure connection between a client and a server and ensures that all data passed between the client and your load balancer is private. A cipher is an encryption algorithm that uses encryption keys to create a coded message. Protocols use several ciphers to encrypt data over the internet. During the connection negotiation process, the client and the load balancer present a list of ciphers and protocols that they each support, in order of preference.
Incorrect options:
Create a strong custom security policy to cover the newly detected vulnerability and attach it to your Application Load Balancer - Elastic Load Balancing provides a wide variety of pre-defined security policies for Application Load Balancers. Application Load Balancers do not support custom security policies.
Add a certificate list to add multiple certificates on the ELB, for additional security - After you create an HTTPS listener, it has a default certificate and an empty certificate list. You can optionally add certificates to the certificate list for the listener. Using a certificate list enables the load balancer to support multiple domains on the same port and provide a different certificate for each domain. Adding the certificate list would not help address this issue.
Create new SSL certificates for all web servers and replace the old ones with the new certificates created - If you use HTTPS (SSL or TLS) for your front-end listener, you must deploy an SSL/TLS certificate on your load balancer. The load balancer uses the certificate to terminate the connection and then decrypt requests from clients before sending them to the instances. Since the listener of the ELB is configured on the HTTPS protocol, you cannot have SSL passthrough to the web servers, hence this option is incorrect.
References:
https://docs.aws.amazon.com/elasticloadbalancing/latest/application/create-https-listener.html
https://docs.aws.amazon.com/elasticloadbalancing/latest/classic/ssl-server-cert.html